Configure SAML and SSO for End Users
Skyhigh Security allows you to configure a login workflow that enables end users to log in to Skyhigh CASB via Single Sign-On (SSO) and provide justifications for DLP incidents triggered by policy violations. Administrators can subsequently review and analyze the end-user responses (justifications) for the violated incidents in Skyhigh CASB.
IMPORTANT: If you have enabled End User Input for Policy Incidents, you must enable SSO and configure SAML for end users.
NOTE: Skyhigh CASB provides you with the ability to create and manage multiple SAML configurations without impacting your existing Skyhigh CASB SAML configuration. Your existing SAML-based logins continue to work as expected. Follow the steps below to create a new SAML configuration that is saved separately within Skyhigh Security IAM systems.
Use these steps to enable SSO and configure SAML:
- ► Step 1: Configure SAML in Skyhigh CASB
-
You must enable SSO and configure SAML in Skyhigh CASB, which allows end users to access the Skyhigh CASB user interface without separate login credentials, and provide business justification for policy incidents.
To enable SSO and configure SAML in Skyhigh CASB:
- Log in to Skyhigh CASB with your tenant.
- Go to Settings > User Management > SAML Configuration.
- Select the tab End-Users.
- Single Sign-On. Toggle on to enable SSO.
- Under Configuring Your Identity Provider, use the following information to configure your IdP App's SAML settings:
- Assertion Consumer Service URL. Edit your IdP application's SAML settings to include the Single sign-on URL.
- Entity ID. Edit your IdP application's SAML settings to include the Audience URI (SP Entity ID).

- ► Step 2: Set up SAML in Your IdP App
-
You must set up SAML in your IdP application to use the IdP App's SAML configuration details such as Issuer URL, Single Sign-On URL, and SAML certificate in Skyhigh CASB. The following example uses Okta as the IdP app for reference.
To set up SAML in your IdP app:
- Log in to Okta using your admin credentials.
- In the Okta Admin console, go to Applications > Applications.
- On the Applications page, click Create App Integration.
- Select SAML 2.0 as the Sign-in method, and click Next.
- Under General Settings, configure the following:
- App Name. Enter the name for your Single Sign-on solution.
- App Visibility. Activate the following checkboxes to hide your IdP app icon from users and in the Okta Mobile app.
- Do not display application icon to users.
- Do not display application icon in the Okta Mobile app.
- Click Next.
- Under Configure SAML, configure the following:
- Single sign-on URL. Enter the Assertion Consumer Service URL from Skyhigh CASB.
- Audience URI (SP Entity ID). Enter the Entity ID from Skyhigh CASB.

- Click Next.
- Under Feedback, configure the following:
- Are you a customer or partner?. Select I'm an Okta customer adding an internal app.
- App type. Activate the checkbox to specify that the Single Sign-On application is internal.
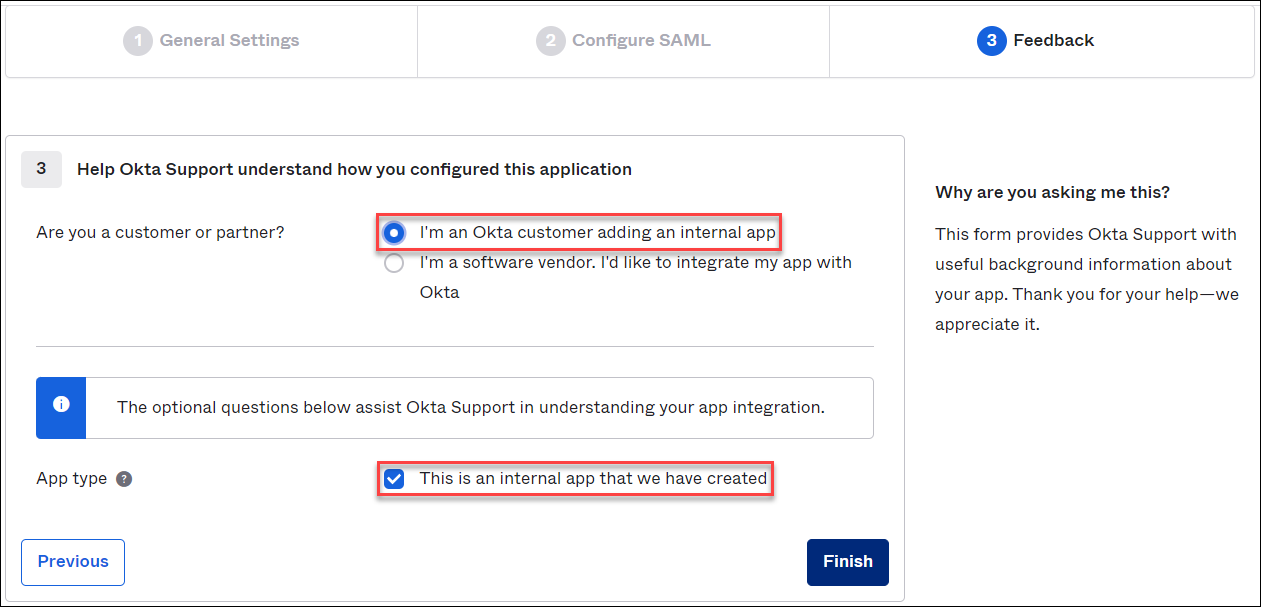
- Click Finish.
- Select the Sign On tab to specify the sign-on method for users to enable SSO for selected users .
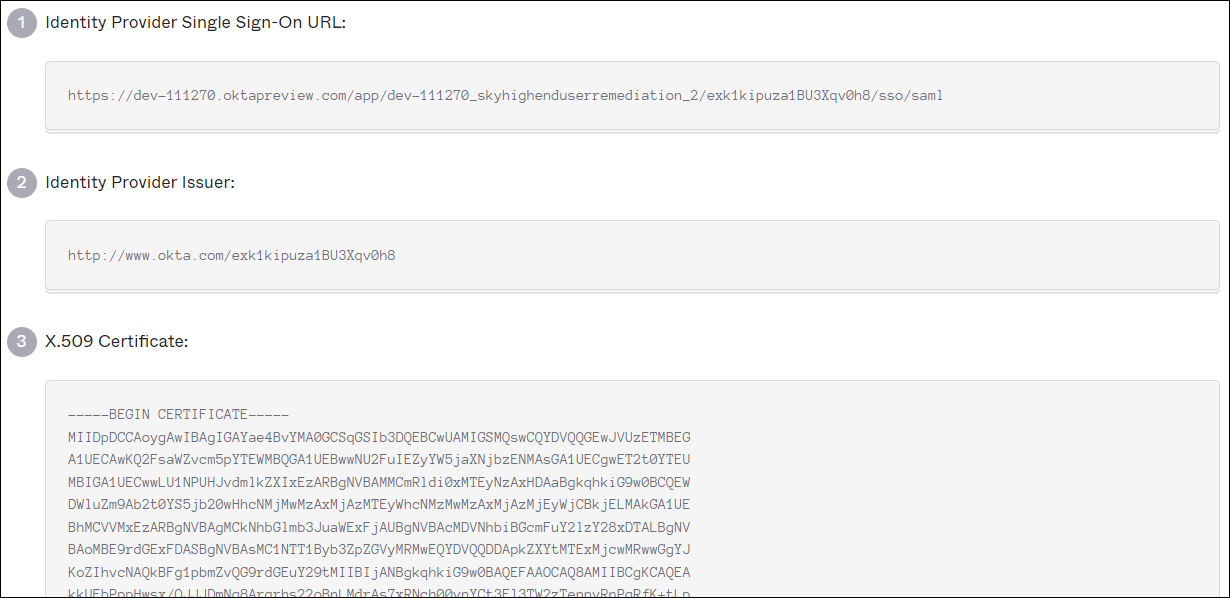
- On the SAML Setup page, under SAML Setup, click View SAML setup instructions. Use the following information to configure SAML in Skyhigh CASB:
- Identity Provider Single Sign-On URL. This is the Login URL required for Skyhigh CASB.
- Identity Provider Issuer. This is the Identity Provider Issuer URL required for Skyhigh CASB.
- X.509 Certificate. Download this certificate to upload it to Skyhigh CASB.
- Select the Assignments tab to enable SSO for end users .
- Go to Assign > Assign to People.
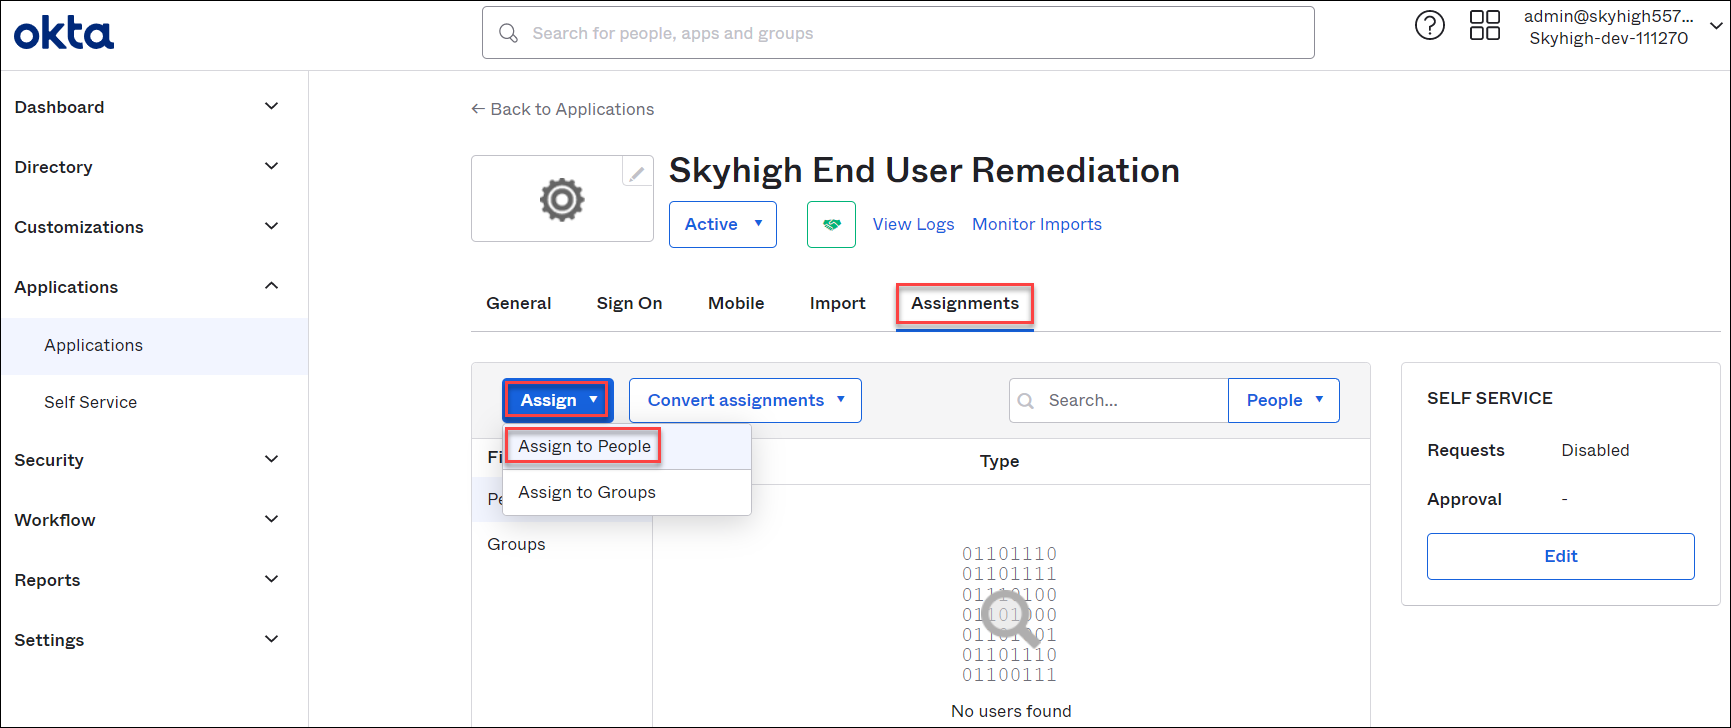
NOTE: If users are not listed in the Okta user directory, use the Directory menu to add users to the Okta user directory.
- Select Assign corresponding to the demo user, and click Done. This demo user is used to test SSO login for Skyhigh CASB.
- Click Save and Go Back.
- ► Step 3: Configure Skyhigh CASB SAML Settings
-
Once you have configured SAML in your IdP app (Okta), you must update Skyhigh CASB SAML settings with the SAML configuration details received from your IdP app.
To configure Skyhigh CASB SAML settings:
- In Skyhigh CASB, go to Settings > User Management > SAML Configuration.
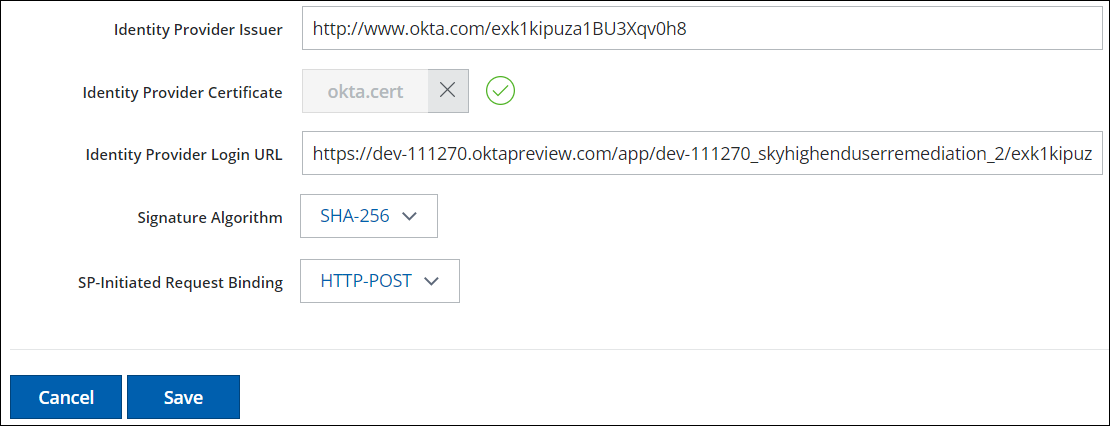
- Select the tab End-Users, and configure the following:
- Identity Provider Issuer. This is the Identity Provider Issuer URL from your IdP.
- Identity Provider Certificate. Click Choose File to upload the SAML certificate downloaded from your IdP. The certificate must be in the PEM (Privacy Enhanced Mail) format.
- Identity Provider Login URL. This is the Identity Provider Single Sign-On URL from your IdP.
- Signature Algorithm. Make sure this matches your IdP app.
- SP-Initiated Request Binding. Make sure this matches your IdP app.
- Click Save.
IMPORTANT: You can create or edit a DLP policy and test the End User Remediation workflow once you enable SSO and configure SAML for end users. This confirms that end users can log in to Skyhigh CASB without separate login credentials, and provide justifications for DLP incidents that are triggered due to policy violations. For details, see End User Remediation Workflow.