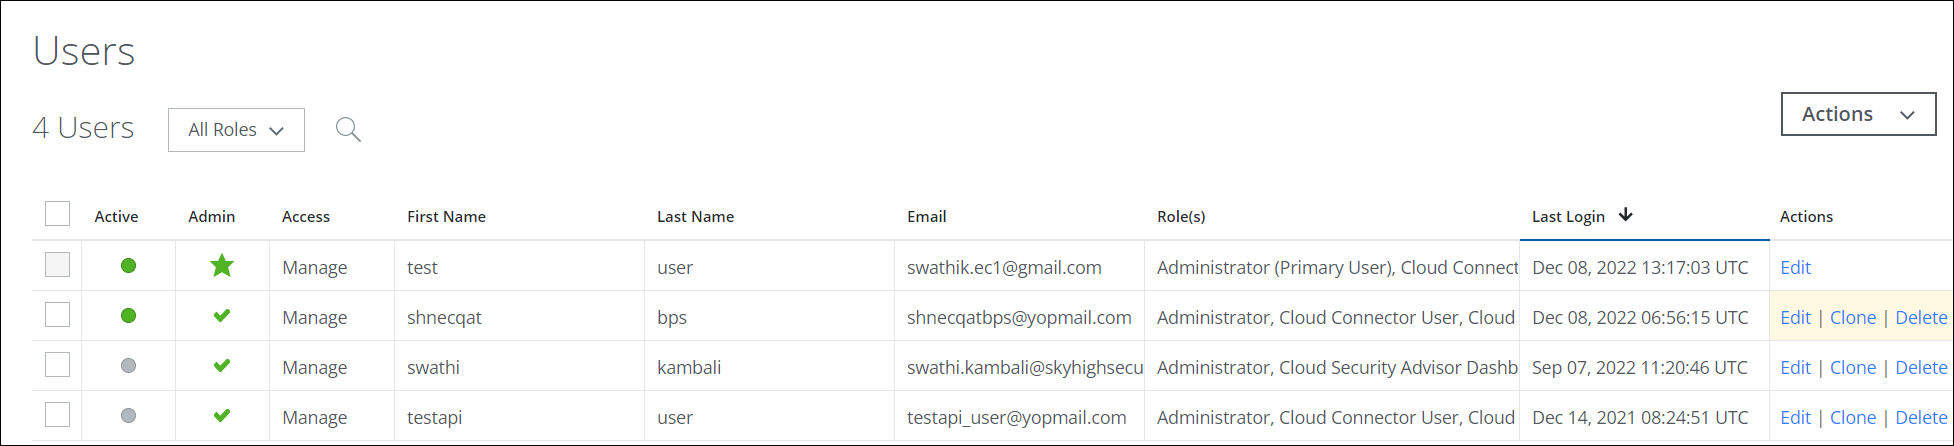
About the Users Page
| Limited Availability: To access the Roles feature, contact Skyhigh Support. |
IMPORTANT: Skyhigh recommends using the CASB dashboard (Settings > User Management > Users) to create a new user on the GovCloud tenant and not from the Identity Provider (found under product selection) page.
The Users page provides a unified location for managing existing users and adding new users. This page is only displayed for Administrator users with User Management permissions.
It's located at Settings > User Management > Users.
NOTE: You can also manage the existing users or add a new user from the Manage Users (found under product selection) page.
NOTE: You must have a User Manager role with Manage access to configure SAML and SSO from the Trellix Identity Provider page.
The Users page provides the following actions and information:
- All Roles. Click to sort the table by roles.
- Actions.
- Create New User. Click to Create a New User.
- Clone User. Click to Clone a User from an existing account.
- Export CSV. Click to export Users and Roles to a CSV file.
- Bulk User Edit: Select multiple users and then click to bulk edit user permissions.
- Settings:
- Edit Table Columns. Select columns you'd like to show; deselect columns you'd like to hide. Click Save Table Settings.
- Search. Enter a first name, last name, or email address to find users.
- Select. Click to select the user.
- Active. Green in the Active column indicates the user is active, while grey indicates that the user is disabled and will not be able to log in.
- Admin. Indicates if the user has administrative permissions. A user with a star in this column is considered the primary user of the tenant. For details about the primary user, see Primary User in CASB Dashboard.
- Access. Displays the user's access level, Manage or Read Only.
- First Name. Displays the user's first name. Click to sort alphabetically.
- Last Name. Displays the user's last name. Click to sort alphabetically.
- Email. Displays the user's email address.
- Role(s). Displays all the roles assigned to a user. Click to sort alphabetically by role name.
- Last Login. Last date and time the user logged in. Click to sort chronologically.
- Actions.
About Users and Roles (LA)
The Users and Roles (Settings > User Management > Users and Roles) page allows you to assign roles to both existing and new users. You can group Permissions to create a role and assign it to users. Permissions define the actions users can perform, and roles group those permissions to manage access. For details on roles, see About Roles.
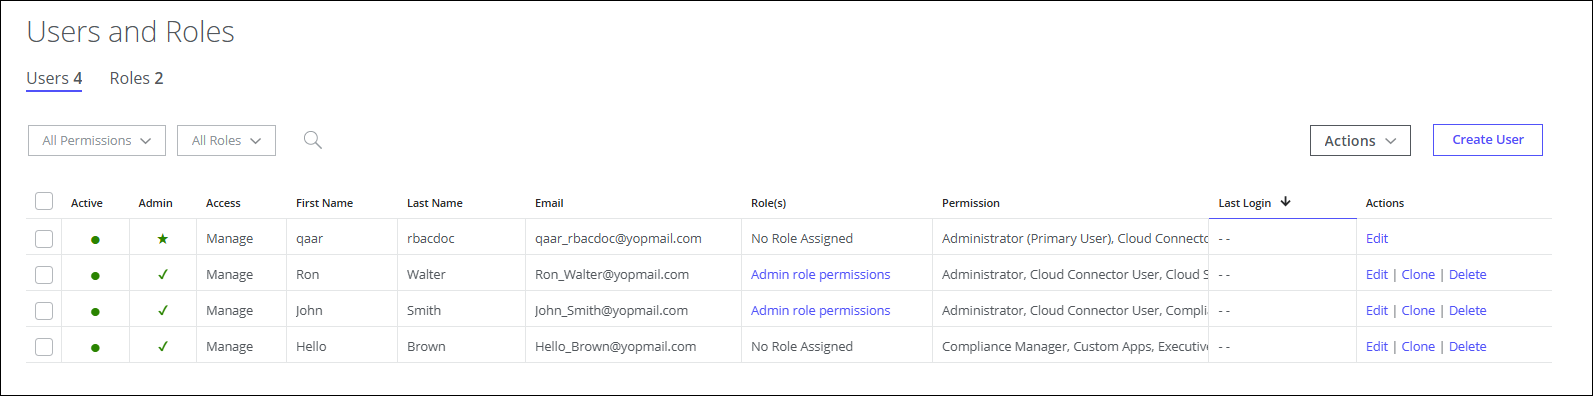
The table displays the following UI elements in addition to the existing information:
- All Permissions. Lists all permissions. Select a permission to filter users. The result displays only users with the selected permission.
- All Roles. The menu lists all the created roles for a specific tenant. By default, All Roles is selected. The table displays all users assigned to roles. Select a role to narrow your search. For example, let’s say you have created the Admin role permissions role. The created roles are listed in the All Roles menu. Select the Admin role permissions role from the menu, and the table displays only users assigned to this role.
- Roles. Displays role names.
- Permission. Displays assigned permissions for a specific role.
You can assign multiple roles to an existing or a new user.
Assign Roles to an Existing User
To assign roles to an existing user:
- Go to Settings > User Management > Users and Roles > Users tab.
- Click Edit corresponding to the user.
- On the Edit User page, click Select Role.
- On the Select Role panel, select the checkboxes to assign roles to a user, and then click Save.

- On the Edit User page, click Save.
Assign Roles to a New User
To assign roles to a new user:
- Go to Settings > User Management > Users and Roles > Users tab.
- Click Create User.
- On the Create User page, enter the user's details, such as First Name, Last Name, and Email Address.
- Click Select Role to assign roles to the user.
- On the Select Role page, click Save.
- On the Create User page, click Save.
To edit permissions, see Edit User Permissions.