Create a Custom OAuth App in Miro
| Limited Availability: CASB Connect for Miro is a Limited Availability feature. To enable API access for your Miro instance, contact Skyhigh Support. |
You can create a Custom OAuth app for Miro in the Miro portal. Follow the steps below to create a Custom OAuth application in Miro.
To create a Custom OAuth application in Miro:
- Log in to Miro using admin credentials.

- Click your profile and then select Settings from the menu.

- Select Your apps tab and then click Create new app to create a new app under the Skyhigh Security Sandbox.

- On the Create new app dialog, enter the app name, select Dev team from the menu and then click Create app.

-
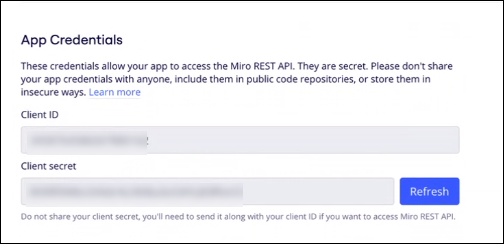
Under App Credentials, Client ID and Client secret are generated. These credentials are used to access the Miro REST APIs.
NOTE: Make sure you copy the app credentials, the Client ID and Client secret. You must provide these credentials while enabling API access in Skyhigh CASB.
-
Enter the redirect URL for OAuth2.0. You must enter the redirect URL in the following format:
https://Skyhigh_CASB_URL/shndash/extensions/GenericOAuthController
Replace Skyhigh_CASB_URL with dashboard-us.ui.skyhigh.cloud OR dashboard-eu.ui.skyhigh.cloud as per your tenant URL. For assistance on Skyhigh CASB URL, contact Skyhigh Security Support.

- Under Permissions, select the read-only scopes. The scopes define the app permissions to interact with a board.
NOTE: To monitor the activity logs, you must select auditlogs:read along with the other scopes under Enterprise plan only.
- Under All plans section, select the following scopes:
boards:read
identity:read
team:read - Under Enterprise plan only section, select the following scopes:
auditlogs:read
organizations:read
organizations:teams:read
projects:read

- You can see the newly created Custom OAuth app under Settings > Your apps > Created apps section.

To create a Miro instance in Skyhigh CASB, see Create a Miro Instance in Skyhigh CASB.