Create Custom OAuth App in Azure for Copilot
| Limited Availability: To access Microsoft 365 Copilot, contact Skyhigh Support. |
To integrate Skyhigh CASB with Copilot, you must register a new application in the Azure portal and apply the required API permissions to the application:
- Register a new application in the Azure portal
- Apply API permissions to the newly created application
- Capture Configuration Details for Copilot API Access
Register a New Application in Azure
To register a new application in the Azure portal, perform the steps below:
- Log in to the Azure portal at https://portal.azure.com/.
- Click App registrations.

- Click New registration.

- Configure the following details in the registration form, and then click Register:
- Name. Enter the name of the application. For example, Skyhigh Security Compliance Control.
- Supported account Types. Select Accounts in this organizational directory only.

- Review the new application properties.

- You must upload a self-signed certificate. Run the following OpenSSL commands in Terminal (macOS) or Command Prompt (Windows) to generate a self-signed certificate, in the sequence shown below:
- Generate a 2048-bit private key. Enter the command below at the prompt. This creates a private key file named office365OfflineDlpKey.pem. The key length should be 2048.
openssl genrsa -out office365OfflineDlpKey.pem 2048
- Create a Certificate Signing Request (CSR). Enter the command below at the prompt. You will be prompted to enter details like country, organization name, common name, etc.
openssl req -new -key office365OfflineDlpKey.pem -out office365OfflineDlp.csr
- Generate a Self-Signed X.509 certificate with a generated key and signing request. Enter the command below at the prompt. This creates a certificate valid for 10 years (3650 days).
openssl x509 -req -in office365OfflineDlp.csr -signkey office365OfflineDlpKey.pem -out office365OfflineDlp-cert.pem -days 3650
- Verify the certificate validity dates. Enter the command below at the prompt. These commands display the start and end validity dates of the certificate.
openssl x509 -startdate -noout -in office365OfflineDlp-cert.pem
openssl x509 -enddate -noout -in office365OfflineDlp-cert.pem
The generated certificate, private key, and CSR will be saved on your device.
- Select Certificates & secrets.

- On the Certificates tab, click Upload certificate.

- Upload the recently generated office365OfflineDlp-cert.pem certificate from your device to the Azure portal.
- Enter a description for the uploaded certificate, and then click Add.

A Thumbprint is generated.

- Apply the required API permissions to the application.
You have successfully created a new application in the Azure portal.
Apply API Permissions to the Application
Assign the following permissions to the application for Activity Monitoring and API DLP for prompts and responses.
| Microsoft Graph Permission Type |
|---|
| User.Read.All |
| Chat.Read.All |
| AiEnterpriseInteraction.Read.All |
To apply the required API permissions to the application, perform the following steps:
- To add the APIs with the permissions, select API Permissions.
- Select Add a permission.

- On the Microsoft APIs tab, select Microsoft Graph.

- Select Application permissions.

- In the Search bar, search for the required permission, select the permission type checkbox, and then click Add permissions.
NOTE: Ensure that all required permissions are added to the application.
For the illustration, we have added a User.Read.All (Microsoft Graph).

- Select Grant admin consent for <your organization name> to grant admin consent for all API permissions.

- In the Grant Admin Consent dialog, select the Yes, add other granted permissions to configured permissions option, and then click Save and continue.

- Click Grant admin consent.

- In the Grant admin consent confirmation dialog, click Yes.

All the API permissions are granted with the admin's consent.

Capture Configuration Details for Copilot API Access
You must add the following details while enabling Copilot API in Skyhigh CASB:
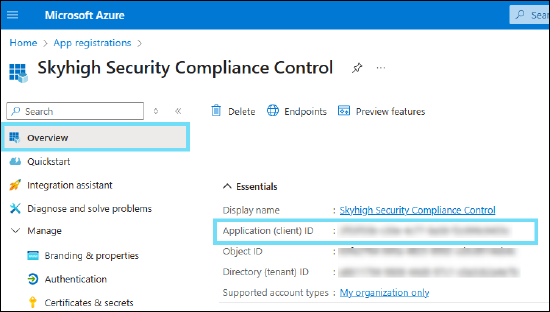
- Client ID. Go to the Azure portal > App registrations > All applications > select your application > Overview tab, and note down the Client ID.
- Private Key. Private key is the .pem file containing the private key that you created earlier (office365OfflineDlpKey.pem).
- Thumbprint. Go to the Azure portal > App registrations > All applications > select your application > Certificates & secrets, and note down the Thumbprint.

- Resource URL. Use the https://<O365TENANTNAME>.sharepoint.com.
- Admin Email. The email address of an admin user assigned to the services, for example, admin@mycompany.onmicrosoft.com.
To create a Copilot instance in Skyhigh CASB, see Create Copilot Instance in Skyhigh CASB.