Integrate ServiceNow SSO with ADFS using SAML
Use the following steps to integrate ServiceNow SSO with ADFS using SAML.
NOTE:
- This topic is intended for Windows Server 2016 with ADFS 3.0 and does not cover setup ADFS.
- To use the IdPs such as ADFS and Okta, you need to configure IdP in ServiceNow. For details, see Configure IdP in ServiceNow.
Prerequisites
Before you begin, make sure you have met the following prerequisites:
- Access to a Skyhigh CASB tenant with a ServiceNow instance configured.
- For IdP integration with ADFS, you'll need:
- Access to ADFS with one test user account.
- A ServiceNow user must match your Active Directory account to test the ADFS integration.
Step 1: Configure ADFS as Identity Provider in ServiceNow
To configure ADFS, import the metadata directly to ServiceNow.
- Go to Multi Provider SSO and click Identity Providers.
- To create a SAML type, click New.
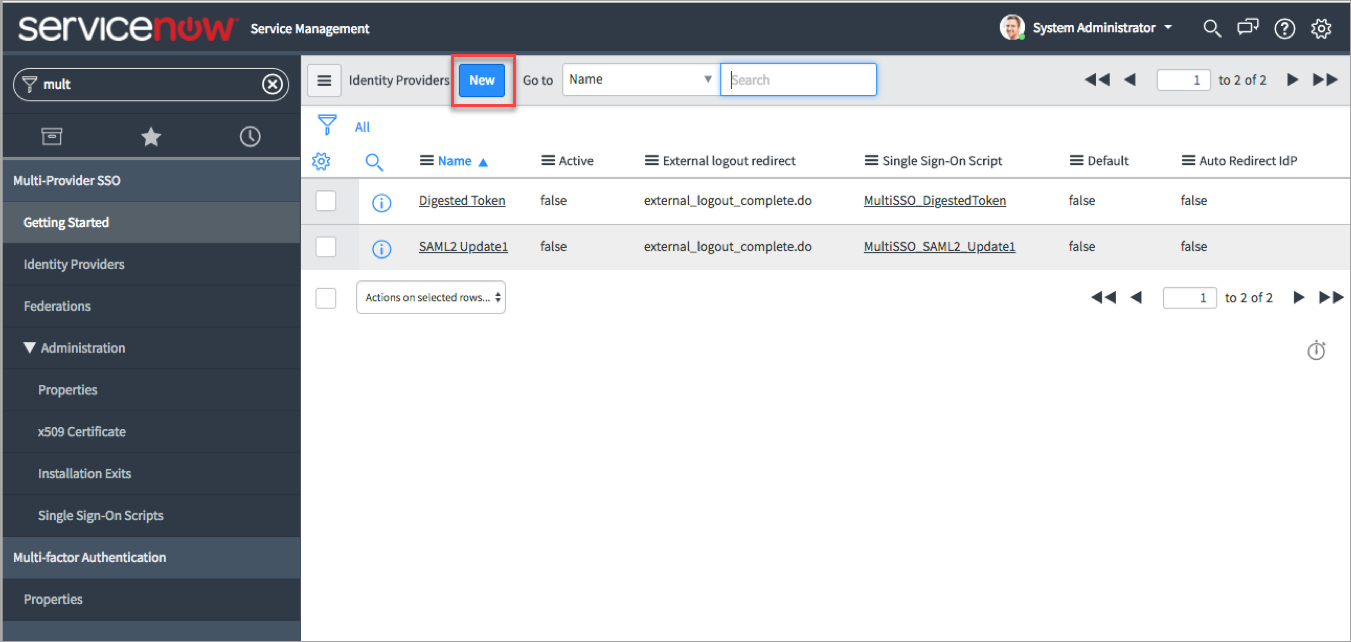
- In the Import Identity Provider Metadata dialog, click the URL radio button and enter the URL for the ADFS metadata. For example, https://myserver.domain.com/Federati...onMetadata.xml. Here, replace myserver.domain.com with the required host name.
The metadata XML file provides the required information including the ADFS certificate.
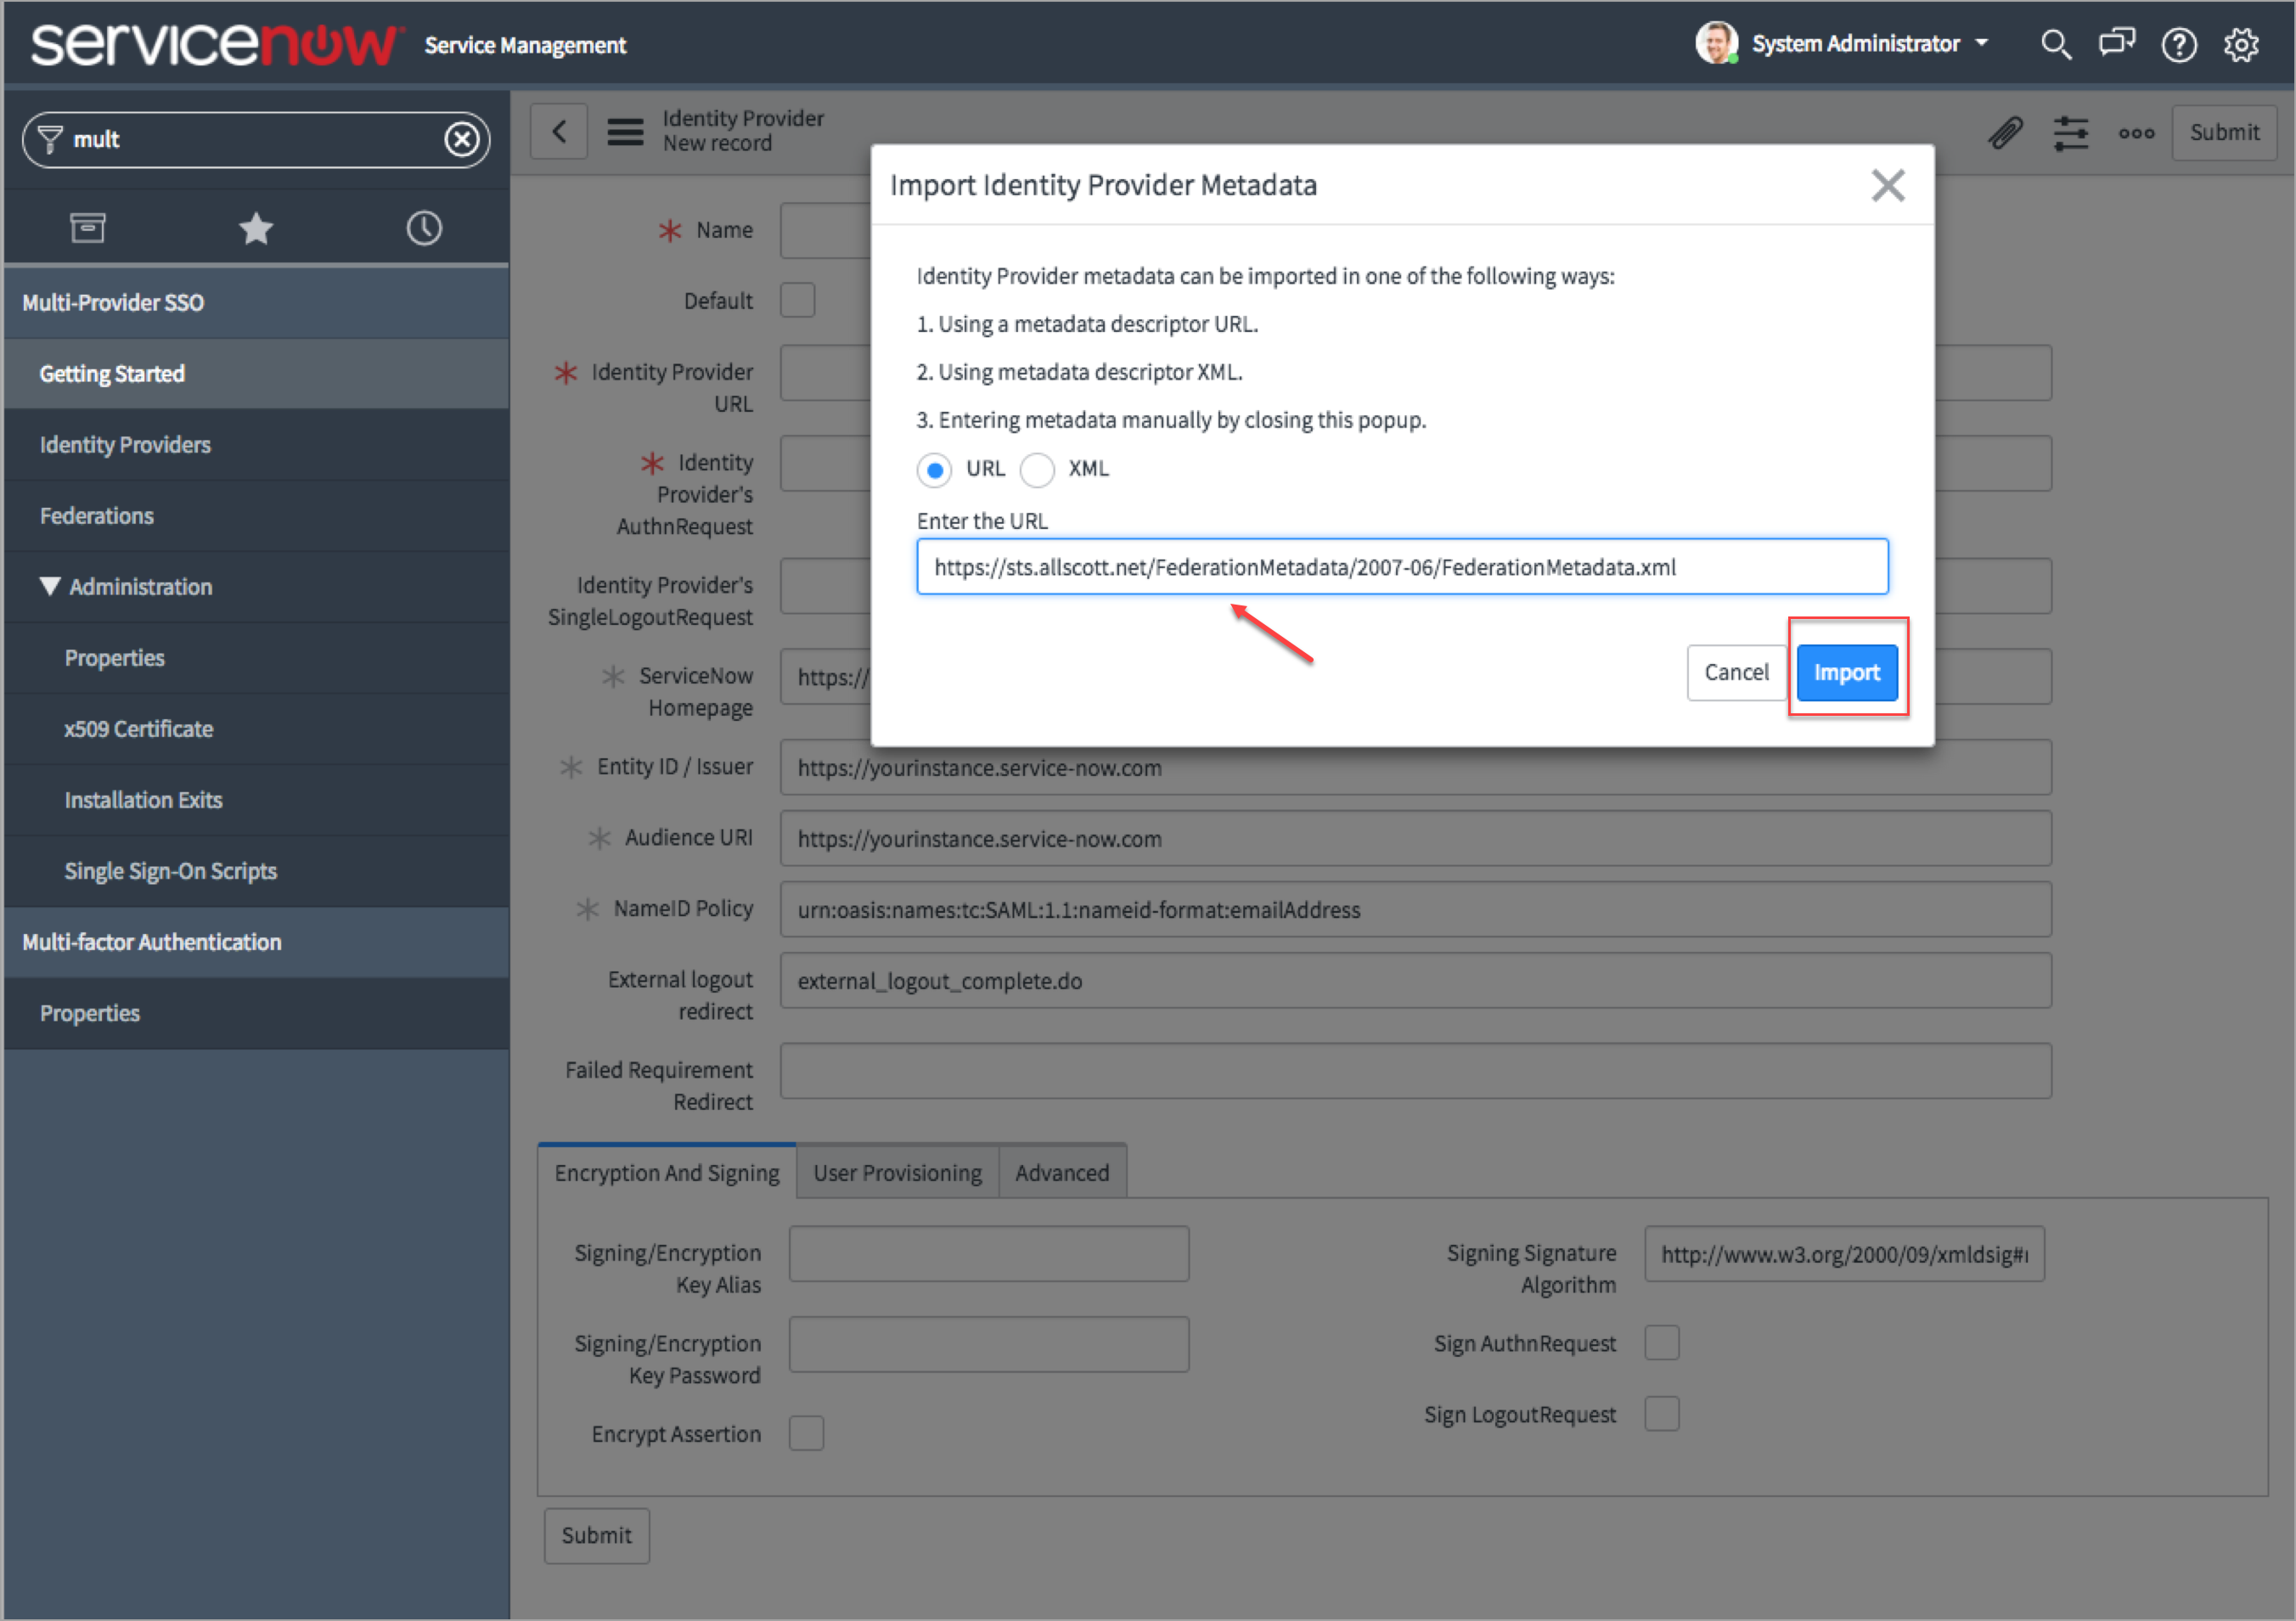
- Click Import.
- Once the import is completed, configure the following fields and click Update.
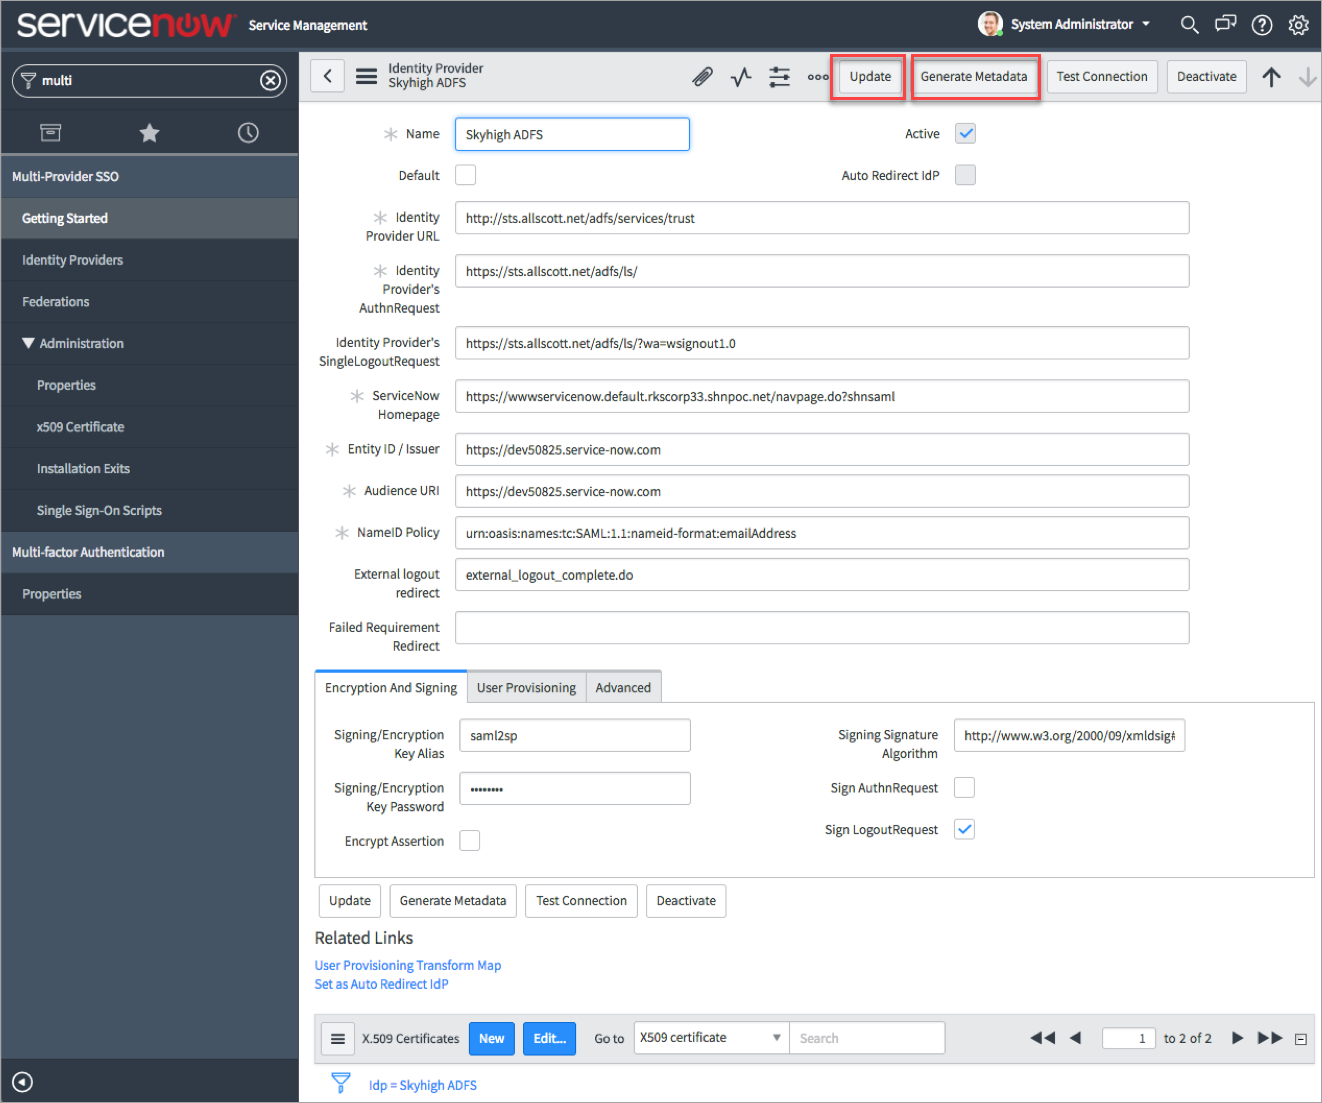
- Name. Enter the name of the identity provider. For example, Skyhigh CASB ADFS.
- Default. If you have selected only one identity provider, then you can activate this checkbox. As an optional field, you can leave it blank.
- Identity Providers’s SingleLogout Request. Append the parameter ?wa=wsignout1.0 at the end of the existing URL in this format : https://sts.allscot.net/adfs/ls/<append parameter> . For example, https://sts.allscot.net/adfs/ls/?wa=wsignout1.0.
- ServiceNow Homepage. Append the ServiceNow Proxy URL at the beginning of the existing URL in the below format. For example, https://wwwservicenow.default.rkscorp.shnpoc.net/navpage.do?. To get the Skyhigh CASB ServiceNow Proxy URL, see Configure ServiceNow via Skyhigh CASB Proxy.
<ServiceNow Proxy URL>/navpage.do?
NOTE: If you are performing Managed Device Check, then append the parameter ?shnsaml at the end of the existing URL in the following format. For example, https://wwwservicenow.default.rkscorp.shnpoc.net/navpage.do?shnsaml.
<ServiceNow Proxy URL>/navpage.do?<append parameter>
- Under Encryption and Signing, configure these fields:
- Sign LogoutRequest. Activate this checkbox.
- Signing/Encryption Key Alias. Enter saml2sp.
- Signing/Encryption Key Password. Enter saml2sp.
NOTE: If you prefer to create and upload your signing certificate instead of the built-in SP certificate, then see Generate a Server Certificate.
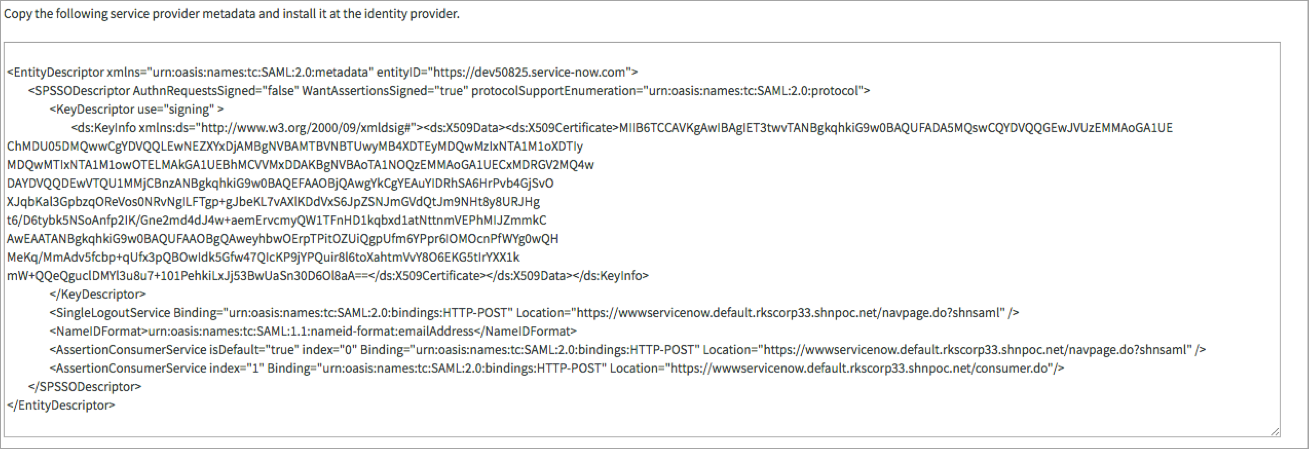
- Click Generate Metadata. If you see any dialogs, then click Allow.
Copy the text and save the file type as XML. Later, you can use this file in the Relying Party Trust.
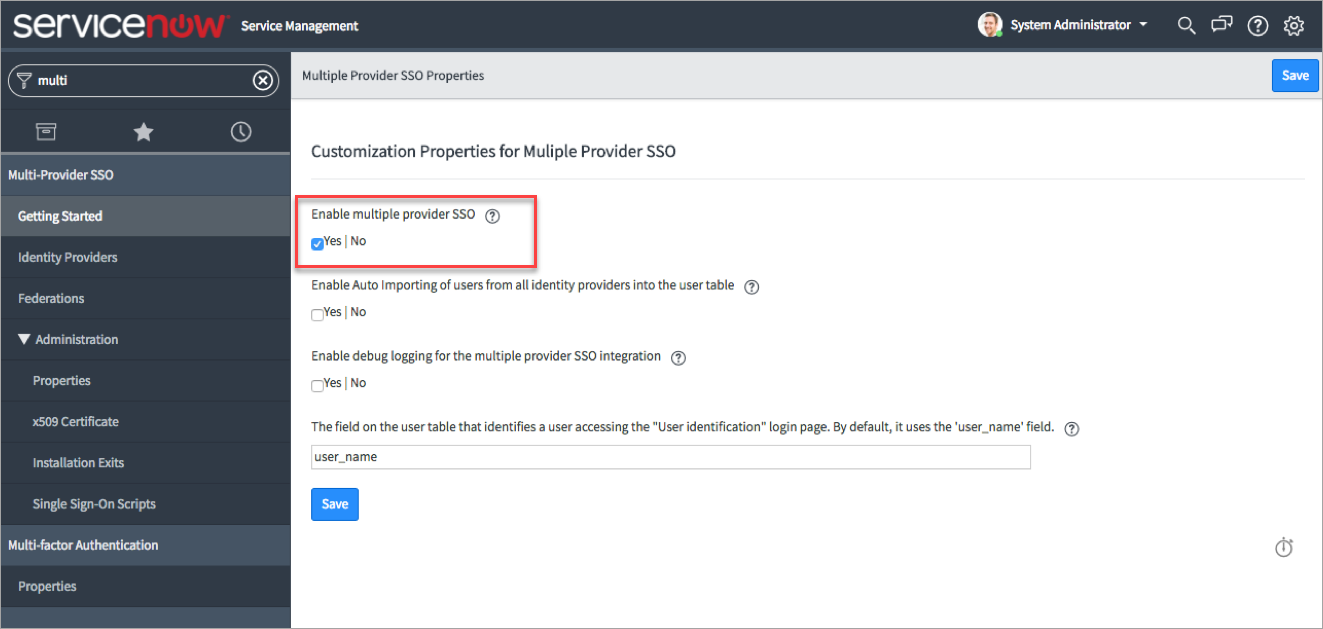
- To enable SSO in ServiceNow, go to Multi Provider SSO and click Administration > Properties.
- Select Enable multiple provider SSO and click Save.
Step 2: Create a Relying Party Trust
To create and add a Relying Party Trust to ADFS:
- Install the configured ADFS on the Windows Server.
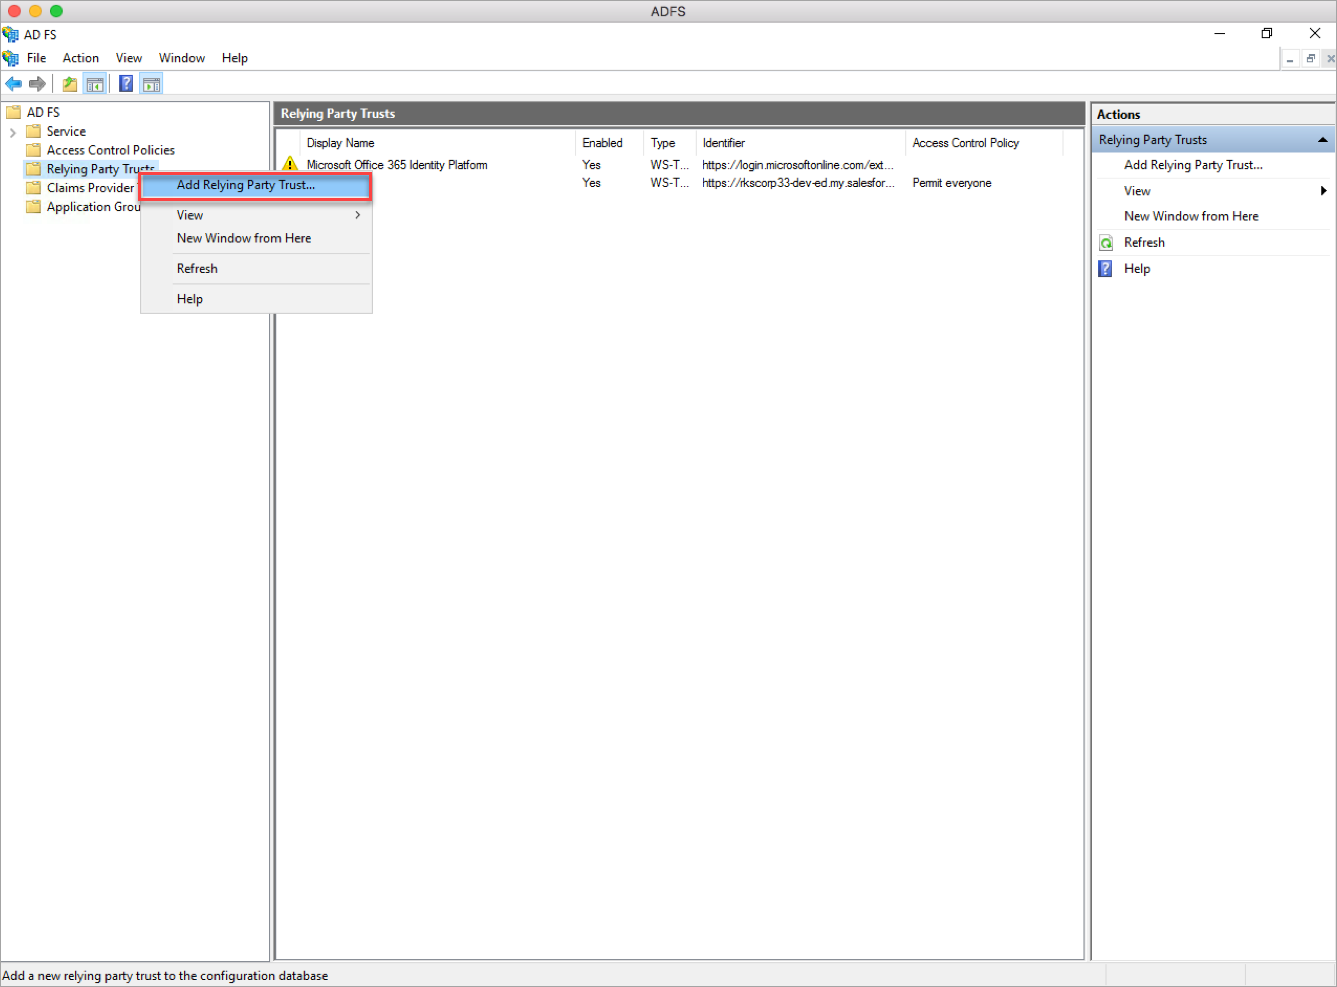
- Open the ADFS Management windows > Administrative Tools and expand the ADFS menu. Right-click the Relying Party Trusts and click Add Relying Party Trust.
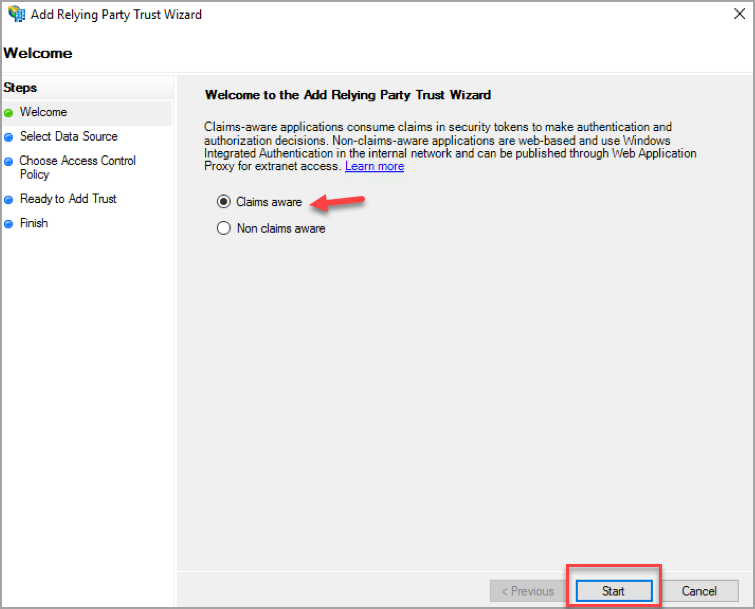
- In the Add Relying Party Trust Wizard page, click the Claims aware radio button and click Start.
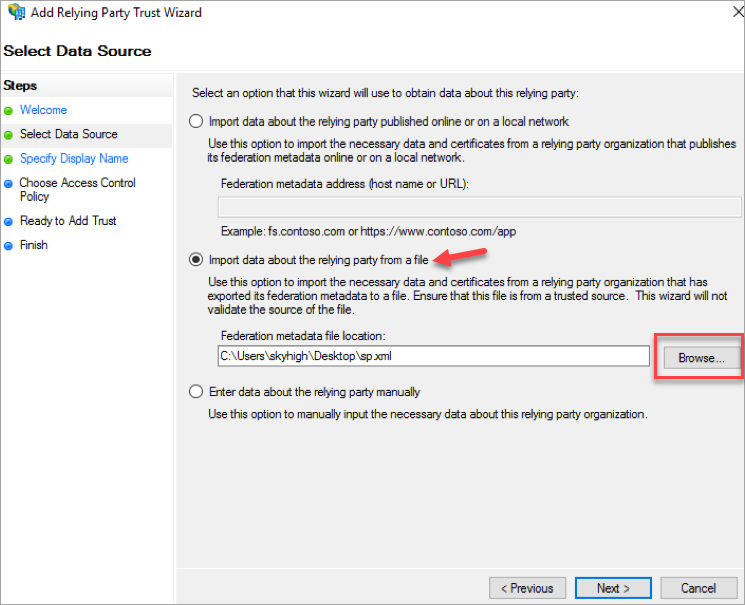
- Click the Import data about the relying party from a file radio button. Browse and upload the metadata XML file saved in your local folder and click Next. The metadata XML file was created in Step 1.
- Click Next.
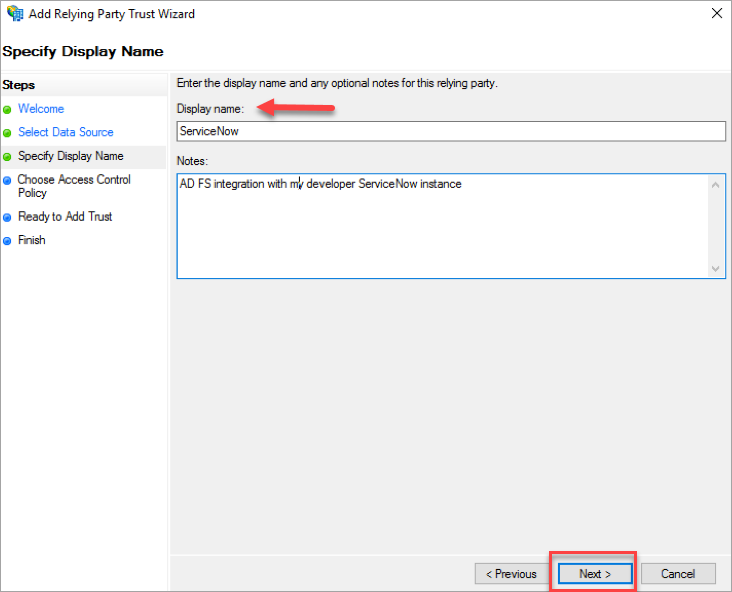
- Enter the Display name and click Next.
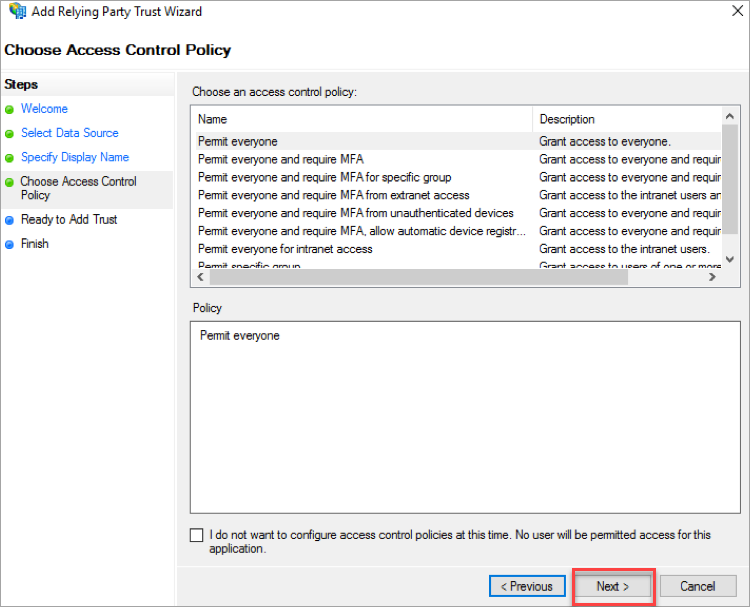
- Select Access Control Policy as Accept defaults unless required otherwise from the options and click Next.
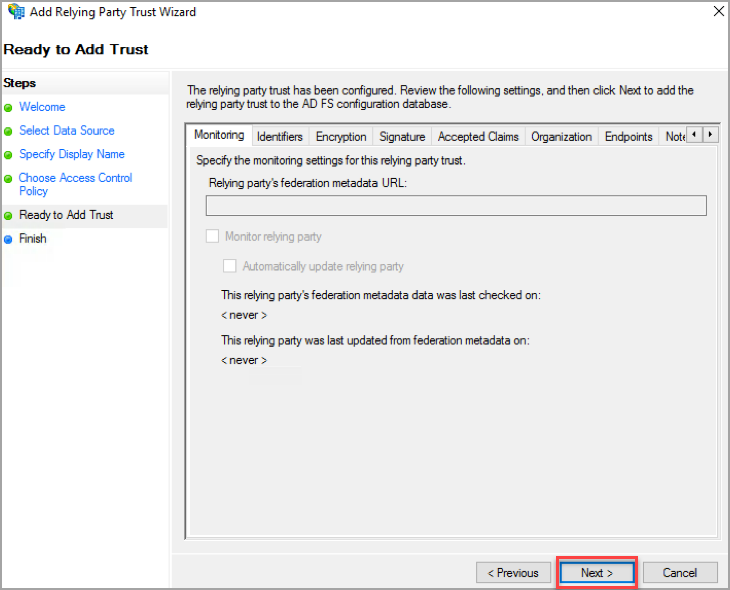
- There are no changes in the Ready to Add Trust page. Click Next.
- Activate the checkbox Configure claims issuance policy for this application and click Close.
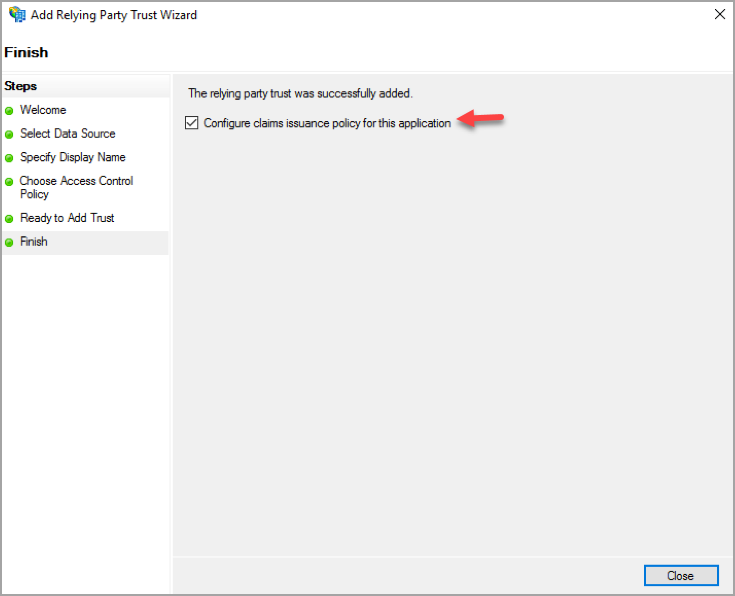
You have successfully added the relying party trust to ADFS.
Step 3: Configure Claim Issuance Policy
The Claim Issuance Policy maps user information in Active Directory to the user information stored in the ServiceNow. In this scenario, the policy maps the UPN of the user in Active Directory to the email address of the user in ServiceNow. You can also use the email address of the user in the Active Directory.
To configure Claim Issuance Policy:
- Under ADFS, right-click the Relying Party Trusts and click Edit Claim Issuance Policy.
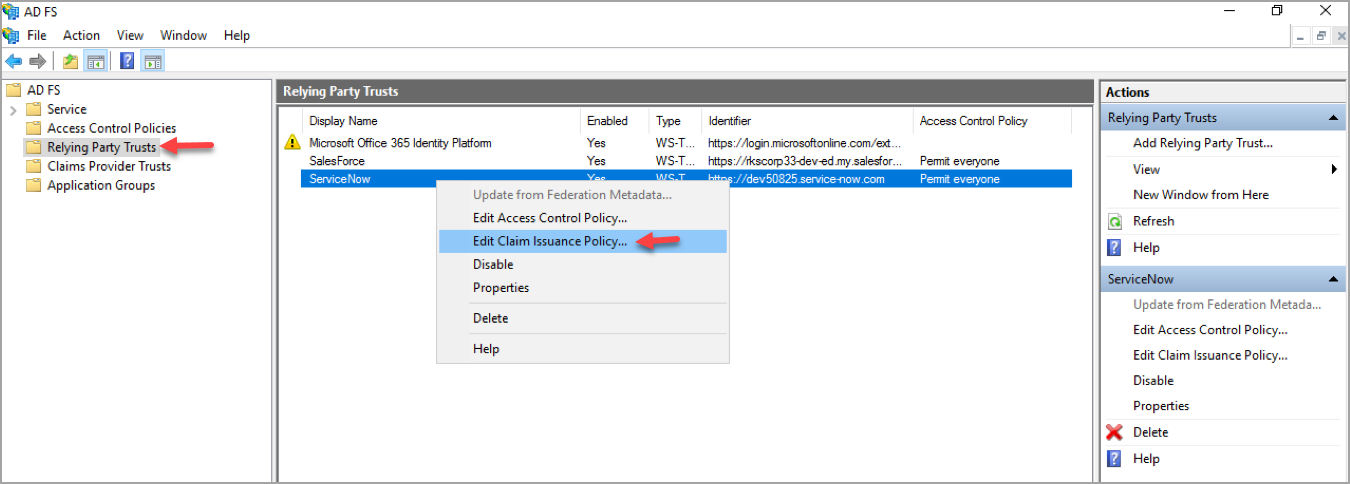
- You are redirected to the Edit Claim Issuance Policy page and click Add Rule.
- In the Add Transform Claim Rule Wizard page, select Claim rule template as Send LDAP Attributes as Claims and click Next.
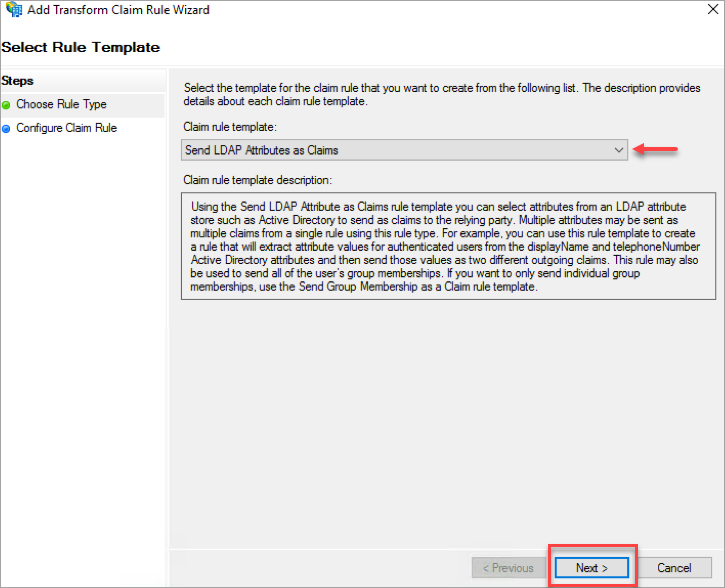
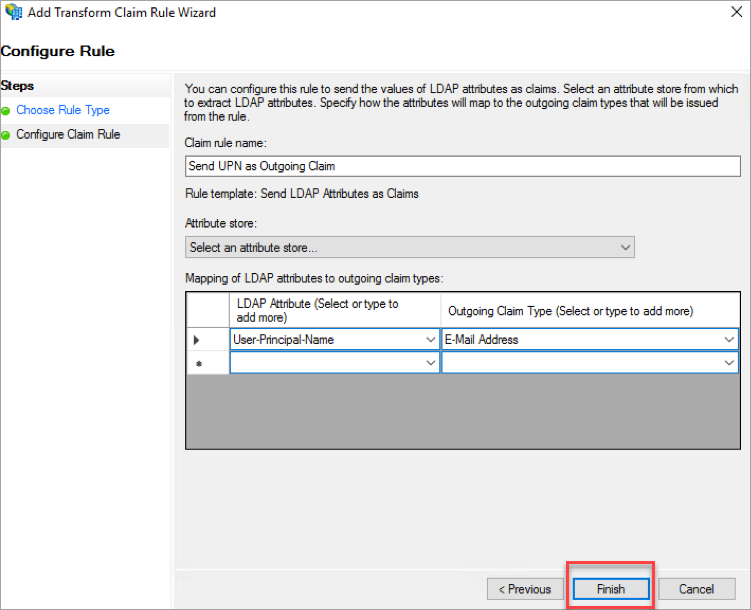
- Under Configure Rule, update the following:
- For Claim Rule Name, enter the name of the rule.
- Select the Attribute store as Active Directory from the menu.
- For Mapping of LDAP attributes to outgoing claim types, select the following attributes from the menu:
- Under LDAP Attribute, select User-Principal-Name.
- Under Outgoing Claim Type, select E-Mail Address.
- Click Finish.
NOTE:
- The User-Principal-Name must match the user’s email address in ServiceNow.
- You can also select an Email Address for the LDAP Attribute, only if you have defined the email address in the Active Directory.
- You are redirected to the Edit Claim Issuance Policy page and click Add Rule.
- In the Add Transform Claim Rule Wizard page, select Claim rule template as Transform an Incoming Claim and click Next.
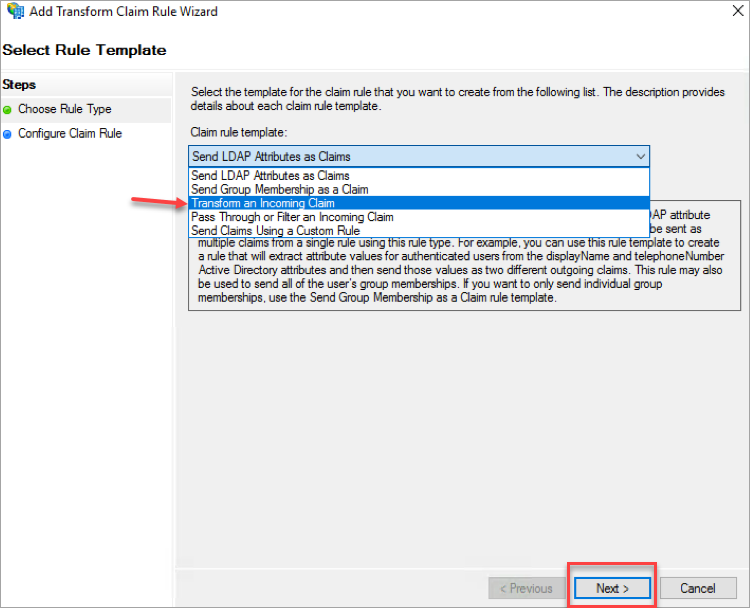
- Under Configure Claim Rule, update the following:
- For Claim rule name, enter the name of the rule.
- Select Incoming claim type as E-Mail Address from the menu.
- Select the Outgoing claim type as Name ID from the menu.
- Select the Outgoing name ID format as Email from the menu.
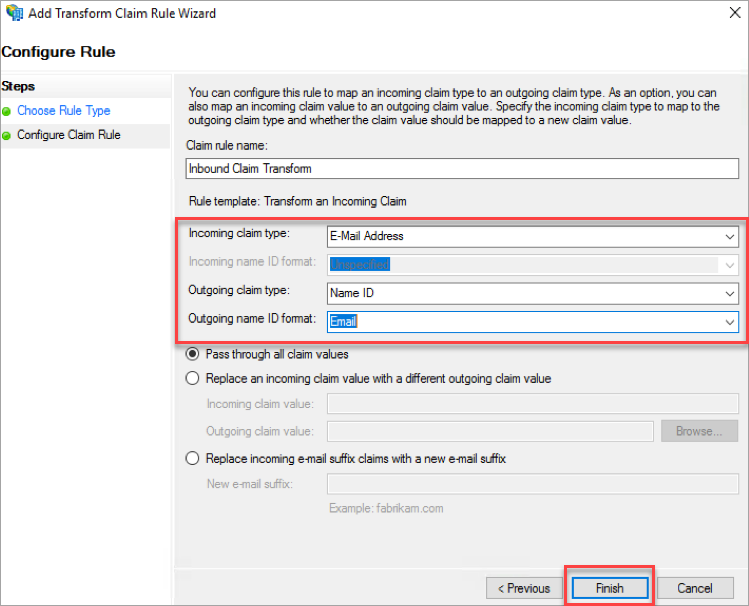
- Click Finish.
You have successfully configured ADFS as Identity Provider in ServiceNow.
Step 4: Validate the SSO Integration with ADFS
IdP Initiated Login
- Log in to ServiceNow using the ADFS portal.
- To use your ADFS server portal, change the host using the link https://sts.acme.net/adfs/ls/idpinitiatedsignon.htm.
- Select your Service and authenticate it with a test user.
SP Initiated Login
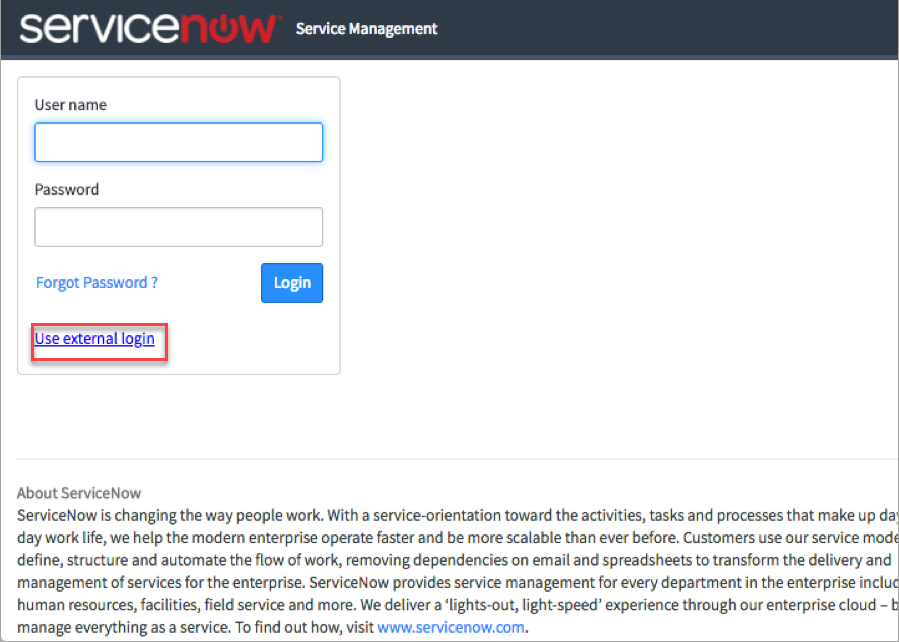
- Go to ServiceNow instance, and click the Use external login link.
- Enter the User ID and click Submit.
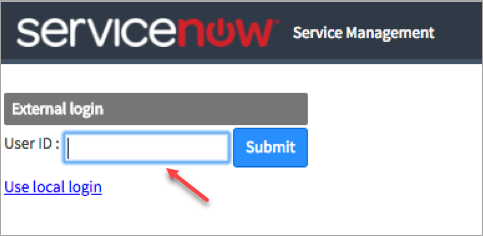
NOTE: The external login is the User ID in the ServiceNow User details and not the email address.

- You are redirected to ADFS for the authentication and return to the ServiceNow dashboard.
If authentication is successful and ?shnsaml is used while defining the Identity Provider, then Cloud Access Policies can be used including managed and unmanaged access controls.
