Migrate Logging Client to Log Collector
NOTE: This section is intended only for the existing Logging Client users.
IMPORTANT:
- To migrate from Logging Client to Log Collector, you must configure the Skyhigh Cloud Connector.
- You must have the Skyhigh Cloud Connector user role to install and configure Cloud Connector. For details, see About User Roles and Access Levels.
- You must access Skyhigh CASB user interface from the same network on which your Cloud Connector is installed. Otherwise, you cannot enable the feature or configure settings.
Before migrating to the Log Collector, you must stop the existing Logging Client. Once you migrate to the Log Collector, you can start collecting the logs from the Log Collector. The logs collected during the migration period will not be lost.
IMPORTANT: Stop the existing Logging Client to avoid duplicate events before enabling the Log Collector. You can stop the Service by clicking Stop Service on the existing Logging Client configuration page.
Perform the below migration steps to collect logs from the Log Collector:
- ► Step 1
- Download and install Cloud Connector version 6.7.1 or above. Before installing the Cloud Connector, make sure all prerequisites have been met. For details, see Skyhigh Cloud Connector Prerequisites. To perform Step 2, the Logging Client and the Cloud Connector should be up and running.
- ► Step 2
-
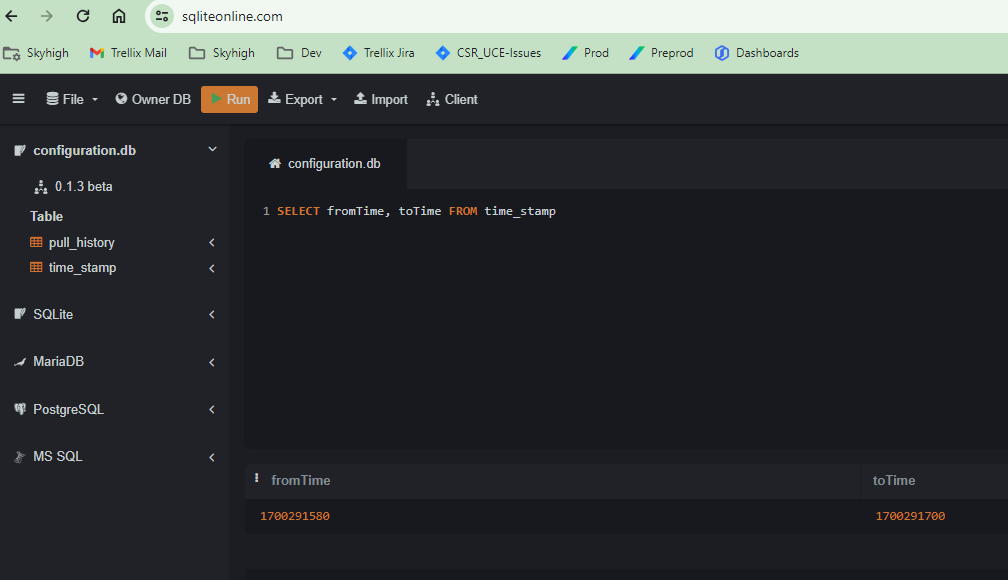
Stop the existing Logging Client and collect the toTime timestamp. The Logging Client has pulled the data until the toTime timestamp. The toTime is recorded in the time_stamp table of the configuration.db.
You can get the toTime timestamp in two different ways:
- By running the commands in the online tools
- By running the Python script from the Logging Client
Run the commands using the online tool
Use online tools such as https://sqliteonline.com/ and from the tool, select configuration.db file (File > Open DB), and then run
SELECT fromTime, toTime FROM time_stampcommand to get toTime.
NOTE: Convert toTime into yyyy.MM.dd.HH.mm.ss format.
Run the Python script from the Logging Client
Run the below Python script from the existing Logging Client to know the toTime timestamp.
NOTE: Python 3.x should be installed to run the below script.
import sqlite3

#Creating file path
dbfile = "C:\<logging-client-tool-installed-path>\app-x.x.x\configuration.db"

#Create a SQL connection to our SQLite database
con = sqlite3.connect(dbfile)

#Query to execute
query = "select toTime from time_stamp"
cur = con.cursor()

#Execute query
results = cur.execute(query)
for x in results:
 print("To Time: " + x[0])
con.close()
Output of the above command:
toTime: 1703142920
- ► Step 3
-
Configure Log Collector on the SIEM Integration (Inline) tab. For Log Collector configurations, see Log Collector Configuration. Once you complete the configuration, you must STOP the Cloud Connector.
- ► Step 4
-
Run the below CLI commands to update the toTime timestamp of the last successful request made by the Logging Client. This command allows the Cloud Connector to make consecutive requests from the updated toTime timestamp. Once you execute the below commands, start the CC to collect and process the logs.
NOTE: Run the CLI commands at the path <EC-Installed-Directory> ./shnlpcli <command>.
Operating System CLI Command Linux root@EC-VM12:/shn/wlc# ./shnlpcli updateLoggingClientLastSuccess --logType "SWG" --updateTime <toTime>
Windows PS C:\shnlp> .\shnlpcli.exe updateLoggingClientLastSuccess --logType "SWG" --updateTime <toTime>
