Integrate with ServiceNow Encryption as a Service
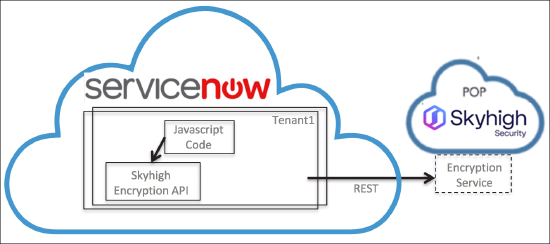
In addition to providing structured data encryption via Reverse Proxy (RP), Skyhigh CASB also offers the ability to integrate with ServiceNow Encryption as a Service (EaaS). ServiceNow provides an option to integrate with an external/outbound REST service (for example, Skyhigh CASB Active Encryption). The REST service can be invoked while running ServiceNow Business Rules.
A Business Rule can be invoked for any data operation, such as Insert, Update, Delete, and Query. Even if the ServiceNow object is created/modified directly, bypassing Skyhigh CASB RP, the fields are encrypted out of band using ServiceNow EaaS. All decryption takes place through the Skyhigh CASB RP. Users accessing ServiceNow data directly see encrypted fields. The following diagrams provide a high-level system interconnect view.
Configure EaaS
There are two parts to configuring EaaS:
- Create an outbound REST message in ServiceNow.
- Write a ServiceNow Business Rule for each field that requires encryption.
Prerequisites
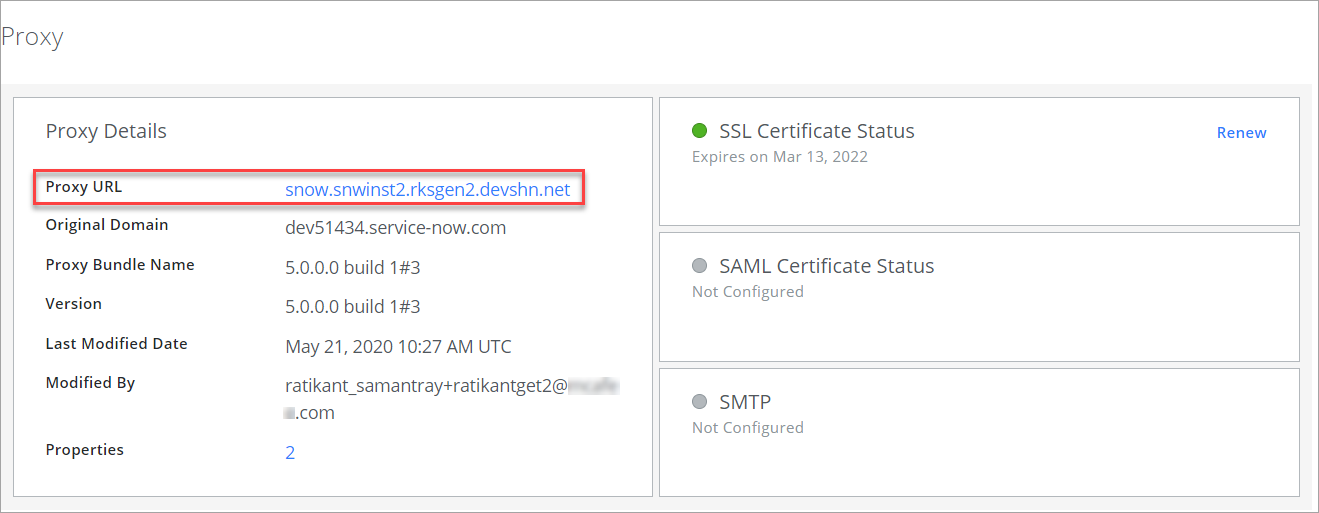
First, you need to know your Skyhigh CASB Proxy URL (for example, snow.snwinst2.rksgen2.devshn.net). You can find this in the Skyhigh CASB user interface at Settings > Service Management. Look at the ServiceNow managed service graphic, as shown:
If you plan to use authentication for ServiceNow API calls to Skyhigh CASB, create proper authentication artifacts for your Skyhigh CASB tenant. Work with Skyhigh CASB Professional Services to create the following artifacts for your Skyhigh CASB tenant:
- CA Certificate (ca.pem)
- Client Certificate (client.pem)
- Client Key (client.key)
- CA Private Key (privkey.pem)
Then bundle the Client Key and Client Certificate into the PKCS 12 format (*.p12 file) to import it to ServiceNow. You can use the following OpenSSL command to do this:
>openssl pkcs12 -export -inkey client.key -in client.pem -out client.p12
Enter Export Password:
Verifying - Enter Export Password:
Make sure to note the password used to create the *.p12 file.
Create ServiceNow Outbound REST Message
For the Skyhigh CASB Active Encryption web service to encrypt data in ServiceNow, you must define the structure of the REST message and parameterize the input. This must be done once for each REST service.
If you are planning to use the unauthenticated API calls (without client certs), you can skip the Steps 2 through 5, and Step 7.
To create an outbound REST message:
- Log in to ServiceNow using Administrator credentials
- Go to System Definition > Certificates and click New to create a certificate.
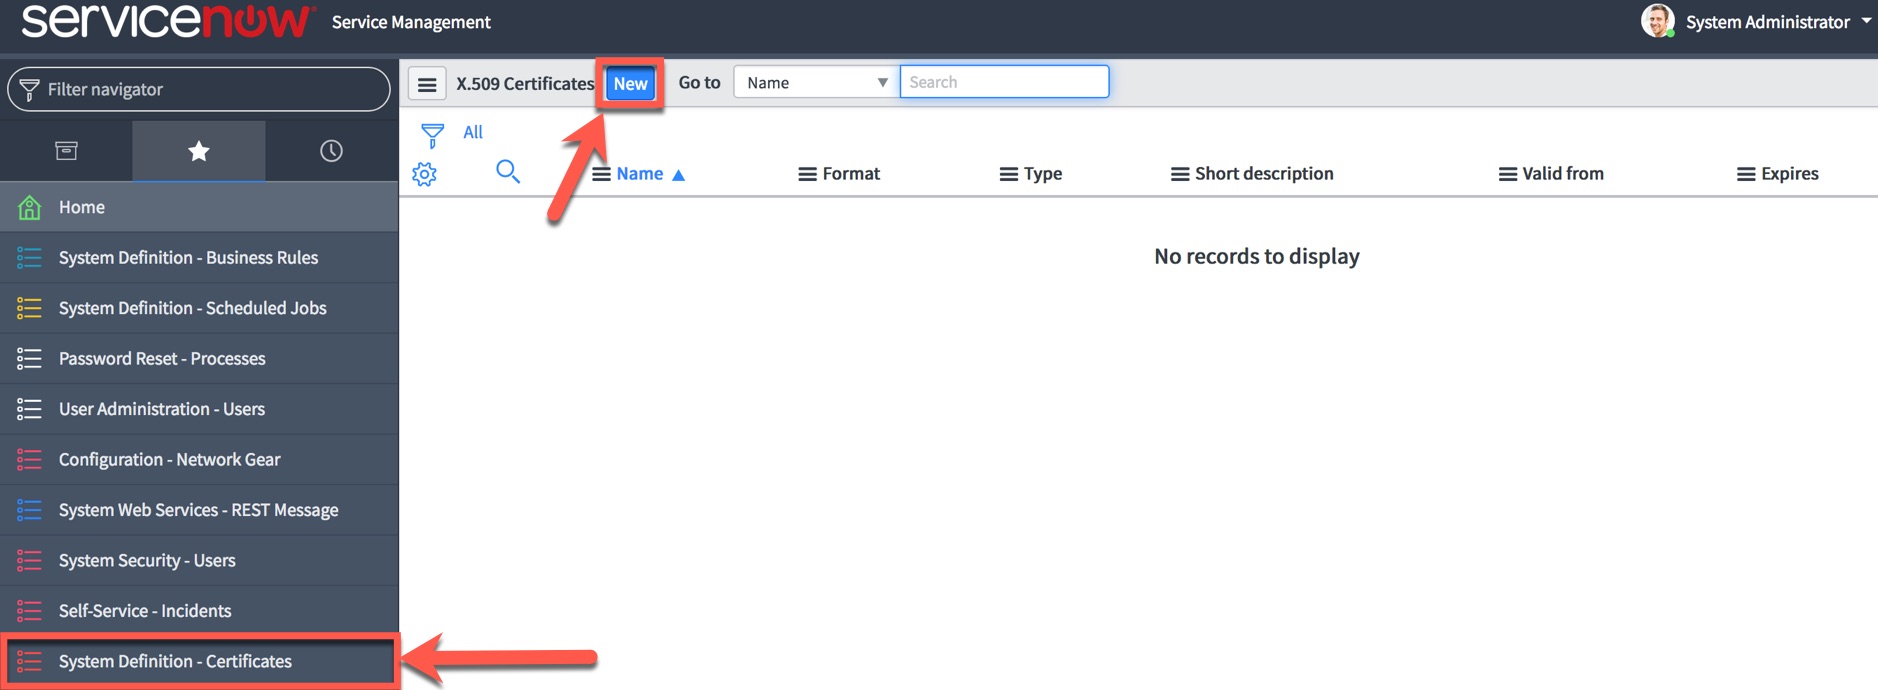
- Create an X.509 Certificate with the following properties, and click Submit:
- Name. An identifiable name for the key store.
- Type. "PKCS12 Key Store" (since we are uploading a *.p12 format certificate).
- Key store password. Enter the export password used to create the *.p12 file (see prerequisites).
- Upload the *.p12 file as an attachment.

- To create a Protocol Profile, go to System Security > Protocol Profiles and click New.

- Create a Protocol Profile with the following properties and click Submit:
- Protocol: Use a sample marker text to indicate the protocol.
- Port: 443
- Keystore: This is the key store you created in Step 3.

- Navigate to System Web Services > Outbound > REST Message. Click New and give the REST Message a Name and Description.
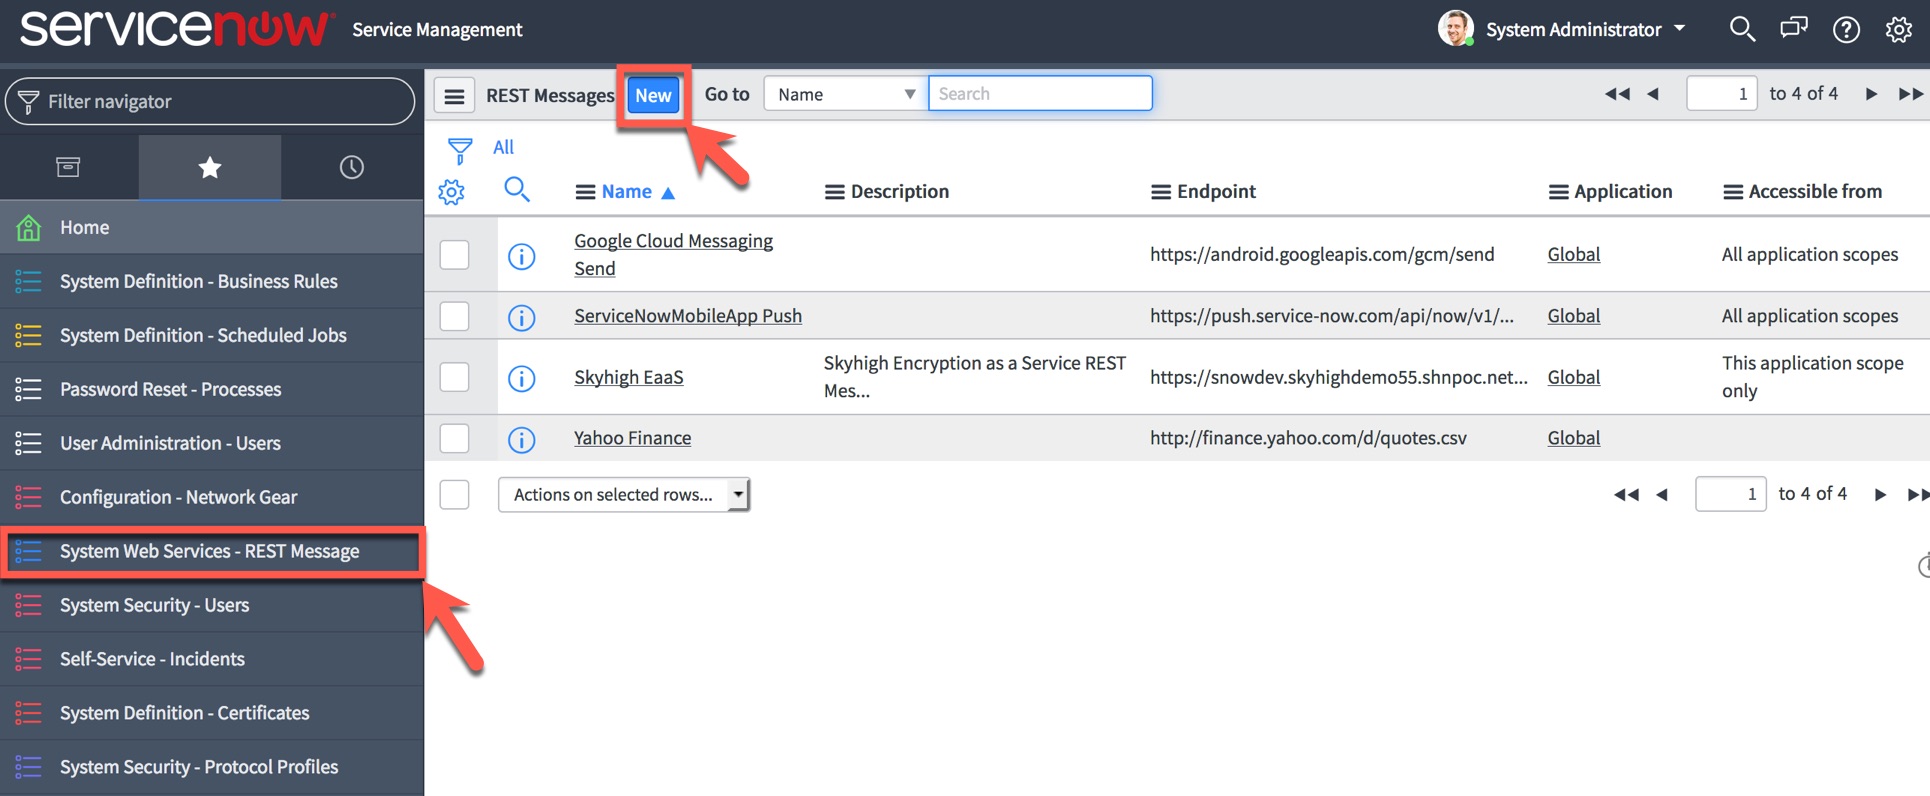
- For Authenticated API calls, click Use Mutual Authentication and select the Mutual authentication profile you created earlier in Step 5 (for example, snowhttps). If you are using unauthenticated API calls, leave this section blank.
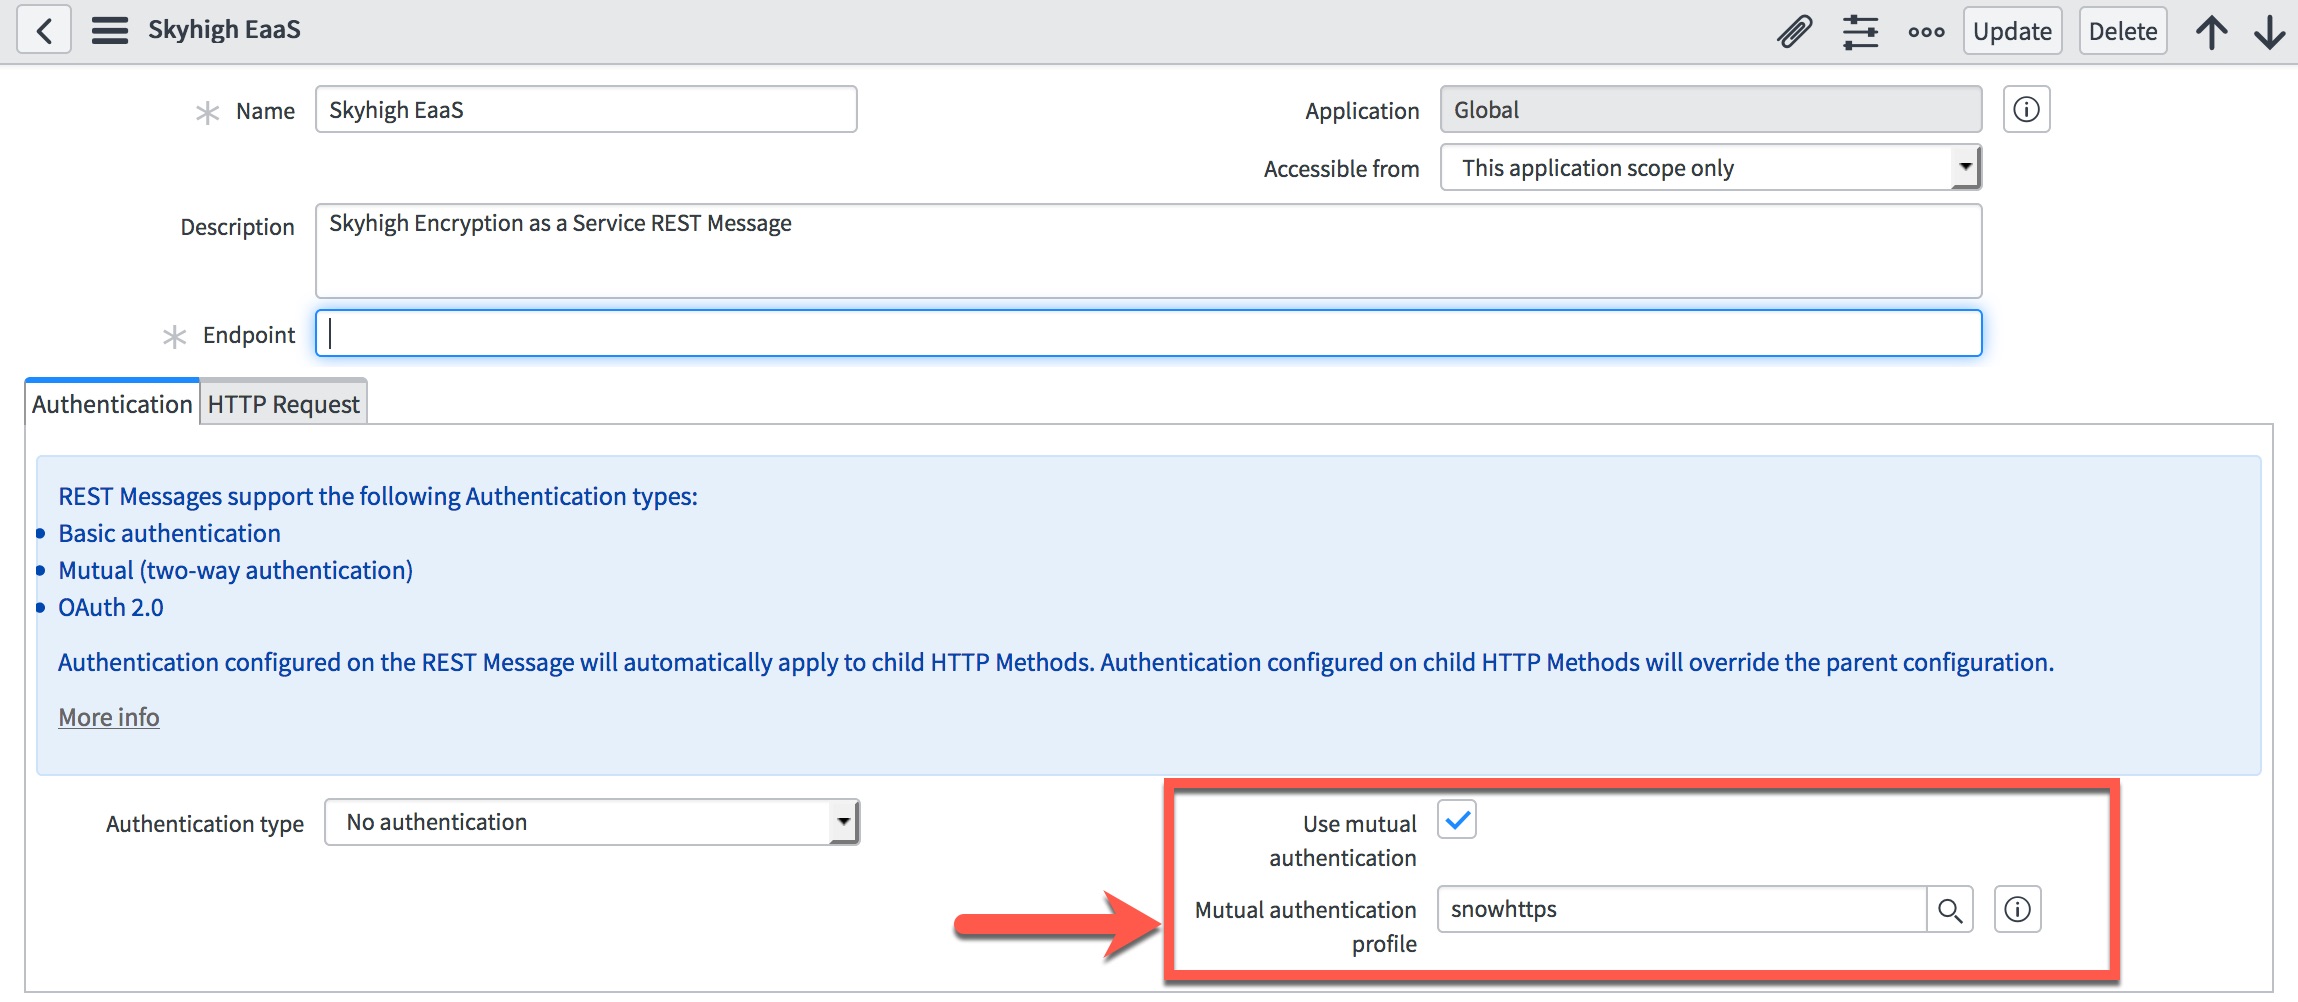
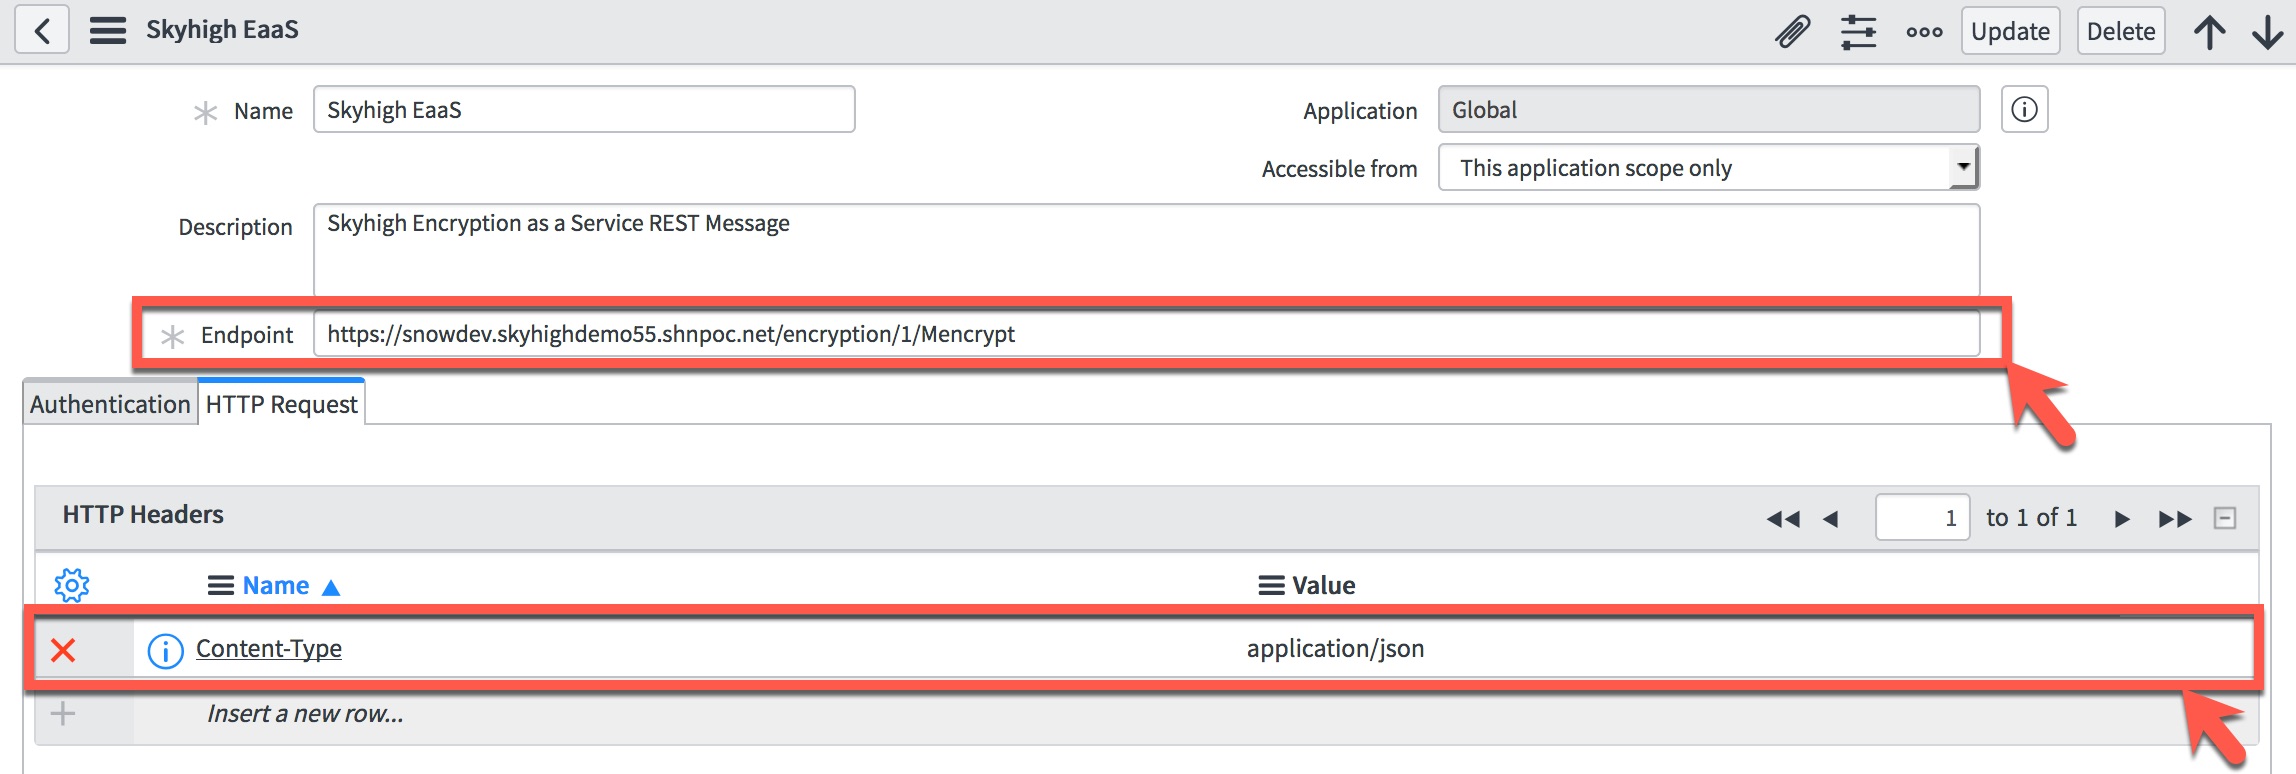
- In the Endpoint field, provide API endpoint URL, which synchronizes with the ServiceNow Protocol Profile. This is where you need to know your Skyhigh CASB domain alias for your ServiceNow instance, such as
snowdev.skyhighdemo55.shnpoc.net
For EaaS v1, the complete URL string for Encryption looks like below:
https://<domain_alias>/encryption/1/Mencrypt
For other EaaS endpoints contact Skyhigh CASB Professional Services or Skyhigh CASB Support and they can suggest the most suitable version of EaaS for your use case.
- Click the HTTP Request tab and insert a new row with the following variables:
- Name:
Content-Type - Value:
application/json
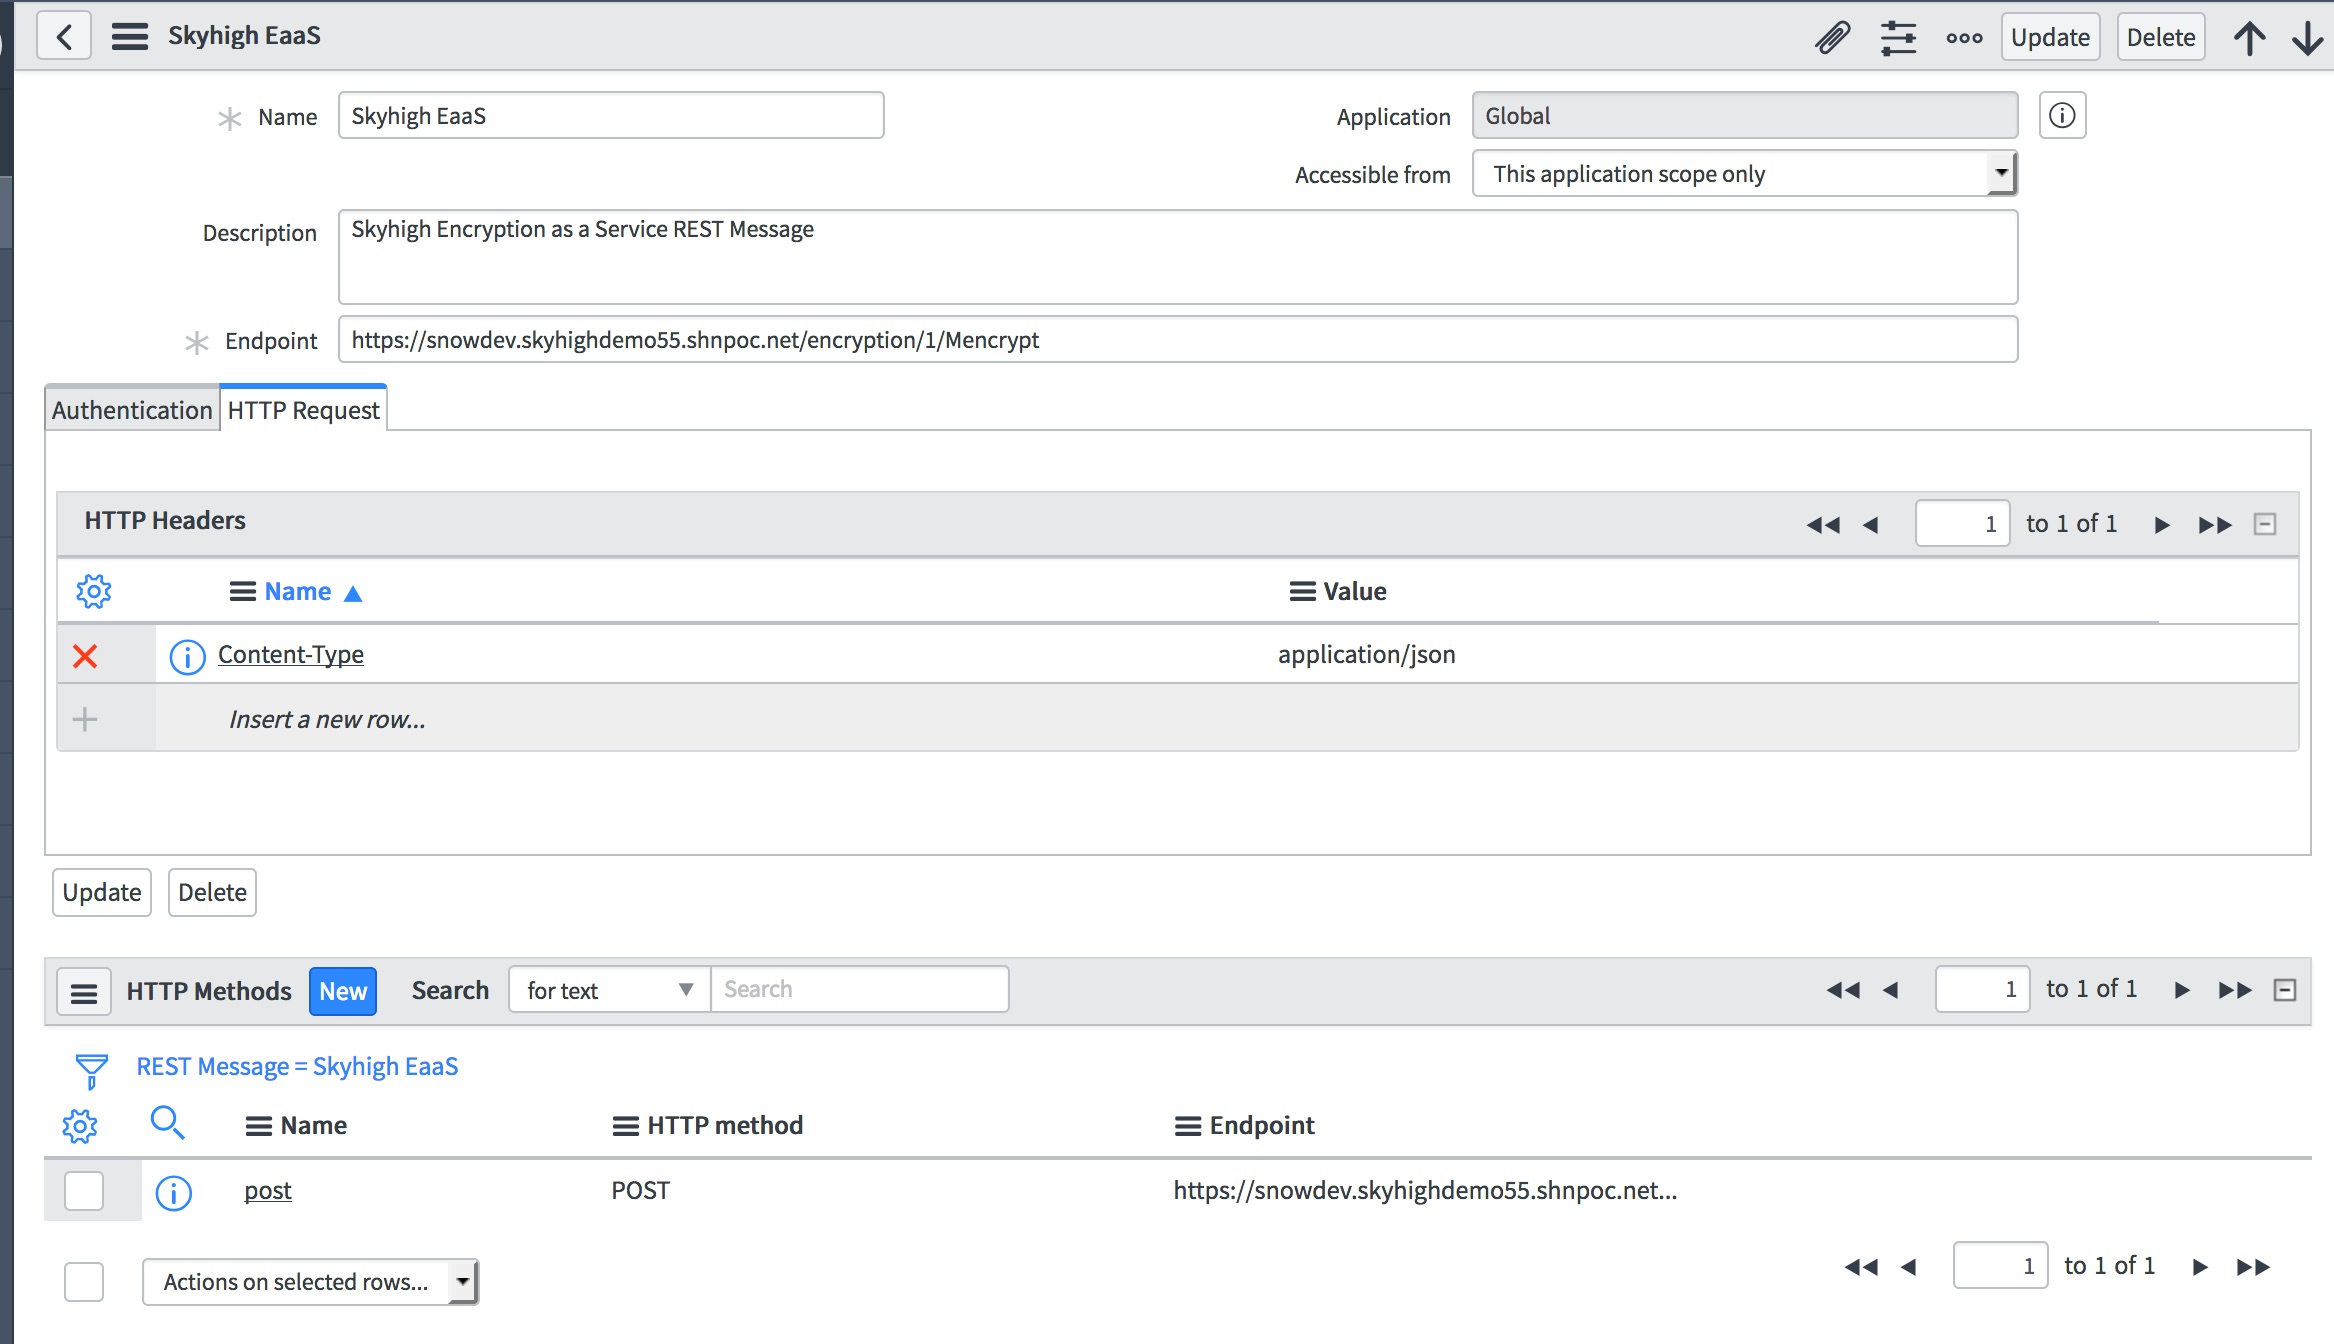
Your REST Message New record window should look like the following screenshot:
- Click Submit to create a system web service.
- Click the name of your newly created Web service (for example, SHN EaaS)
- Delete all HTTP Methods listed.
- Create a POST method for EaaS to work. Click New.

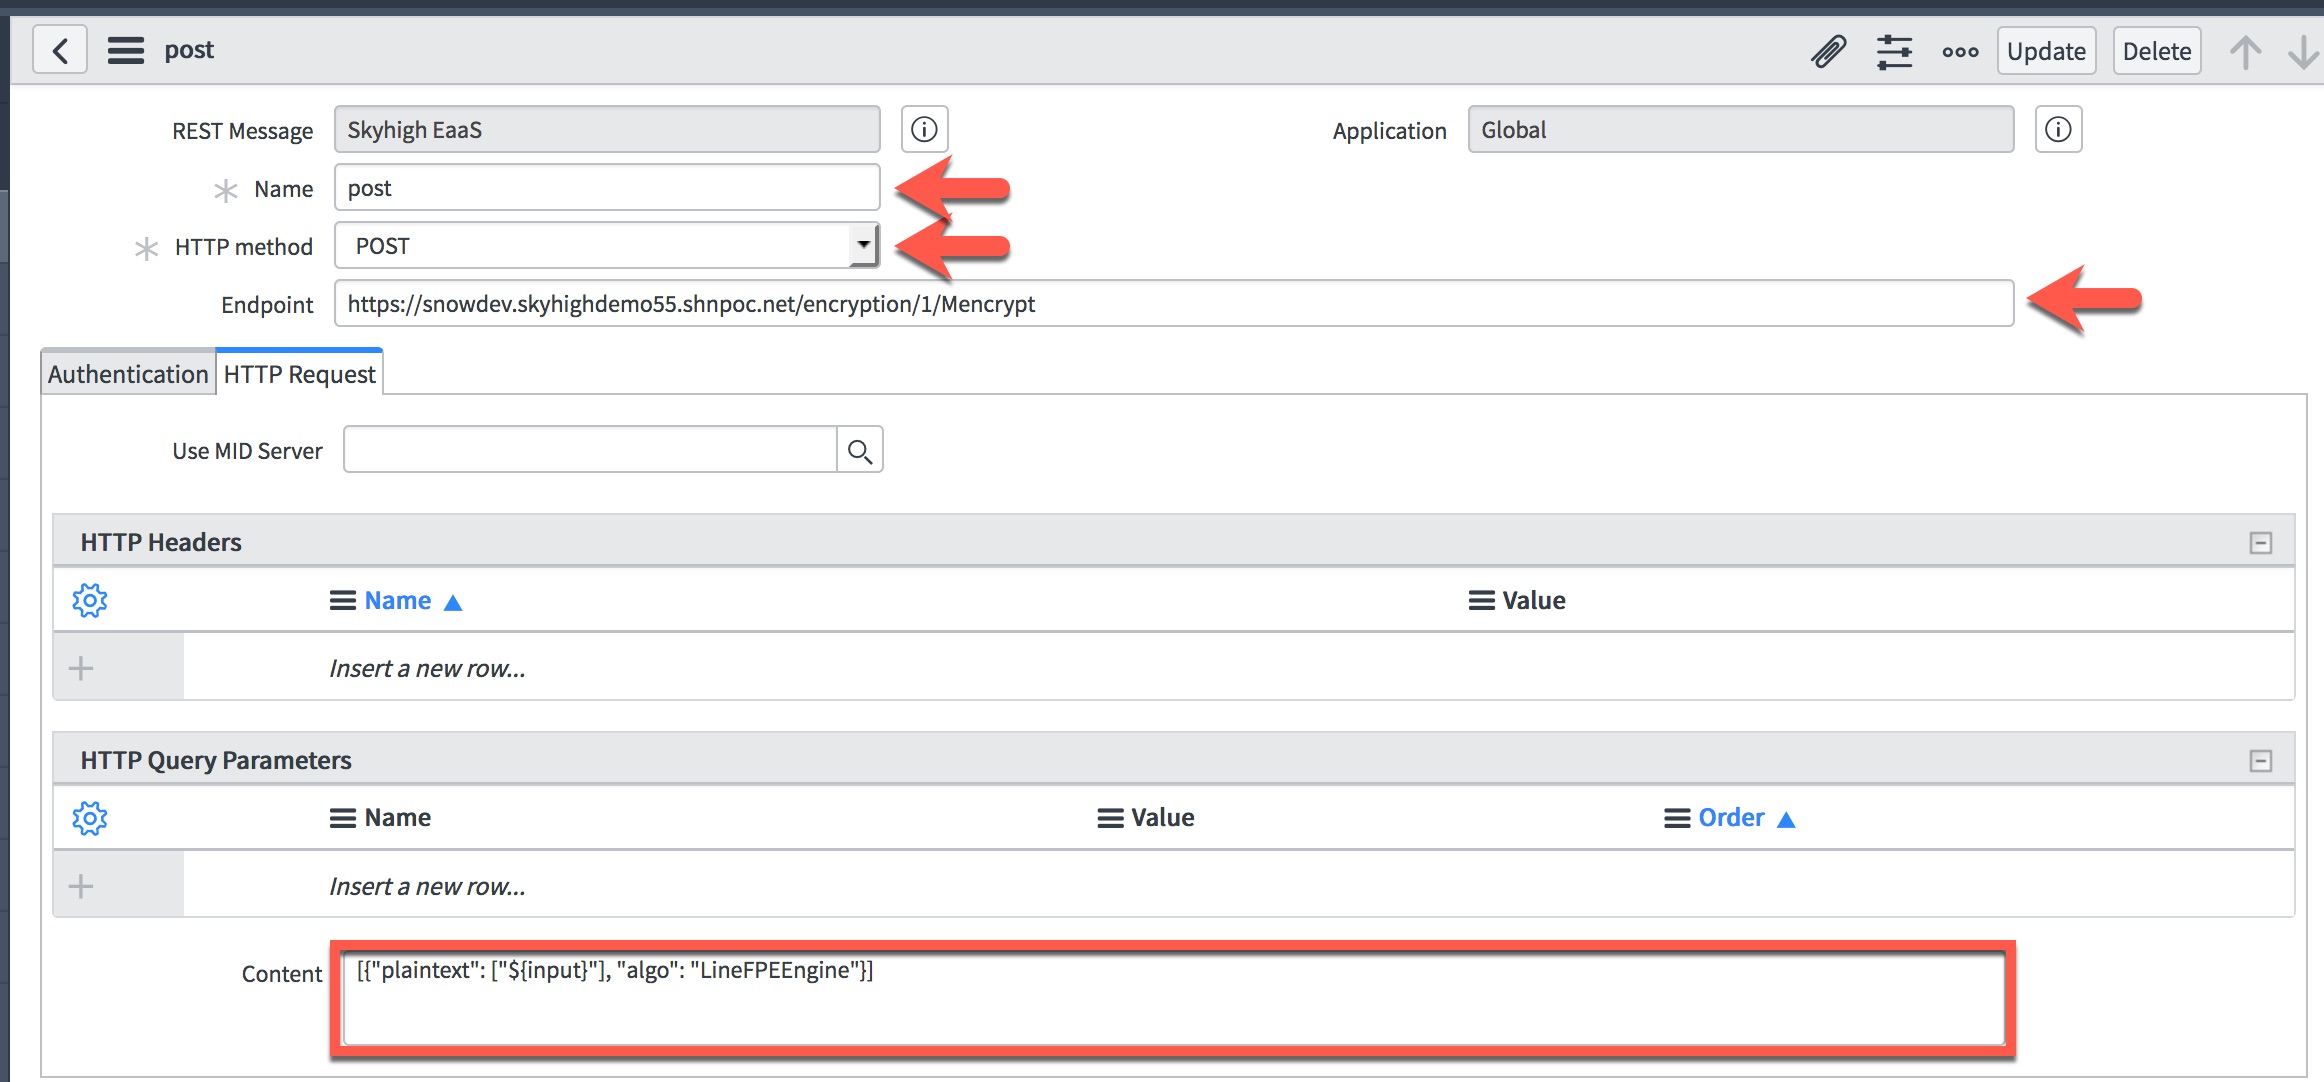
- Fill out HTTP Method New record as follows:
- Name. post
- HTTP method. POST
- Endpoint.
The complete URL string depends on whether you use authenticated or unauthenticated API calls. For an authenticated call, prefix the URL with the name of the protocol created in Step 4. For example:
Authentication Enabled: snowhttps://<domain_alias>/encryption/1/Mencrypt
Unauthenticated Endpoint: https://<domain_alias>/encryption/1/Mencrypt
For HTTP Query Parameters table, insert the following into the Content field:
[{"plaintext": ["${input}"], "algo": "<encryption_algorithm>"}]
For <encryption_algorithm>, specify abbreviated encryption algorithm name as shown in the following table:
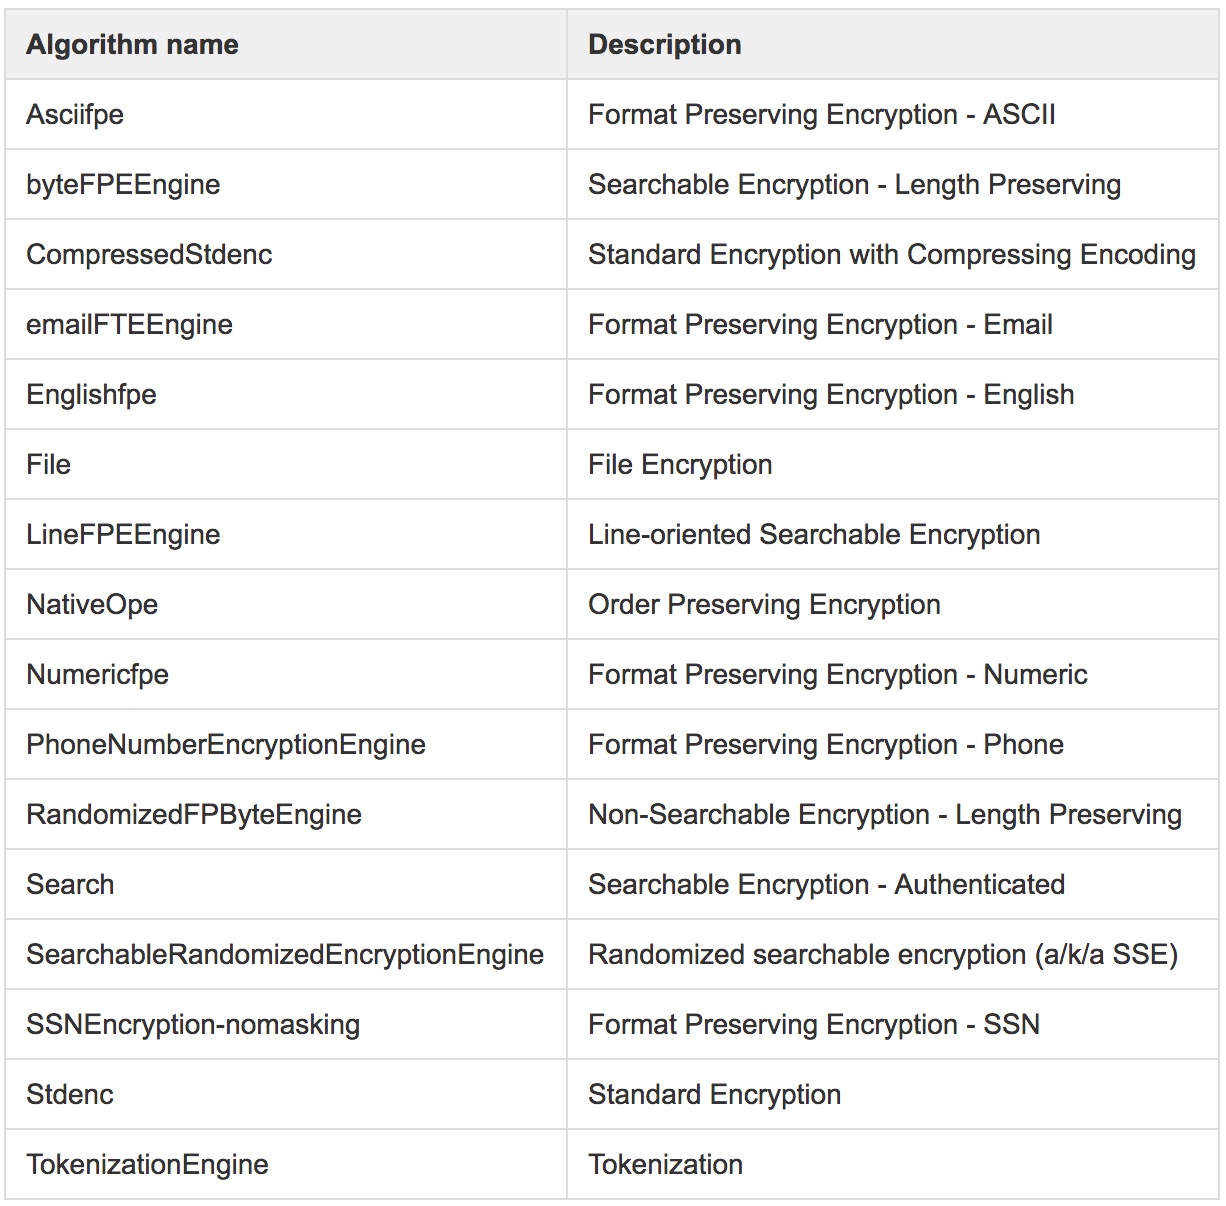
For example, to use Line-oriented Searchable Encryption, the Content field looks like this:
[{"plaintext": ["${input}"], "algo": "LineFPEEngine"}]
Ultimately, your POST method form should look similar to the following screenshot.
- You Completed REST Message form should look similar to the following screenshot.
- Click Update to save the content.
This completes the REST message configuration.
Write the ServiceNow Business Rule
Business rules are written in JavaScript, and you need to write one for each object in ServiceNow. If you need to encrypt multiple fields for the same object, one business rule is sufficient.
To write a business rule:
- Log in to ServiceNow as an Administrator and navigate to System Definition > Business Rules.
- Click New.
- Name your business rule with a unique identifier.
- Select the table to be used. The following example uses the Incidents table and aims to encrypt the Short Description field on Create/Update.
- Check Advanced to enable the script window.
- Under When to Run tab, check Insert and Update

- In the script window under Advanced tab, copy the following script (after required customization):
gs.log("Shn Encrypt Incident Description");
if ( !current.u_system_username.isNil() ) {
gs.log("Before add: " + current.short_description);

       // "பப" is the standard prefix of an encrypted string for most Skyhigh encryption algorithms
       // some format preserving algorithms might have a different pattern
       var encrHeader = "பப";
       if (current.short_description.substring(0, encrHeader.length) != encrHeader ) {

         //Replace the Name of the REST message with that of the Name of the REST message created in ServiceNow.
         var r = new sn_ws.RESTMessageV2("Skyhigh EaaS", "post");
              r.setStringParameter('input', jsonEncode(current.short_description.toString()));
              var response = r.execute();

              gs.log("Rest response = " + response.getBody());
              gs.log("Rest HTTP response code = " + response.getStatusCode());

              var rCode = response.getStatusCode();
      if (rCode == 200) {
                      var parser = new JSONParser();
              var parsed = parser.parse(response.getBody());
                      gs.log("Encrypted Short Description = " + parsed[0].result[0].ciphertext);
                      var modShortDescription = parsed[0].result[0].ciphertext;
                      if ( !modShortDescription.isNil() )
                             current.short_description = modShortDescription;
              }
       } else {
              gs.log("Already encrypted. Don't encrypt it again");
       }
}

function jsonEncode(str) {
  str = new JSON().encode(str);
  return str.substring(1, str.length - 1);
}
Adjust this rule to better match your own needs. For more information about how to write business rules for ServiceNow, see ServiceNow documentation: http://wiki.servicenow.com/index.php?title=Business_Rules#gsc.tab=0
- Save the business rule.
Test
- In Step 8 above, make sure the 'encryption_algorithm' is specified as 'LineFPEEngine'
- Create an Incident with the short description field populated.
- Save it.
- You should see the Short Description text encrypted.
Debugging
- Go to Session Debug and click Debug business rule. This enables the debug for the current login session only.
- We should see the logs (sample below) in the browser (at the bottom of the page).
03:24:17.485: Global ==> 'Incident REST Short Description Encrypt' on incident:INC0010007
03:24:17.493: : Shn Encrypt Incident Description
03:24:17.494: : Before add: This is a Short Description of this incident in Plain text
03:24:17.915: : Rest response = [{"algo" :"LineFPEEngine", "result" : [{"ciphertext":"பபl0哗簑4丌丂/舎2丂一/8亄一/瞽硑C巯丂/嬁贷貙姣蘻巅4上丂/蛞2七一/哗簑4丌一/徐捳菎淖8乭一/宎2丂一/蕂渃C偊丂/垨嵏4一一டட","plaintext":"This is a Short Description of this incident in Plain text"}]}]
03:24:17.926: : Rest HTTP response code = 200
03:24:17.933: : Encrypted Short Description = பபl0哗簑4丌丂/舎2丂一/8亄一/瞽硑C巯丂/嬁贷貙姣蘻巅4上丂/蛞2七一/哗簑4丌一/徐捳菎淖8乭一/宎2丂一/蕂渃C偊丂/垨嵏4一一டட
03:24:17.935: Global <== 'Incident REST Short Description Encrypt' on incident:INC0010007
Encryption As Service API Error Message
When an object fails to decrypt, the following list of error messages is displayed.
- If an input JSON is malformed, then the error message displayed as:
{"error": "Malformed Request - invalid JSON Object" } - If an object failed to decode the input, then the error message displayed as:
{"error": "Char encoding error in request" } - If the ciphertext is missing in JSON Object, then the error message displayed as:
{"error": "No ciphertext in decrypt request" } - When decryption of an Object fails in the MDecrypt call, value of “ciphertext” will have one of the following error message listed below:
For example:[{"algo":"<algo>","result":[
{"plaintext":"",*"ciphertext":"Invalid cipher text"} {"plaintext":"cipher2plaintext","ciphertext":"cipher2"}
,....]},{},{},.....]Error messages are:
"Unsupported Algorithm"
"Invalid ciphertext"
"Mail format incorrect in plain text"
"SSN Format incorrect in plain text"
"Mail format incorrect in plain text"
"Decryption failed"
- For any other unknown issues, the following error message is displayed:
{"error": "handle_cipher_mreq: JSONException: <error_message>" }
