Google Suite - Integrate SSO with PING IDP
This procedure describes how to integrate Single Sign-On (SSO) with PING IDP.
Prerequisites
Make sure you have the following items before integrating SSO with PING IDP:
- Admin access to Google Suite portal (https://gsuite.google.com).
- Admin access to Pingone portal (https://admin.pingone.com).
- Access to Skyhigh CASB tenant and existing Google Drive managed service. (Focusing mainly on G Drive app from G Suite.)
- Access to Ping SSO with G Suite as third-party IDP.
- Download the SP Certificate from Set up single sign-on (SSO) under Security.
- To download the SP Certificate, click DOWNLOAD CERTIFICATE.
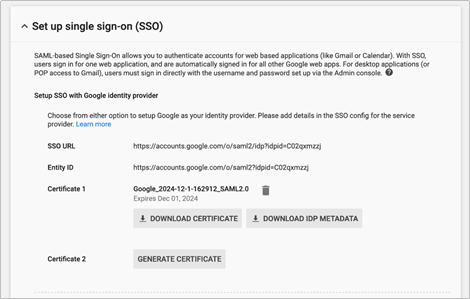
- To download the SP Certificate, click DOWNLOAD CERTIFICATE.
- Download the IDP Certificate from Ping admin under the existing G Suite application.
- To download the IDP Certificate, click Download next to Signing Certificate.
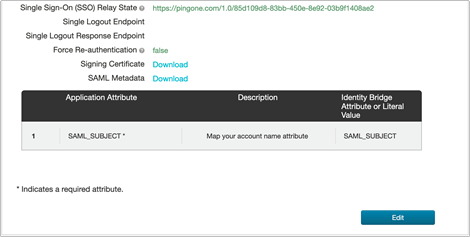
- To download the IDP Certificate, click Download next to Signing Certificate.
Setup the SSO Integration via Proxy
Perform the following activities to achieve the SSO Integration via Proxy:
Step 1: Configure Proxy in Skyhigh CASB
- Login to Skyhigh CASB to configure SAML setup for the existing G Drive managed service.
- To set up SAML, click managed G Drive instance and select Setup > Configure.
- Under Upload Identity Provider Certificate, upload the IDP Certificate and click Next.
- Under Provide Service Provider Certificate, upload the SP Certificate and click Next.
- Download Proxy Certificate and save it in your local folder.
Step 2: Configure SP in G Suite Portal
- Login to the G Suite admin portal to configure SP.
- Choose Security > Set up single sign-on (SSO) to go to the SSO page.
- Scroll to Setup SSO with the third party identity provider and to upload the Proxy Certificate, click Replace certificate.
- Replace the existing IDP Certificate (added as part of the SSO setup) with Proxy Certificate.
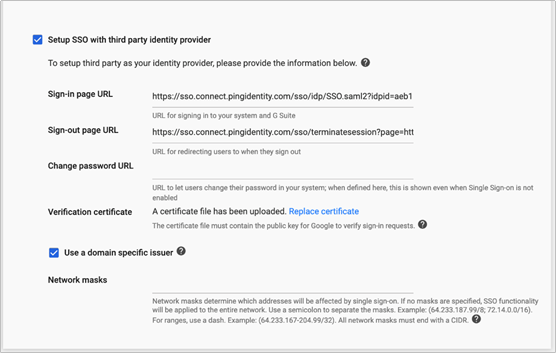
Step 3: Configure IDP in Pingone Portal
- Login to the Pingone admin portal to access the existing G Suite application.
- To update the Connection Configuration, click Edit > Continue to Next Step.
- Under the Connection Configuration, change the ACS URL as listed:
- Existing ACS URL: https://www.google.com/a/awesomeworks.in/acs, (Here awesomeworks.in is the custom domain associated to G Suite.)
- Replace the existing ACS URL with the proxy vanity domain URL: https://www.google.com.googledrive.gping.proxyqa.myshn.net/a/awesomeworks.in/acs&shnsam. Refer to the following image:
- Click Continue to Next Step until the changes are saved.
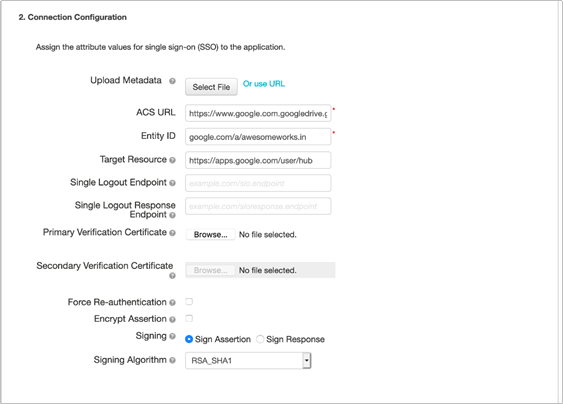
Step 4: Validate the SSO Integration with Proxy
The SSO Integration with Proxy is completed. To verify the result of the SSO integration, perform the following activities:
- Go to https://gsuite.google.com and log in using your custom domain. Select the target app as Drive.
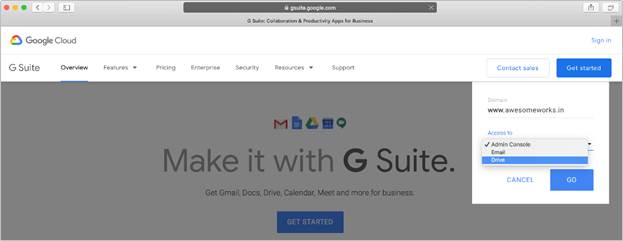
- Click GO. You are navigated to the Ping Sign-On page. Provide your valid IDP credentials to get authenticated.
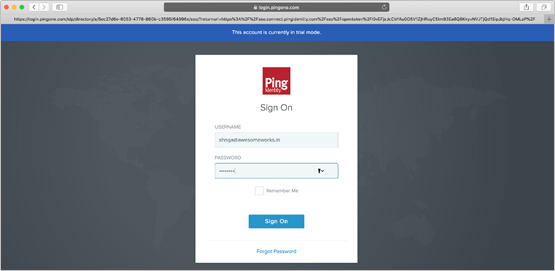
- Click Sign On. You are redirected successfully to the G Drive application. Check the address bar to confirm the access is via proxy.
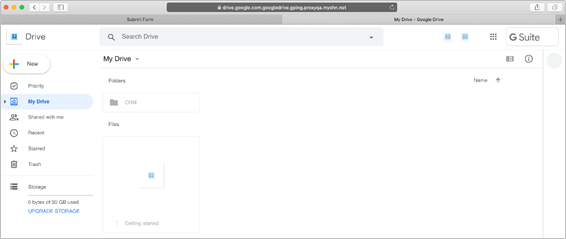
The address bar concludes that the SSO configuration via proxy is successful for Google Drive with Ping IDP.
NOTE: The configuration changes may take some time to reflect. So wait for 10 to 15 minutes before testing the proxy integration.
