Configure an IPsec Tunnel on Secure Web Gateway
To configure an IPsec tunnel that routes web traffic from a location in your network to Secure Web Gateway, you provide your identity settings and specify a subnet with the internal IP addresses of your network. Web traffic originating from this subnet is then routed through the IPsec tunnel and protected.
You can configure more than one subnet and also any subnet of your network to be protected in this way.
A network component in the location that you configure here, for example, a router, a VPN client, or an SD-WAN service, initiates the routing of web traffic through the tunnel. For this reason, it is referred to as the initiator.
Before you complete the steps described below, review Before Configuring an IPsec Tunnel.
For more information, see also Locations and Configuring IP Addresses Using CIDR Notation.
- On the user interface for Secure Web Gateway, place your mouse pointer over the settings icon in the top right corner, then navigate to Infrastructure > Web Gateway Setup on the menus that appear.
-
On the setup main page, scroll down to Configure Locations and click New Location.
-
On the Configure Location page, enter a name for the location in the Name field, for example, London.

-
If you want to add SAML authentication as method for authenticating users who send requests for web access, select a configuration from the list provided under Select SAML Configuration. Users are then authenticated according to the settings of this configuration.
If you have configured SAML authentication as part of your web policy, select None here. Otherwise, SAML authentication will not use the settings you have configured for your web policy, but the settings of the configuration that you have selected here.
To use advanced settings for SAML authentication, you need to configure them under your web policy. -
If you want to store log data about web traffic in a particular region, select this region from the list provided under Log Data Residency.
-
As mapping type for this location, select IPsec Mapping.

-
Provide your identity settings.
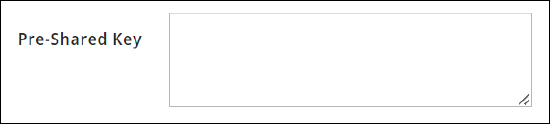
b. Share an authentication key.
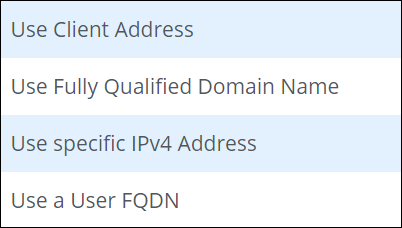
a. Select one of the options below from the Client ID Type drop-down list and specify a client address or both a
client ID and address for an option, as explained in the following.
When an IPsec tunnel is built, the initiator in your location sends a message with a client ID that it proposes to
the IPsec server on Secure Web Gateway. The connection through the tunnel is only set up if the client ID sent
by the initiator matches the client ID that you configure here.
In the Pre-shared Key field, enter a value for a key that you provide as secret for use in the authentication
process.
The key that you configure here must be the same as the one that is configured for the initiator.
The IPsec server on Secure Web Gateway uses this key to authenticate users who have their web traffic routed
through the IPsec tunnel.
-
Use Client Address — If the initiator in your location is not placed behind an Network Address Translation (NAT) service, but directly accesses the Internet, this option is appropriate. The client address then serves as client ID.
In the Client Address field, type an IP address or domain name, for example, 127.0.0.1 or london.acme.com. -
Use Fully Qualified Domain Name — If the initiator in your location is placed behind an Network Address Translation (NAT) service and sends a Fully Qualified Domain Name (FQDN) as its Client ID, this option is appropriate.
In the Client ID field, type an FQDN, for example, london.acme.com, and in the Client Address field, type an IP address or domain name, for example, 127.0.0.1 or london.acme.com. -
Use Specific IPv4 Address — If the initiator in your location is placed behind an Network Address Translation (NAT) service and sends its internal IP address in IPv4 format as Client ID, this option is appropriate.
In the Client ID field, type an IPv4 address, for example, 127.0.0.1, and in the Client Address field, type an IP address or domain name, for example, 127.0.0.1 or london.acme.com. -
Use a User FQDN — If the initiator in your location is placed behind an Network Address Translation (NAT) service and sends a Fully Qualified Domain Name (FQDN) that is user-specific as its Client ID, this option is appropriate.
In the Client ID field, type a user-specific FQDN, for example, in email format, username@london.acme.com, and in the Client Address field, type an IP address or domain name, for example, 127.0.0.1 or london.acme.com.
-
-
Specify a subnet with the internal IP addresses of your network. Enter it in the input field under Subnet using the IPv4 address format and CIDR notation to specify it, for example, 192.168.0.0/16.
This subnet is located before the tunnel. Web traffic originating from it is protected by being routed through this tunnel.
You can also add a plain-text comment on this subnet. Use the + icon to add more subnets.

If you want to have web traffic originating from any subnet of your network routed through the tunnel and protected this way, select Any subnet.
You can only use this feature if you are connecting to a Point of Presence (PoP) for Secure Web Gateway in one of the following locations: Los Angeles, New York, Miami*, Frankfurt*, Singapore*, Tokyo, Sydney.
In the locations marked by an asterisk, you can connect to more than only one PoP. If you want to use the feature in one of these locations, contact Skyhigh Security support.
9. Click Save.
You have now configured an IPsec tunnel to route web traffic from a location in your network to Secure Web Gateway, which uses the internal IP addresses that you have specified to build the tunnel.
Secure Web Gateway also uses your identity settings to identify you and the key that you have shared for authenticating users when their web traffic is routed through it.
You can configure an IPsec tunnel for more than one location in your network. For example, if your organization has offices in London and New York, you can configure a tunnel for each of these locations.