Shadow/Web DLP Incidents
Skyhigh CASB provides a unified Policy Incidents view to discover, manage, and remediate all policy incidents in one place.
Shadow/Web DLP Incidents Behaviour
- In the Sanctioned/Shadow DLP policies, if multiple policies are matched, multiple incidents are generated on the Policy Incidents page.
- In the Web DLP Policies, if multiple policies are matched, only one incident is generated on the Policy Incidents page. This incident provides the details of all the matched policies, and no additional incidents are created.
For full details on Policy Incidents Table View and Chart View, see Policy Incidents Page.
View Shadow/Web DLP Incidents
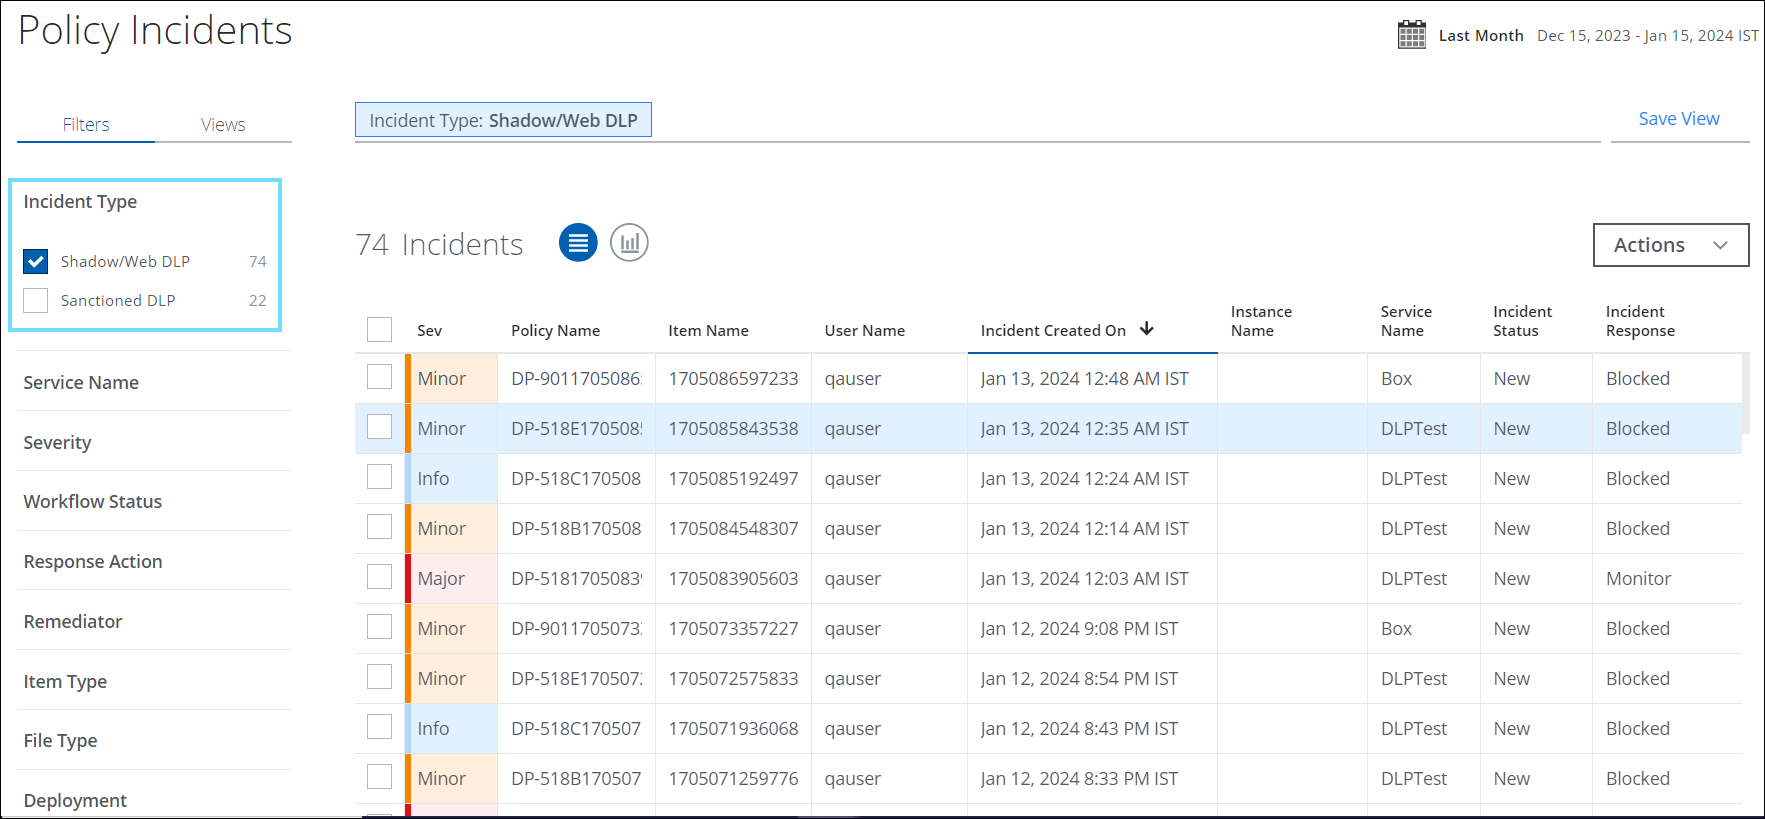
To view incidents discovered by your Shadow/Web DLP Policies:
- Go to Incidents > Policy Incidents page.
- In the Filters tab, select Incident Type > Shadow/Web DLP.

The Policy Incidents page provides the following information and actions:
- Search. Search via the Omnibar. You can search for multiple incident IDs by entering a comma-separated query in Omnibar.
- Filters. Select options on the Filters tab to scope down your search.
- Views. Select the Views tab to use Saved Views created by you or shared with you by another user to reuse specified search parameters from a previous search on current data.
- Date Picker. Use the Date Picker to select a preset or custom date range in order to display data from only this date range.
NOTE: The data is retained for 100 days and displayed accordingly, but the date picker allows you to select only a 30-day range. You can change the range to view data for another 30-day period or any custom range (within 30 days).
- Save View. Click to create a Saved View from your search query.
- Actions. Click Actions to:
- Change Owner
- Change Status
- Delete Incidents. Select the checkbox(es) for incidents you want to delete. Then click Delete in the confirmation dialog. This action cannot be undone. Large requests may take a few moments to process.
- Download CSV. Click to export violations as a CSV file. The download begins immediately.
NOTE: The columns in the CSV file reflect the columns in the table as displayed, but additional columns are included at the end by default. If the default columns match those displayed, those columns precede in the CSV file, followed by the remaining default columns.
- Select Response
- Create Report
- Business Report (PDF). Create a PDF report and run it immediately, which then appears in the Report Manager.
- CSV. Create a CSV report and run it immediately, which then appears in the Report Manager.
- XLS. Create an XLS report and run it immediately, which then appears in the Report Manager.
- Schedule. Schedule a report to run at a later time, which then appears in the Report Manager.
- Settings
- Edit Table Columns. You can edit table columns and save your changes as a Saved View.
Download Evidence Files for Shadow/Web DLP Incidents
You can download evidence files for Shadow/Web DLP incidents, with a maximum limit of 150 MB. This enables you to analyze potential data breaches, validate policy violations, and gain additional insights to remediate security incidents effectively. For details on the contents of evidence files, see Shadow/Web DLP Evidence Contents.
IMPORTANT: Users with an Incident Management role and the Download Evidence permission can download evidence files for Shadow/Web DLP incidents.
To download evidence files for Shadow/Web DLP incidents:
- Go to Incidents > Policy Incidents.
- On the Policy Incidents page, select the Incident Type as Shadow/Web DLP.
- Click any incident on the table to see the Cloud Card for that incident.
- On the Shadow/Web DLP Incident Cloud Card, under Evidence and Content match, click the link next to the Item name. For details, see Shadow/Web DLP Incident Cloud Card.
Display and Filter for Classifications on Shadow/Web DLP Incidents
The Classification filter displays a list of various classification names along with the number of incidents linked to each classification. You can select different classifications to filter the Shadow/Web DLP incidents accordingly. This capability allows for the quick identification of classifications that have the highest incident counts. It offers valuable insights into the data that is causing the most classifications, helping the administrator in identifying potential risk areas within the organization.
You can also filter the classification for the Sanctioned DLP incidents. For details, see Sanctioned DLP Incidents.
To filter Classification data for Shadow/Web DLP Incidents:
- On the Policy Incidents page, select the Incident Type filter as Shadow/Web DLP.
- Select the Classification filter and choose the required classification from the list to view the associated incidents.

- Click any Shadow/Web DLP incident on the Incidents table to see the Cloud Card for that incident.
- On the Shadow/Web DLP Incident Cloud Card, review the classification details and update the necessary remediation action for your incident. For details, see Shadow/Web DLP Incident Cloud Card.
View Classification Insights on the Dashboard Card for Shadow/Web DLP Incidents
You can create dashboard cards for Classifications directly from the Policy Incidents page by filtering for the specific classification you want to display on the Dashboards page. These cards provide a high-level overview of classification insights and trends, allowing you to visualize data more effectively and make informed decisions.
There are two ways to add a Dashboard Card:
- When creating a Saved View on the Policy Incidents page, select the Add Dashboard Card checkbox and add the Classification attribute. To add a Dashboard Card from Saved View, see Create a Saved View.
- On your Dashboard, click + Add New Card, then select the Card Type as Incidents to locate the Classification. To add a new card from the Dashboard, see Add a New Card.

Filter for ML-driven Potential False Positive Shadow/Web DLP Incidents
You can search for Shadow/Web DLP incidents that are potential false positives easily and quickly on the Policy Incidents page. This enables you to identify and review incidents that may not be actual policy violations, allowing you to take necessary actions such as marking them as false positives or tuning your policy configurations to reduce false positives in the future. To filter potential false positives for Sanctioned DLP incidents, see Sanctioned DLP incidents.
NOTE: To view the count of ML-driven potential false positives on the Policy Incidents page, you must toggle Enable Potential False Positives to On on the Incident Management page. A count of 0 indicates that the toggle is currently off, which is common for new users. Existing users who have disabled the toggle can still see past counts of potential false positives from the last 30 days. However, new counts will only appear once the toggle is re-enabled.
To filter for ML-driven Potential False Positives for Shadow/Web DLP Incidents:
- On the Policy Incidents page, select the Incident Type filter as Shadow/Web DLP and the Machine Learning Status filter as Potential False Positive.
- You can view all the DLP incidents that are classified as potential false positives in the Incidents table. For details on potential false positives, see About ML-driven Potential False Positives.

- Click any Shadow/Web DLP incident on the Incidents table to see the Cloud Card for that incident.
- On the Shadow/Web DLP Incident Cloud Card, review the incident details and update the incident status as required. For example, select the Incident Status as False positive. For details, see Shadow/Web DLP Incidents cloud card.
View Expected Response Action for Shadow/Web DLP Incidents
The Policy Incidents page displays the Expected Response for Shadow/Web DLP Incidents. This Expected Response action is configured during DLP policy creation and defines the intended action when a policy violation occurs. This helps SOC administrators identify potential discrepancies between the Expected Response and the actual Incident Response taken during policy evaluation, which is vital for troubleshooting and refining security policies for robust data protection and operational efficiency.
For example, consider a Web DLP policy configured to "monitor" data transfers (logging activity without blocking). Despite this, the transfer might still be blocked. This can occur if other, stricter web policy rules (e.g., related to content or destination reputation) override the DLP policy during evaluation. Consequently, a "monitor" action in Web DLP could lead to a "blocked" outcome. This highlights the intricate interplay of various security policies and their evaluation order. Understanding these discrepancies is vital for effective troubleshooting and refining security policies.
Accessing Expected Response: To access the Expected Response action, go to Incidents > Policy Incidents > Actions > Edit Table Column > Add Expected Response column.
How do you use this capability?
- Search for Expected Response. You can use the Omnibar on the Policy Incidents page to search for a specific Expected Response action. This capability enables quick access to Shadow/Web DLP incidents associated with specific policies.
- View Expected Response in the Incident Table. The Expected Response column in the incident table is not visible by default. You need to add the Expected Response column to the incident table. For information on adding the required column to the incident table, see Edit Table Column.

- View Expected Response on Policy Incident Cloud Card. Click any Web DLP incident on the Incidents table to see the Expected Response action for that incident. This helps to review the Expected Response defined in the DLP policy against the actual Incident Response triggered after the incident is generated. For details, see Shadow/Web DLP Policy Incident Cloud Card.