Create Custom Advanced Patterns using Skyhigh Built-In Advanced Patterns
Create a custom advanced pattern using Skyhigh Built-in advanced pattern to meet your data protection needs. For example, if you need to protect sensitive personal information using the Skyhigh Social Security Number advanced pattern as your basis, but you want to apply validation algorithms to regular expressions based on your organizational needs.
To create Custom Advanced Patterns using Skyhigh Security Built-in Advanced Patterns:
- Go to Policy > DLP Policies > Classifications.
- Click Create Classification.
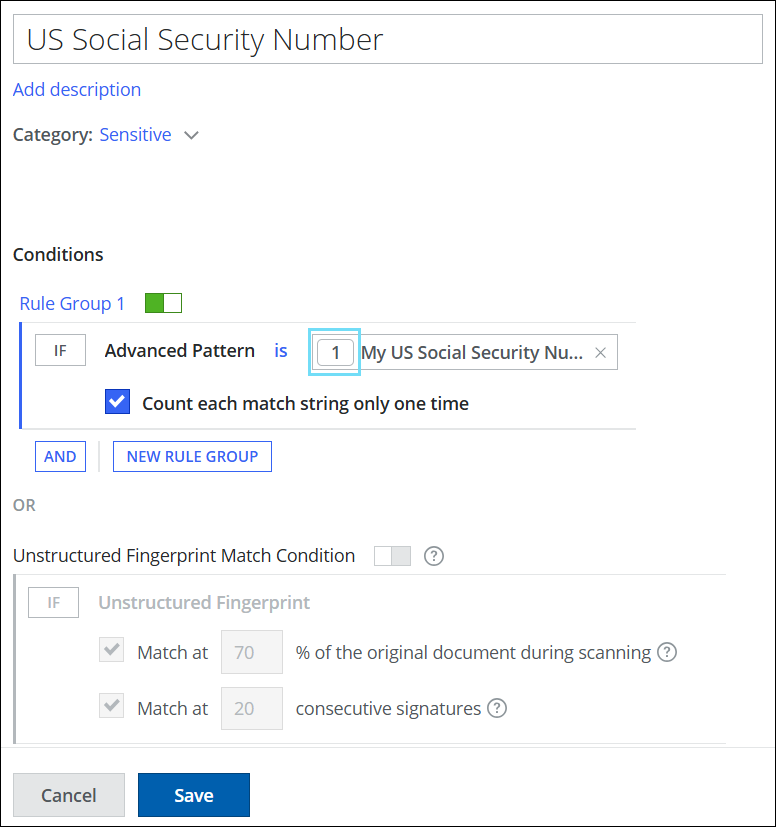
- Classification Name. Enter a name for this classification. For example, US Social Security Number. Enter an optional description to describe its use or purpose.
- Category. Select a Category from the list. For example, Sensitive.
- Conditions. Click Select Criteria and choose Advanced Pattern.
The Select Advanced Patterns cloud card displays. - Condition Operators. Select an operator for your condition based on your use case. For example, select is for Advanced Pattern. To understand the functionality of each Condition operator, see Condition Operators for DLP Classification.
- Count each match string only one time. When you select this checkbox, a string that matches the advanced pattern in the advanced pattern rule will not be counted again. To learn more about the use case, see Count each match string only one time feature.
- Count each match string only one time. When you select this checkbox, a string that matches the advanced pattern in the advanced pattern rule will not be counted again. To learn more about the use case, see Count each match string only one time feature.
NOTE: If you enable the Count each match string only one time checkbox, the unique match criteria apply to each advanced pattern in the classification. For example, if your classification has two advanced patterns with the same regular expression, then the classification will trigger two separate matches for the same regular expression.
- On the Select Advanced Patterns Cloud Card, click
 corresponding to the Skyhigh Security Built-in Advanced Patterns from the list. For example, US Social Security Number.

You can now view the Regular Expressions for the selected Advanced Patterns displayed on the second side panel.
- Click Usage to see if the selected Advanced Pattern is being used in other classifications.
- Click the three-dots menu (
 ) and click Clone.

A new custom advanced pattern is created, named US Social Security Number (Copy). You can rename the custom advanced pattern to suit your use case.

- Click Save.
The Skyhigh Built-In clone is now added to the Advanced Patterns and Classifications list. - On the Select Advanced Patterns cloud card, select the newly created custom advanced pattern from the list.
- Click to view the Regular Expressions for the selected Advanced Patterns displayed on the second side panel.

- Click No Validation corresponding to the regular expression to open the Select Validation Algorithm cloud card.

- Select the appropriate Validation Algorithm from the list and click Done. For example, US Social Security Randomization Number (Skyhigh).

- Add a Score to weigh the new regex Advanced Pattern. Scores can be either negative or positive, ranging from -99 to 999. The higher the number, the greater the weight given to the keyword, which will exceed the threshold and trigger an incident.
- To reduce false positives, add expressions in the Exceptions tab to exclude specific keywords or regular expressions from being processed as matches in DLP classifications. You can also import exceptions in bulk from a CSV file. For details, see Create Advanced Pattern Exception using Import CSV.
- Click Save.
- (Optional) You can edit the threshold by clicking [1]. Enter a number to indicate the weight of the Advanced Pattern in threshold matching.
- Add more classification conditions as needed and click Save.
Your custom classification with Skyhigh built-in advanced patterns and validation is saved to the selected category in the Classifications list. Add the classification to your DLP policies as needed.
NOTE: You can view events for new, updated, and deleted advanced patterns in the Audit Log. For details, see View DLP Classification Events in the Audit Log.