Create Advanced Patterns
Advanced patterns are regular expressions or phrases used to match data, such as dates or credit card numbers. You can either select Skyhigh Security built-in advanced pattern or customize your own:
- Create Skyhigh Security Built-in Advanced Patterns
- Create Custom Advanced Patterns using Skyhigh Built-In Advanced Patterns
- Create Custom Advanced Patterns
Additionally, you can also set a score for the threshold in your classification to minimize the occurrence of false positives.
Create Skyhigh Security Built-in Advanced Patterns
NOTE: Skyhigh Security built-in advanced patterns cannot be edited.
To create Skyhigh Security Built-in Advanced Patterns:
- Go to Policy > DLP Policies > Classifications.
- Click Actions > Create Classification.
- Classification Name. Enter a name for this classification. For example, New Advanced Pattern. Enter an optional description to describe its use or purpose.
- Category. Select a Category from the list. For example, Sensitive.
- Conditions. Click Select Criteria and choose Advanced Pattern. The Select Advanced Patterns cloud card displays.
- Condition Operators. Select an operator for your condition based on your use case. For example, select is one of for Advanced Pattern. To understand the functionality of each Condition operator, see Condition Operators for DLP Classification.
- Count each match string only one time. When you select this checkbox, a string that matches the advanced pattern in the advanced pattern rule will not be counted again.
NOTE: If you enable the Count each match string only one time checkbox, the unique match criteria apply to each advanced pattern in the classification. For example, if your classification has two advanced patterns with the same regular expression, then the classification will trigger two separate matches for the same regular expression.
- On the Select Advanced Patterns Cloud Card, select the required Skyhigh Security-Built-in Advanced Patterns from the list.

NOTE: You can select any number of Skyhigh Built-In advanced patterns from the Select Advanced Patterns cloud card, but only the first 10 Built-In advanced patterns are displayed on the Classification editor.
- Click i to view the Regular Expressions for the selected Advanced Patterns displayed on the second side panel. You can also click Usage to see if the selected Advanced Pattern is being used in other classifications.
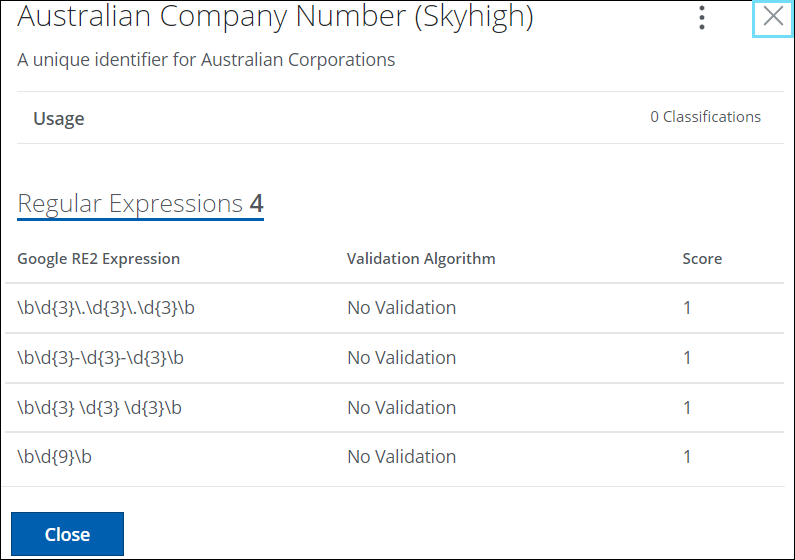
- To close the side panel, click X.
- Click Done.
- The new Advanced Pattern is now added to the Classification editor. Optionally, you can edit the threshold by clicking [1]. Enter a number to indicate the weight of the Advanced Pattern in threshold matching.

- Add more classification conditions as needed and click Save.
Your new classification with Skyhigh-built advanced patterns is saved to the selected category in the Classifications list. Add the classification to your data protection policies as needed.
NOTE: You can view events for new, updated, and deleted advanced patterns in the Audit Log. For details, see View DLP Classification Events in the Audit Log.
Create Custom Advanced Patterns
You can define custom advanced patterns to identify your sensitive data. Advanced patterns use regular expressions (regex) that allow pattern matching to identify sensitive data such as social security numbers or credit card numbers.
You can create Custom Advanced Patterns using these two options:
- Add Regex. Use this option to manually add regex and use the validation algorithm to validate the regex. To reduce false positives, add Ignored Expressions to exclude specific keywords or regular expressions from being processed as matches in DLP classifications.
- AI RegEx Generator. Use this option to efficiently generate expressions for the scenarios where you are unfamiliar with the details of regexes. AI RegEx Generator seamlessly constructs and comprehends complex Google RE2-compliant regular expressions through a conversation-based interface. It is specialized in addressing queries solely related to regular expressions and ignores irrelevant queries.
Skyhigh Built-in Advanced Pattern Use Cases
Set the Threshold for the number of Regular Expression Matches in Skyhigh's Built-In Advanced Pattern List
- Create a classification using Skyhigh's Built-In advanced patterns. Perform the initial steps of creating your advanced pattern classification as provided in steps 1 to 10 in the Create Skyhigh Security Built-in Advanced Patterns section.
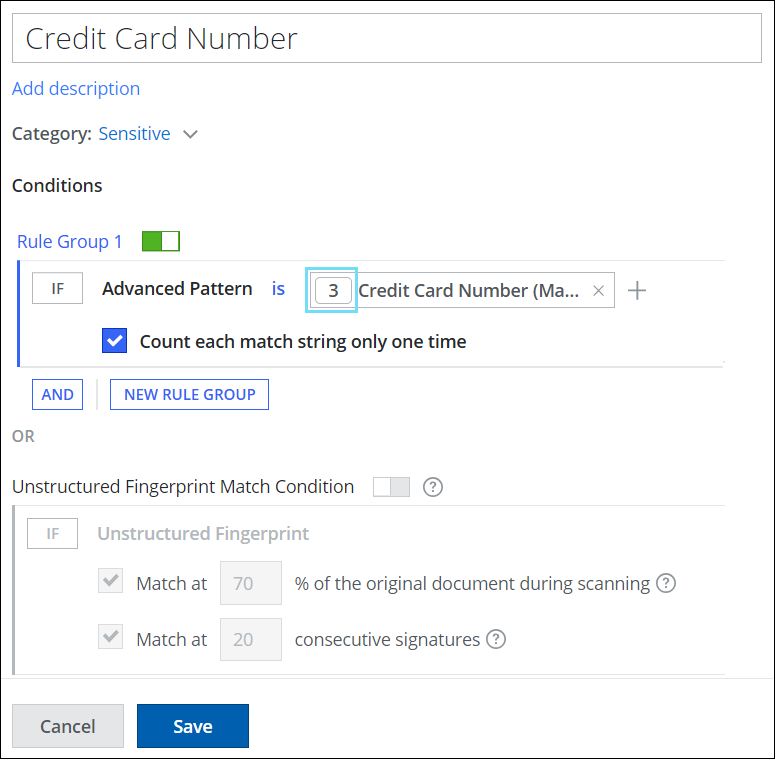
- Select your Skyhigh Built-In advanced pattern. For example, select Credit Card Number (Mastercard).

- To set the threshold as 3, add your advanced pattern list to the Classification editor. Edit the threshold by clicking [1] and enter 3 to indicate the weight of the Advanced Pattern List in threshold matching and save your classification.
Skyhigh Built-In Advanced Pattern and Custom Advanced Pattern Use Case
Create Complex Matching Rules using Boolean Logic for Advanced Patterns
Boolean logic combines several complex rules or conditions through Rule Groups. These groups combine all conditions using OR, AND, and NOT operators. You can create complex matching rules by combining Skyhigh Built-In or Custom advanced pattern lists using OR, AND, and NOT operators. All conditions within a group must match for the group to be triggered. Multiple Rule Groups can be defined and combined using OR, AND, and NOT operators for Advanced Pattern definitions. This means any group within a policy must match the policy to be triggered.
To create complex matching rules for advanced pattern definitions:
- Create a classification by selecting any of or all of Skyhigh Built-In Advanced Patterns or Custom Advanced Patterns.

- Click Rule Group 1 to edit the desired name for your rule group.
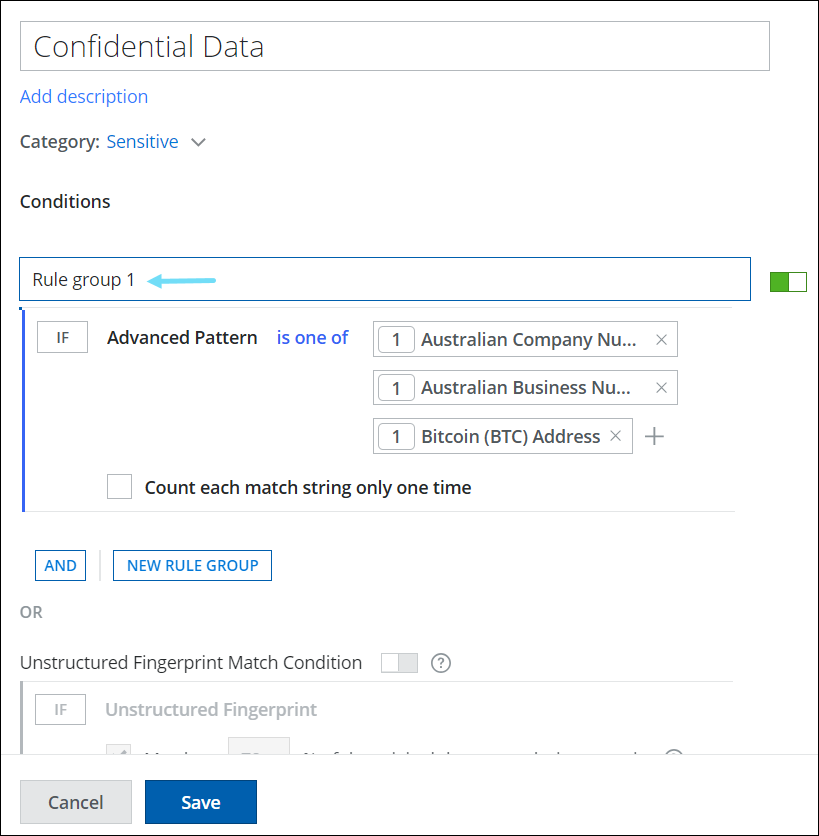
- Click AND to add more advanced pattern conditions to your Rule Group.

- Click NEW RULE GROUP to add a new advanced pattern condition combined with the OR operator.

- Click NEW RULE GROUP to add a new advanced pattern condition using the NOT (is not or is none of) operator and save your classification.

Match Regular Expressions in Specific Email Sections
Suppose you have a medical email that contains a broad range of sensitive text patterns, but you want the DLP engine to match text patterns in specific sections of the email. To match regular expressions in specific sections of the email, you must first create a classification using a Skyhigh built-in or custom advanced pattern list of regular expressions. You can then configure a DLP policy with the newly created classification to specify the sections (Everywhere, Email Header) of the email. This enables the DLP engine to trigger matches on regular expressions in specific sections of the email, thereby reducing false positives and ensuring accuracy in your data protection measures.
For example, create a classification using two Skyhigh built-in advanced pattern lists of regular expressions named Australian Business Number and Australian Company Number, and configure a sanctioned DLP policy with the new classification to specify the Email Header section of the email. This ensures that a match is only triggered if the regular expressions in the Australian Business Number and Australian Company Number advanced pattern lists are accessed in the header section of the email.
To match regular expressions in specific email sections:
- Create a classification by selecting any of or all of Skyhigh Built-In Advanced Patterns or Custom Advanced Patterns. For example, select Skyhigh built-in advanced patterns.

- Create a Sanctioned or Shadow DLP policy using the newly created classification. For example, create a sanctioned DLP policy.
- Use the Skyhigh CASB DLP policy wizard to perform the initial steps of creating your Sanctioned DLP policy as provided in steps 1 to 4 in Create a Sanctioned DLP Policy.

- On the Rules & Exceptions page, configure the following:
- Rules. For IF, select Classifications. The Select Classification cloud card appears.

- Classification. Select the newly created classification from the list of supported classifications and click Done.

- Location. Select Email Header. By default, All is selected.

- Location. Select Email Header. By default, All is selected.
- Classification. Select the newly created classification from the list of supported classifications and click Done.
- Rules. For IF, select Classifications. The Select Classification cloud card appears.
- Complete the remaining steps to configure your DLP policy as mentioned from step 5 (c) in Create a Sanctioned DLP Policy.