User Risk Rules
User risk rules allow you to categorize users based on their risk types, such as Low, Medium, and High-risk users, and enforce security policies associated with that risk type. This helps you apply the necessary controls to mitigate potential threats in your organization and protect your most sensitive information even from low-risk users.
The risk type of a user provided by Skyhigh CASB is determined by their current user risk score, which ranges from Low to High. Low is (1-3), Medium is (4-6), and High is (7-9). For details on user risk score, see User Risk Score.

Create a Sanctioned DLP Policy for User Risk
Create a sanctioned DLP policy using user risk to meet your data protection needs. For example, you can create a policy that detects and quarantines Australian personally identifiable information (PII) from being shared by low-risk users in Microsoft SharePoint Online.
To add a user risk type to a DLP policy:
- In Skyhigh CASB, go to Policy > DLP Policies.
- Click Actions > Sanctioned Policy > Create New Policy to create a policy. (See Create a DLP Policy from a Template for information about templates.)

- On the Description page, name the policy and describe its status and scope:
- Name. Enter a descriptive name to identify the policy easily.
- Description. (Optional) Enter a description for your DLP Policy.
- Deployment Type. Select an integration method: API, Lightning Link, or Reverse Proxy. Some user actions and response actions depend on the type you choose.
- Services. Click Select Service Instances and select your instance from the list. For example, select Microsoft Sharepoint Online. Click Done.
- Users. Select the users to apply the policy to.
- All Users. Click to apply the policy to all users.
- Use a predefined dictionary. Click to select a predefined dictionary from the menu.
- Manually enter users. Click to manually enter user emails using a comma to separate items. There is a limit of 1,000 characters.
- Click Save.
- Add Exclusions. Click to add users to exclude from the policy, if needed.
- None.
- Use a predefined dictionary. Click to select a predefined dictionary from the menu.
- Manually enter users. Click to manually enter user emails using a comma to separate items. There is a limit of 1,000 characters.
- Click Save.
- User Groups. If your tenant has User Data (Active Directory) configured, click Edit to select the User Groups to include in the policy.
- Click Done.
- Add Exclusions. Click to add user groups to exclude from the policy, if needed. Select user groups from the list and click Done.
- Click Done.
- Click Next.

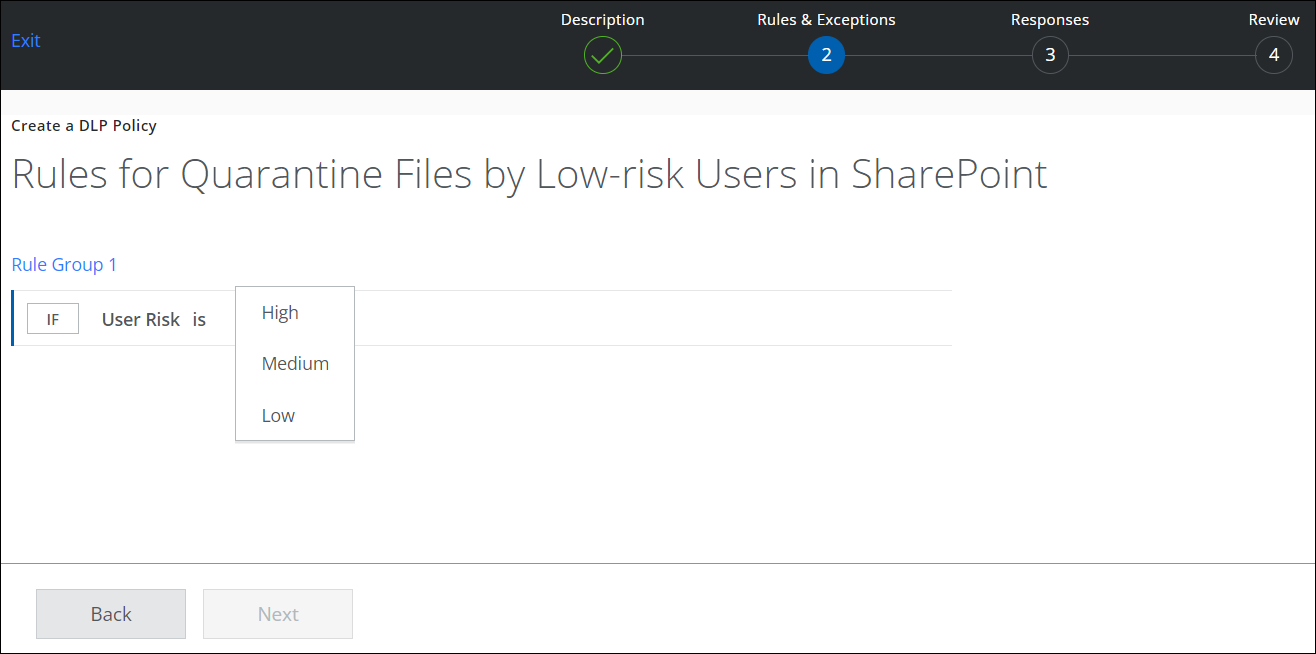
- On the Rules & Exceptions page, configure the following information:
- Rules. For IF, select User Risk. Select one of the following options:
- High. This risk type includes users with a high potential to become vulnerable to threats. This level is the least trustworthy.
- Medium. This risk type includes users with a moderate potential to become vulnerable to threats.
- Low. This risk type includes users with a low potential to become vulnerable to threats. This level is the most trustworthy.
- Rules. For IF, select User Risk. Select one of the following options:
- Click AND to add another rule, if needed.
NOTE: Skyhigh recommends that you use the User Risk rule in combination with other rules in your DLP policy. For details on the supported DLP policy rules, see About Sanctioned DLP Policy Rules and Rule Groups.
- Click THEN to add a severity: Critical, Major, Minor, Warning, or Info. For example, select Critical.

- Click New Rule Group to add more, if needed.
- Click Add Exception. Add one or more exceptions, if needed. A DLP policy ignores any exception group within the policy. An exception group is ignored when ALL exceptions within the group match.
- Click Add Exception Group to add more.
- Click Next.
- On the Responses page:
- Responses. Select one or more response actions that are triggered when the policy rules are matched. By default, all DLP policies create an incident.
- Click Done.

- Click Next.
- Click Save.
