Create a Sanctioned DLP Policy
To protect your data, create a Sanctioned Data Loss Prevention (DLP) policy using the Policy Wizard.
A Data Loss Prevention (DLP) policy defines the criteria for generating an incident and optionally sets specific actions that are triggered in response to the detected incident. Use the following procedure to create or edit a DLP policy for any Skyhigh CASB sanctioned cloud service provider. You can apply a single DLP policy to multiple services, as long as they all support the rules and responses in the policy.
Once you create your DLP policy, it is enabled by default.
IMPORTANT:
- Skyhigh CASB does not support importing or exporting policies or policy templates that include more than 50 rule groups or that exceed 64 KB in size, whichever limit is reached earlier.
- When creating or editing DLP policies for IaaS services (AWS, Azure, and GCP), the options related to Users and User Groups are not applicable.
Create /Edit Sanctioned DLP Policy
To create or edit a DLP Policy:
- In Skyhigh CASB, go to Policy > DLP Policies.
- Click Actions > Sanctioned Policy > Create New Policy. (See Create a Policy from a Template for information about templates.)
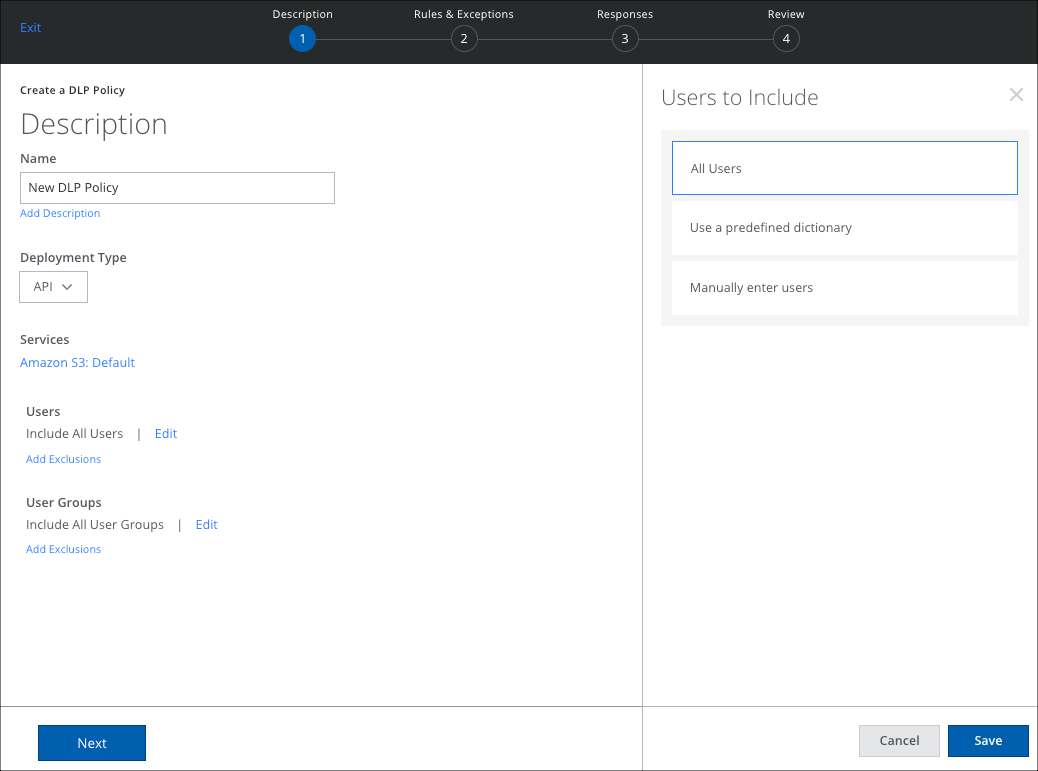
- On the Description page, name the policy and describe its status and scope:
- Name. Enter a descriptive name to help identify the policy.
- Add Description. (Optional) Enter a description for your DLP Policy.
- Deployment Type. Select an integration method. Some user actions and response actions depend on the Type you choose. Choose from:
- API
- Lightning Link
- Reverse Proxy
- Services. Click Select Service Instances, then select the instances you want the policy to apply to from the list and click Done.

- Users. Click Edit to select one of the options for Users to Include in the policy.
- All Users. Apply the policy to all users.
- Use a predefined dictionary. Apply the policy to users in a predefined dictionary.
- Manually enter users. Manually enter user emails in a list. Use a comma to separate email addresses.
- Click Save.
- Add Exclusions. Select any Users to Exclude from the policy.
- None. Do not exclude any users from the policy.
- Use a predefined dictionary. Apply the policy to users in a predefined dictionary.
- Manually enter users. Manually enter user emails in a list. Use a comma to separate email addresses.
- Click Save.

- User Groups. If your tenant has User Data (Active Directory) configured, click Edit to select the User Groups to include in the policy and click Done.
- Add Exclusions. Select any User Groups to exclude from the policy and click Done.
- Click Next.

- On the Rules & Exceptions page, enter the following information:
- Rules. Specify the rules that the policy enforces. You can specify one or more rules or rule groups. You can also delete the rule group. Deleting the rule group removes the included rules in that set. When the rule is defined, the rule group name is automatically generated. You can edit and provide a new name for each rule group.
- Click AND to add another rule, if needed.
- Click THEN to add a severity: Critical, Major, Minor, Warning, or Info.
- Click New Rule Group to add more, if needed.
- Click Add Exception. Add one or more exceptions, if needed. A DLP policy ignores any exception group within the policy. An exception group is ignored when ALL exceptions within the group match.
- Click Add Exception Group to add more.
- Click Next.
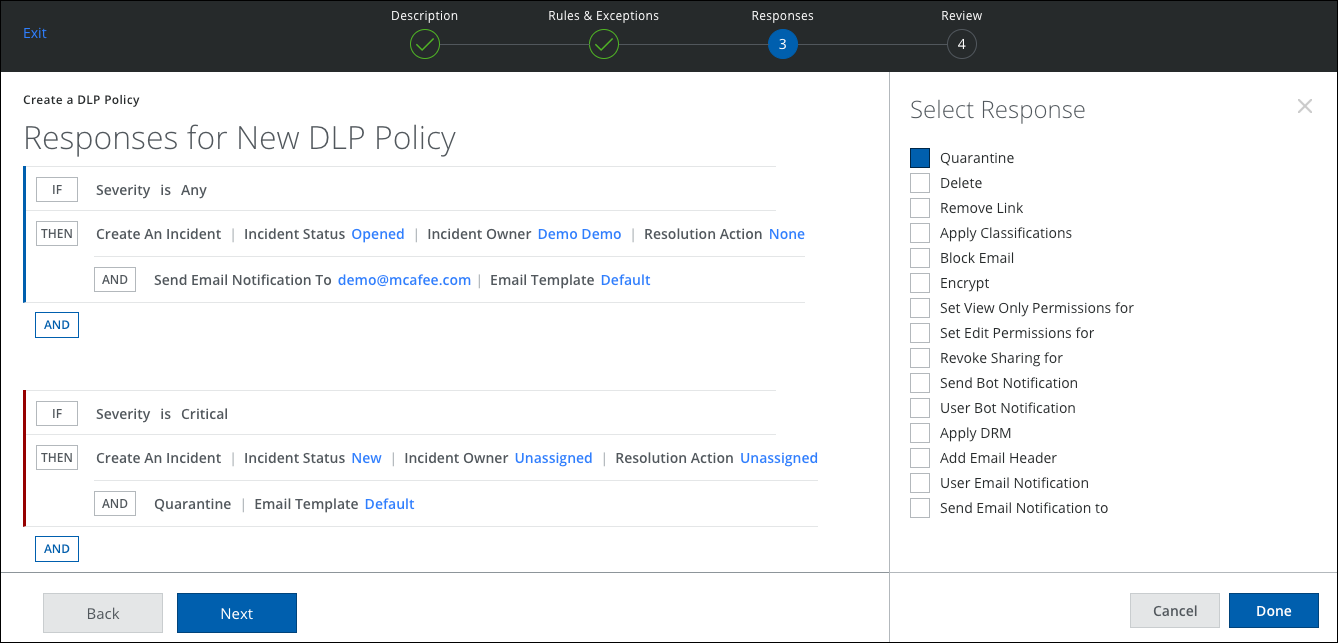
- On the Response page:
- For Create An Incident, you can select the option from the menu for Incident Status, Incident Owner, and Resolution Action.
- Response. Select one or more response actions that are triggered when the policy rules are matched. By default, all DLP policies create an incident.
- Click Done.

IMPORTANT: Due to the priority order, it is not supported to use the DLP Policy Wizard to automatically set the incident status and Incident Consolidation at the same time. Use one feature or the other.
- Click Next.
- On the Review page, review the policy you have created. To make any edits, click Edit.
- Click Done.
Your newly created Sanctioned DLP Policy is displayed on the DLP Policies page.
If any DLP policies are violated, you can view the incidents and apply the necessary remediation actions on the Incidents > Policy Incidents page. For details, see Policy Incidents Page.
NOTE: You can view events for newly created or updated sanctioned DLP policies in the Audit Log. For details, see View Sanctioned DLP Policy Events in the Audit Log.
Configure Save Evidence for Sanctioned DLP/CASB Policy
|
Advanced DLP: Save CASB Evidence is an advanced DLP feature. To enable the Download Sanctioned DLP Evidence feature, contact Skyhigh Support. |
NOTE:
- You can save evidence for Sanctioned DLP/CASB policy incidents only when the DLP policy is configured solely with the Classification-based rules.
- The Save Evidence option is only available in the new DLP policy user interface.
To create a classification-based Sanctioned DLP policy:
- Go to Policy > DLP Policies.
- Click Actions > Sanctioned Policy > Create New Policy.
- On the Description page, name the policy and describe its status and scope:
- Name. Enter a descriptive name to help identify the policy.
- Add Description. (Optional) Enter a description for your DLP Policy.
- Deployment Type. Select an integration method. Some user actions and response actions depend on the Type you choose. Choose from:
- API
- Lightning Link
- Reverse Proxy
- Services. Click Select Service Instances, then select the instances you want the policy to apply to from the list and click Done.
- Users. Click Edit to select one of the options for Users to Include in the policy.
- All Users. Apply the policy to all users.
- Use a predefined dictionary. Apply the policy to users in a predefined dictionary.
- Manually enter users. Manually enter user emails in a list. Use a comma to separate email addresses.
- Click Save.
- Add Exclusions. Select any Users to Exclude from the policy.
- None. Do not exclude any users from the policy.
- Use a predefined dictionary. Apply the policy to users in a predefined dictionary.
- Manually enter users. Manually enter user emails in a list. Use a comma to separate email addresses.
- Click Save.
- User Groups. If your tenant has User Data (Active Directory) configured, click Edit to select the User Groups to include in the policy and click Done.
- Add Exclusions. Select any User Groups to exclude from the policy and click Done.

- Click Next.
- On the Rules & Exceptions page, enter the following information:
- Rules. Select the Rule as Classification, and you can also add one or more rules in the same rule group.
- Location. Select the location of the content to be scanned: Default or Email Subject, Header, Body, Attachments.
- Click THEN to add a severity: Critical, Major, Minor, Warning, or Info.
- Click AND to add another rule, if needed.
- Click NEW RULE GROUP to add more rules, if needed.

- On the Response page:
- For Create An Incident, you can select the option from the menu for Incident Status, Incident Owner, and Resolution Action.
- Click THEN to add a response as Save Evidence for a classification-based rule, and you can select other response actions for each rule. These response actions are triggered when the policy rules are matched. By default, all DLP policies create an incident. For more details on saving evidence, see Save DLP Evidence.

- Click Done and Click Next.
- On the Review page, review the policy you have created. To make any edits, click Edit.
- Click Done.

Your newly created Sanctioned DLP Policy is displayed on the DLP Policies page.
If Classification-based DLP policies are violated, you can view the incidents, save or download the evidence, and apply the necessary remediation actions on the Incidents > Policy Incidents page. For details, see Policy Incidents Page.