Create a Classification using Proximity
You can create a classification based on proximity to identify sensitive data with text patterns using advanced patterns, dictionaries, and keywords. Use a proximity match in your classification to define how many characters can separate items in advanced patterns, dictionaries, and keywords and still trigger a match. If two items are found within the selected number of characters, it's a match.
To create a classification using proximity:
- Go to Policy > DLP Policies > Classifications.
- Click Create Classification.
- Classification Name. Enter a name for this classification. For example, Proximity Match Classification. Enter an optional description to describe its use or purpose.
- Category. Select a Category from the list.
- Conditions. Click Select Criteria and choose Proximity.

- Define your proximity classification criteria:

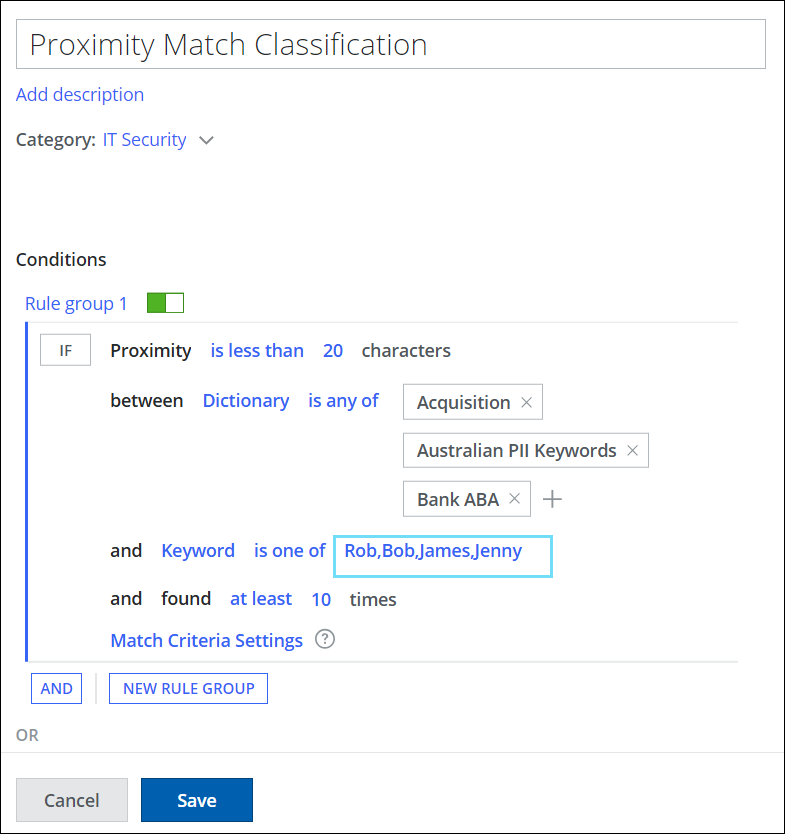
- Proximity is less than <number> characters. Enter a number to specify how close the values must appear. The number of characters should be between 1 and not more than 99,999 characters.
For Example: If you enter 20, the two values must appear within 20 characters of each other to trigger the classification criteria. - between: Select Criteria. Select two values to specify proximity for. The values can be a dictionary, an advanced pattern, or a keyword. Select any two of the following:
- Dictionary. Select from:
- is any of. To match any of the items. You can add Skyhigh Built-in Dictionary or Custom Dictionary. For details on the use cases, see Proximity Use Cases.
- Select one or more Dictionaries from the side panel or select from the custom dictionary. (To close the side panel, click X.)

- NOTE: You can select any number of Skyhigh Built-In or Custom dictionaries from the Select Dictionaries cloud card, but only the first 10 Built-In or Custom dictionaries are displayed on the Classification editor.
- Advanced Pattern. Select from:
- is any of. To match any of the items. You can add Skyhigh Built-in Advanced Patterns or Custom Advanced Patterns. For details on the use cases, see Proximity Use Cases.
- Select one or more Advanced Patterns from the side panel or select from the custom Advanced Patterns. (To close the side panel, click X.)

- NOTE: You can select any number of Skyhigh Built-In or Custom advanced patterns from the Select Advanced Patterns cloud card, but only the first 10 Built-In or Custom advanced patterns are displayed on the Classification editor.
- Keyword. Enter your keywords separated by commas without a space.

- Dictionary. Select from:
- and. The values again can be a dictionary, an advanced pattern, or a keyword.
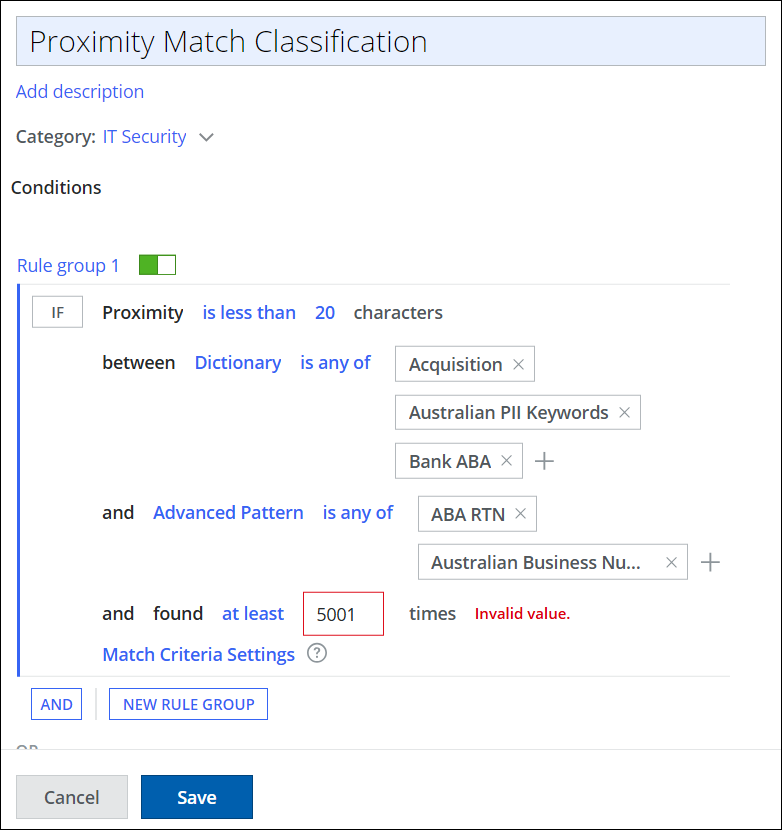
- and found at least <number> times. To count a proximity match, a string that matches criteria 1 must be found within the specified distance of a string that matches criteria 2 as defined in the proximity rule. If you require multiple matches to trigger the classification, you can specify the minimum number here. The minimum number can range between 1 and 5000. To control the settings of how the strings are paired for proximity matches, you can use Match Criteria Settings.
Note: The classification scan will continue beyond the specified threshold, and the total number of matches found in the sensitive file will be displayed in the policy incident. - Match Criteria Settings. Match criteria settings are flags that provide additional information to the DLP scanning engine. Click to configure the settings and view an example of the match criteria for the proximity rule. To learn more about the use cases, see Advanced Proximity Use Cases.
- Select Match Criteria. Define the settings for the match criteria to control how the matches are paired between criteria 1 and criteria 2 for unique or non-unique proximity matches. The DLP scanning engine analyzes the input text, and when the condition specified in each of criteria 1 or criteria 2 is met, the match strings are added to a set of results for that corresponding criteria. Once all matches are collected, the DLP scanning engine pairs matches from both sets of results (criteria 1 and criteria 2) within the specified proximity distance.
- Criteria line 1. Select an option to trigger unique or non-unique matches for criteria 1 defined in the proximity rule. For example, here criteria 1 is a Dictionary. Criteria line 1 corresponds to the condition (criteria 1) defined in the proximity rule.
- Option 1: Terms found in a Proximity match will not be re-used. Identical terms found later in the document can be used for Proximity matches.
When you select this option, a match string from the first set (Criteria 1) that is paired in proximity with a match string from the second set (Criteria 2) is removed from the first set (Criteria 1) of the match results to prevent further use in other proximity pairings. By default, this option is selected. - Option 2: Terms found in a Proximity match will not be re-used. Identical terms found later in the document will not be used for Proximity matches. When you select this option, a match string from the first set (Criteria 1) that is paired in proximity with a match string from the second set (Criteria 2) is removed from the first set (Criteria 1) of the match results. The DLP engine scans through the remaining matches in the first set to remove any duplicates.
- Option 3: Terms found in a Proximity match can be re-used in subsequent matches. When you select this option, a match string from the first set (Criteria 1) that is paired in proximity with a match string from the second set (Criteria 2) is not removed from the first set (Criteria 1) of the match results and it can be used in subsequent proximity pairings.
Note: You can only select this option for one of the criteria (Criteria line 1 or Criteria line 2) as it triggers a large number of proximity matches.

- Option 1: Terms found in a Proximity match will not be re-used. Identical terms found later in the document can be used for Proximity matches.
- Criteria line 2. Select one of the following options to trigger unique or non-unique matches for criteria 2 defined in the proximity rule. For example, here criteria 2 is an Advanced Pattern. Criteria line 2 corresponds to the condition (criteria 2) defined in the proximity rule.
- Option 1: Terms found in a Proximity match will not be re-used. Identical terms found later in the document can be used for Proximity matches. When you select this option, a match string from the second set (Criteria 2) that is paired in proximity with a match string from the first set (Criteria 1) is removed from the second set (Criteria 2) of the match results to prevent further use in other proximity pairings. By default, this option is selected.
- Option 2: Terms found in a Proximity match will not be re-used. Identical terms found later in the document will not be used for Proximity matches. When you select this option, a match string from the second set (Criteria 2) that is paired in proximity with a match string from the first set (Criteria 1) is removed from the second set (Criteria 2) of the match results. The DLP engine scans through the remaining matches in the second set to remove any duplicates.
- Option 3: Terms found in a Proximity match can be re-used in subsequent matches. When you select this option, a match string from the second set (Criteria 2) that is paired in proximity with a match string from the first set (Criteria 1) is not removed from the second set (Criteria 2) of the match results and it can be used in subsequent proximity pairings.
Note: You can only select this option for one of the criteria (Criteria line 1 or Criteria line 2) as it triggers a large number of proximity matches.

- (Optional) Show Example criteria. Click to view an example of the match criteria.
- Click Save.
- Criteria line 1. Select an option to trigger unique or non-unique matches for criteria 1 defined in the proximity rule. For example, here criteria 1 is a Dictionary. Criteria line 1 corresponds to the condition (criteria 1) defined in the proximity rule.
- Example of Match Criteria. Displays a real-time example of proximity matches, updated based on the settings selected in the Select Match Criteria cloud card.
- Proximity Rule. Displays a proximity rule with a proximity of 5 characters between criteria 1 and criteria 2.
- Example. Displays sample data with highlighted proximity matches.
- Match Count. Displays a clear breakdown of proximity matches, including their corresponding details such as match counts and match strings.
- Click Close.

- Select Match Criteria. Define the settings for the match criteria to control how the matches are paired between criteria 1 and criteria 2 for unique or non-unique proximity matches. The DLP scanning engine analyzes the input text, and when the condition specified in each of criteria 1 or criteria 2 is met, the match strings are added to a set of results for that corresponding criteria. Once all matches are collected, the DLP scanning engine pairs matches from both sets of results (criteria 1 and criteria 2) within the specified proximity distance.
- Proximity is less than <number> characters. Enter a number to specify how close the values must appear. The number of characters should be between 1 and not more than 99,999 characters.
NOTE: The proximity rule limit should be within 1 to 5000. If you attempt to exceed the proximity limit, an error message displays as an Invalid value and you cannot save the classification.
- ► See Image
-

- Click Save.
Your Proximity classification is saved to the selected category in the Classifications list. Add the classification to your DLP policies as needed.
