Advanced Proximity Use Cases
Unique Match Criteria
Use Case: Suppose you have an email thread containing multiple mentions of your employee's Personally Identifiable Information (PII), such as their names and locations. To prevent this sensitive data from being leaked outside your organization, you can use a proximity classification. This classification identifies data leaks by detecting instances where an employee's name is mentioned near their location within an email thread.
In normal communication, it's common for names and locations to appear close together. Therefore, you only want to flag instances as a data leak if the same name and location pair appears multiple times. However, the current proximity classification triggers too many false positives because it repeatedly counts matches for the same keywords.
Refer to the sample email thread below for an example of the use case:
- ► View the Sample Email Thread
-
Subject: Hello
How are you?
Lorem ipsum dolor sit amet, consectetur adipiscing elit, sed do eiusmod tempor incididunt ut labore et dolore magna aliqua.
Fred, London
Subject: R.E Hello
I'm fine
Lorem ipsum dolor sit amet, consectetur adipiscing elit, sed do eiusmod tempor incididunt ut labore et dolore magna aliqua.
Peter, Paris
Subject: R.E. R.E. Hello
Good
Lorem ipsum dolor sit amet, consectetur adipiscing elit, sed do eiusmod tempor incididunt ut labore et dolore magna aliqua.
Fred, London
NOTE: You can also view the match results for the proximity classification, including the number of unique and non-unique matches. For details, see Classification Match Results.
To solve the use case, follow these steps:
- Create custom dictionary classification(s) for the following dictionaries:
- First Names: Include keywords for your employee's names such as Fred and Peter. For example, create a custom dictionary named First Names including these keywords.

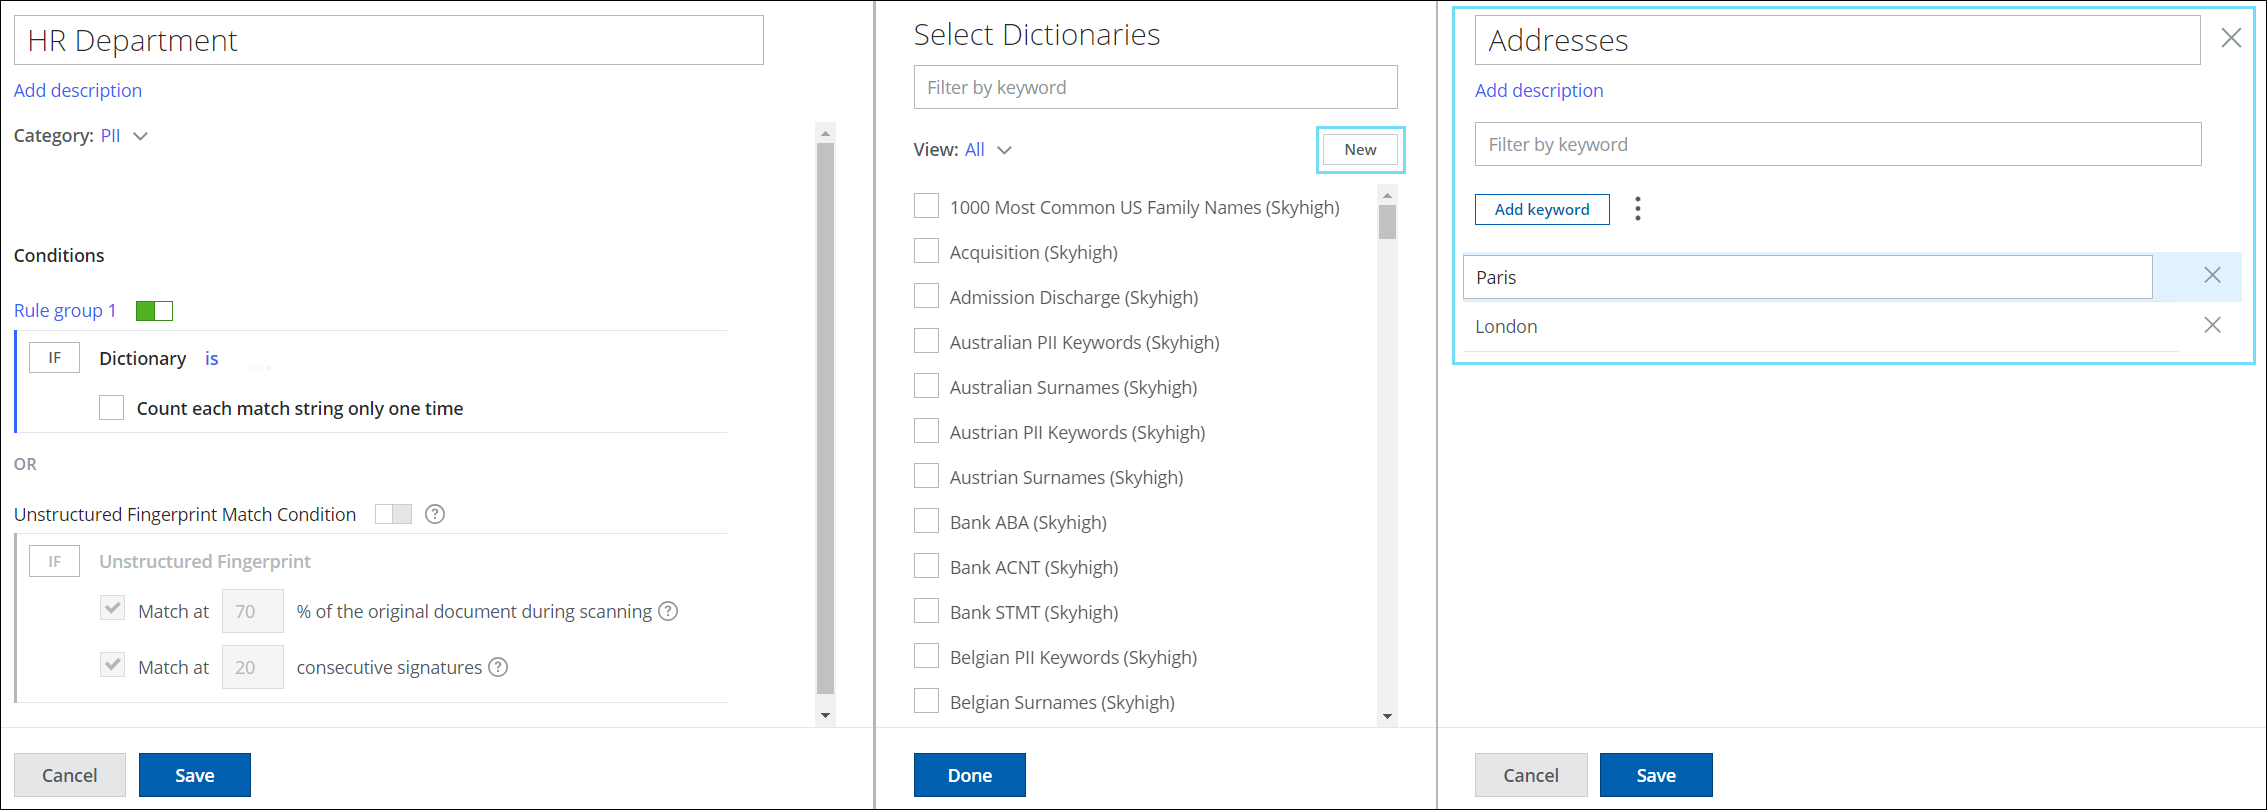
- Addresses: Include keywords for addresses such as London and Paris. For example, create a custom dictionary named Addresses including these keywords.
- First Names: Include keywords for your employee's names such as Fred and Peter. For example, create a custom dictionary named First Names including these keywords.
- Create a proximity classification by defining the proximity between the custom dictionaries and enabling the unique match criteria. Perform the initial steps of creating your proximity classification as provided in steps 1 to 5 in the Create a Classification using Proximity section.
- Configure the following to define your proximity classification criteria:
- Proximity is less than <number> characters. Enter a number to specify how close the values must appear. For example, if you enter 50, the two keywords must appear within 50 characters of each other to trigger the classification criteria.
- between: Select Criteria. Click to select the dictionaries to specify proximity. Select the following:
- Dictionary. Select the newly created custom dictionaries from the side panel. For example, select First Names and Addresses.

- Dictionary. Select the newly created custom dictionaries from the side panel. For example, select First Names and Addresses.
- and found at least <number> times. Enter a number to specify how many times the values must appear in proximity to each other to trigger the classification criteria. For example, enter 2. To control the settings of how the strings are paired for proximity matches, you can use Match Criteria Settings.
- Match Criteria Settings. Click to configure the settings of the match criteria for the proximity rule.

- Select Match Criteria. Define the settings for the match criteria to generate unique and non-unique proximity matches.
- Criteria line 1. Select the following option to trigger unique matches for criteria 1, as defined in the proximity rule. For example, here criteria 1 is a Dictionary. Criteria line 1 corresponds to the condition (criteria 1) defined in the proximity rule.
- Option 2. Select this option to exclude the second instance of Fred from being considered for subsequent proximity matches.

- Option 2. Select this option to exclude the second instance of Fred from being considered for subsequent proximity matches.
- Criteria line 2. Select the following option to trigger unique matches for criteria 2, as defined in the proximity rule. For example, here criteria 2 is a Dictionary. Criteria line 2 corresponds to the condition (criteria 2) defined in the proximity rule.
- Option 2. Select this option to exclude the second instance of London from being considered for subsequent proximity matches.

- Option 2. Select this option to exclude the second instance of London from being considered for subsequent proximity matches.
- Criteria line 1. Select the following option to trigger unique matches for criteria 1, as defined in the proximity rule. For example, here criteria 1 is a Dictionary. Criteria line 1 corresponds to the condition (criteria 1) defined in the proximity rule.
- Select Match Criteria. Define the settings for the match criteria to generate unique and non-unique proximity matches.
- Click Save.
Once you create the proximity classification, you can use it in your DLP policies for email services. This enables the DLP engine to detect and trigger matches for sensitive data such as names and locations that appear close together in the sample email thread, based on your new classification.
Classification Match Results
You can see a breakdown of the match results for the proximity classification based on the sample email thread in the following tables:
- ► View the Classification Matches table
-
Classification Matches
The Classification Matches table provides details on the specific match strings, along with their corresponding index positions detected in the sample email thread.
Sl No.
Match String
Index
1.
Fred
156
2.
London
162
3.
Peter
331
4.
Paris
338
5.
Fred
503
6.
London
509
- ► View the Classification Match Summary table
-
Classification Match Summary
The Classification Match Summary table provides an overview of the classification matches based on the settings configured for the match criteria of your proximity rule.
Match Criteria
Count
Match Pair (Sl No.)
Match Details Criteria line 1 (Option 1) and Criteria line 2 (Option 1)
3
(1,2), (3,4), and (5,6)
N/A Criteria line 1 (Option 2) and Criteria line 2 (Option 2) 2
(1,2), (3,4)
The match pair (5,6) is not counted as a unique match as it is a duplicate of the matched pair (1,2). NOTES:
The table does not include other combinations for the match criteria due to the specified proximity distance.
Match Criteria with Keyword Validation - Data Identifiers vs Classifications
Use Case: Suppose you have a financial file containing multiple mentions of credit card numbers, such as Visa cards. To protect this sensitive data, you can use a proximity classification. This classification detects potential data leaks by identifying instances where a credit card number is mentioned near a financial term within a file.
In your organization, employees may be allowed to share their credit card numbers with authorized entities, such as banks. However, if multiple different credit card numbers are being shared by the same employee, this should trigger an investigation to ensure there is no unauthorized data exfiltration.
Refer to the contents of the sample file below for an example of the use case:
- ► View the Sample File Contents
-
- Lorem ipsum dolor sit amet 378282246310005 credit card Lorem ipsum dolor sit amet
- Lorem ipsum dolor sit amet 378282246310005 CCN Lorem ipsum dolor sit amet
- Lorem ipsum dolor sit amet 6331101999990016 Lorem ipsum dolor sit amet
- Lorem ipsum dolor sit amet 5105105105105100 credit card Lorem ipsum dolor sit amet
- Lorem ipsum dolor sit amet 4012888888881881 credit card Lorem ipsum dolor sit amet
NOTE: You can also view the details for the match results of data identifiers and classifications, including the number of matches. For details, see Data Identifier and Classification Match Results.
To detect matches for credit card numbers found near financial terms in the file, you can use any of the following methods:
NOTE: Skyhigh recommends to migrate your DLP policies with proximity rules from data identifiers to classifications. You can use the Create a Classification using Proximity method to identify and protect sensitive data appearing in proximity efficiently.
Create a Sanctioned DLP Policy using Data Identifiers
NOTE: Data Identifiers are legacy DLP features that will no longer be supported by the end of June 2025, it is recommended to use a classification-based approach for all your DLP use cases. To assist with migrating your DLP policies from Data Identifiers to Classifications, refer to the Migration Guide.
Refer to the sample image below for an example of the use case for data identifiers:
- ► View the Sample Use Case for Data Identifiers

Create a Classification using Proximity
To solve the use case, follow these steps:
- Create a proximity classification by defining the proximity between an advanced pattern and a dictionary and configuring the unique match criteria settings. Perform the initial steps of creating your proximity classification as provided in steps 1 to 5 in the Create a Classification using Proximity section.
- Configure the following to define your proximity classification criteria:
- Proximity is less than <number> characters. Enter a number to specify how close the values must appear. For example, if you enter 500, the advanced pattern and the keyword must appear within 500 characters of each other to trigger the classification criteria.
- between: Select Criteria. Click to select the advanced pattern to specify proximity. Configure the following:
- Advanced Pattern. Select the required Skyhigh Security-Built-in or Custom Advanced Patterns from the list. For example, select the Skyhigh Security-built-in advanced pattern named Credit Card Number (Visa).

- Advanced Pattern. Select the required Skyhigh Security-Built-in or Custom Advanced Patterns from the list. For example, select the Skyhigh Security-built-in advanced pattern named Credit Card Number (Visa).
- and. Click to select the dictionary to specify proximity. Configure the following:
- Dictionary. Select the required Skyhigh Security-Built-in or Custom Dictionaries from the list. For example, select the Skyhigh Security-built-in dictionary named PCI GLBA.

- Dictionary. Select the required Skyhigh Security-Built-in or Custom Dictionaries from the list. For example, select the Skyhigh Security-built-in dictionary named PCI GLBA.
- and found at least <number> times. Enter a number to specify how many times the values must appear in proximity to each other to trigger the classification criteria. For example, enter 2. To control the settings of how the strings are paired for proximity matches, you can use Match Criteria Settings.
- Match Criteria Settings. Click to configure the settings of the match criteria for the proximity rule.

- Select Match Criteria. Define the settings for the match criteria to generate unique and non-unique proximity matches.
- Criteria line 1. Select the following option to trigger unique matches for criteria 1, as defined in the proximity rule. For example, here criteria 1 is an Advanced Pattern. Criteria line 1 corresponds to the condition (criteria 1) defined in the proximity rule.
- Option 2. Select this option to trigger on different credit card numbers.

- Option 2. Select this option to trigger on different credit card numbers.
- Criteria line 2. Select the following option to trigger non-unique matches for criteria 2, as defined in the proximity rule. For example, here criteria 2 is a Dictionary. Criteria line 2 corresponds to the condition (criteria 2) defined in the proximity rule.
- Option 3. Select this option to allow the same keyword to be used in match pairs for multiple proximity matches.

- Option 3. Select this option to allow the same keyword to be used in match pairs for multiple proximity matches.
- Click Save.
- Criteria line 1. Select the following option to trigger unique matches for criteria 1, as defined in the proximity rule. For example, here criteria 1 is an Advanced Pattern. Criteria line 1 corresponds to the condition (criteria 1) defined in the proximity rule.
- Select Match Criteria. Define the settings for the match criteria to generate unique and non-unique proximity matches.
- Click Save.
Once you create the proximity classification by configuring the settings of it's match criteria, you can use it in your DLP policies for cloud services. This enables the DLP engine to detect and trigger matches for sensitive data such as credit card numbers that appear close together with financial terms in the sample file, based on your new proximity classification.
Data Identifier and Classification Match Results
You can see a breakdown of the match results for data identifiers and classifications based on the sample file in the following tables:
- ► View the Data Identifier and Classification Matches table
-
Data Identifier and Classification Matches
The Data Identifier and Classification Matches table provides details on the specific match strings, along with their corresponding index positions detected in the sample financial file.
Sl No.
Match String
Match Line
1.
378282246310005
1
2.
credit card
1
3.
378282246310005
2
4.
CCN
2
5.
6331101999990016
3
6.
5105105105105100
4
7. credit card 4 8. 4012888888881881 5 9. credit card 5
- ► View the Data Identifier and Classifications Match Summary table
-
Data Identifier and Classifications Match Summary
The Data Identifier and Classifications Match Summary table provides an overview of the matches for data identifiers and classifications, including their corresponding match counts and locations detected in the sample email thread.
Match Type/Match Criteria
Count
Match Line
Match Details Data Identifiers 3 (1), (4), and (5) - The match line (2) is not counted as a unique match as it is a duplicate of the matched line (1).
- The match line (3) is not counted as a match because it is not in proximity with a keyword.
- The match line (3) will also be counted as a match if Keyword Validation is disabled for the keywords list.
Classifications Criteria line 1 (Option 1) and Criteria line 2 (Option 1) 4 (1), (2), (4), and (5) The match line (3) is not counted as a match because it is not in proximity with a keyword. Criteria line 1 (Option 2) and Criteria line 2 (Option 3) 3 (1), (4), and (5) - The match line (2) is not counted as a unique match as it is a duplicate of the matched line (1).
- The match line (3) is not counted as a match because it is not in proximity with a keyword.