Create a Policy using Nested AND and OR Operators
In earlier versions, criteria within a Custom Rule or Default Ruleset Condition could only be combined using a single operator, either AND or OR, applied across the entire rule. The order of criteria did not matter, and new criteria were always added at the end. This approach limited flexibility, as one operator bound all criteria or the condition.
The Nest In and Nest Out features are now the default behaviour. Precedence is determined through the order and nesting defined in the UI, rather than fixed rules such as AND before OR. These changes give you more flexibility to build complex logical structures.
With Nest In and Nest Out, operators can be dynamically adjusted:
- Nest In increases precedence, pushing an operator deeper into the expression together with its attached criterion. Depending on the requirement, the operator can switch (AND ↔ OR) or remain the same.
- Nest Out lowers precedence, pulling an operator outward and leaving the criterion behind, again with the option to switch or keep the operator.
This manipulation not only changes the operator type (for example, switching from AND to OR, or retaining the same operator across multiple nesting levels) but also alters its grouping and visual nesting within the expression.
Key Capabilities of the Nest In and Nest Out
- Alternating Operators. AND and OR operators always alternate across levels. They cannot exist at the same level.
- Criteria Requirements. Nesting requires at least 3 criteria. With only two criteria, Nest In and Out acts as a toggle (switch between AND and OR).
- Visual Guidance. Visual nesting lines show hierarchy and help you understand operator levels.
- Consistency in Policy Code. Published policy code mirrors the nesting structure exactly as defined in the UI, so the policy behaves exactly as the UI shows.
- Notes. Click the Notes icon to save notes for each rule and ruleset.
- Pre-Disabled Actions. If the logic is invalid, the system automatically disables the Action option to prevent meaningless operations.
Key Benefits of Using Nest In and Nest Out
- Expression Logic String. Displays criteria names and operators (not values). Updates dynamically with nesting changes.
- Criteria Addition.
- You can insert Criterion between existing ones.
- The System automatically selects the Operator based on where you add the Criterion.
- A new criterion is inserted immediately after the selected row.
- Criteria Deletion. When a Criterion is deleted, the system removes the operator most deeply nested within it.
- Review Changes. Shows differences between the last valid expression and the new expression.
Rule management now includes several usability updates that make it easier to view, organize, and navigate conditions and rule sets. Icons allow you to collapse and expand individual rules, with each icon showing the number of conditions contained within. If a rule or ruleset is collapsed while in an invalid state, an amber incomplete badge appears instead of the summary, making it easy to spot issues at a glance. At the ruleset level, two dedicated icons are available. Icons in the ruleset level indicate hierarchy and detail. One icon represents the presence of child rulesets within the selected ruleset, allowing you to expand or collapse the subtree. The other icon represents custom rules defined in the ruleset, giving a quick view of how many are included at that level. You can also create multiple levels of rule sets to structure complex policies more effectively.
The following screenshot shows the rule summary.

In addition, a menu provides quick options to expand all rules, collapse all rules, or collapse all rule sets.
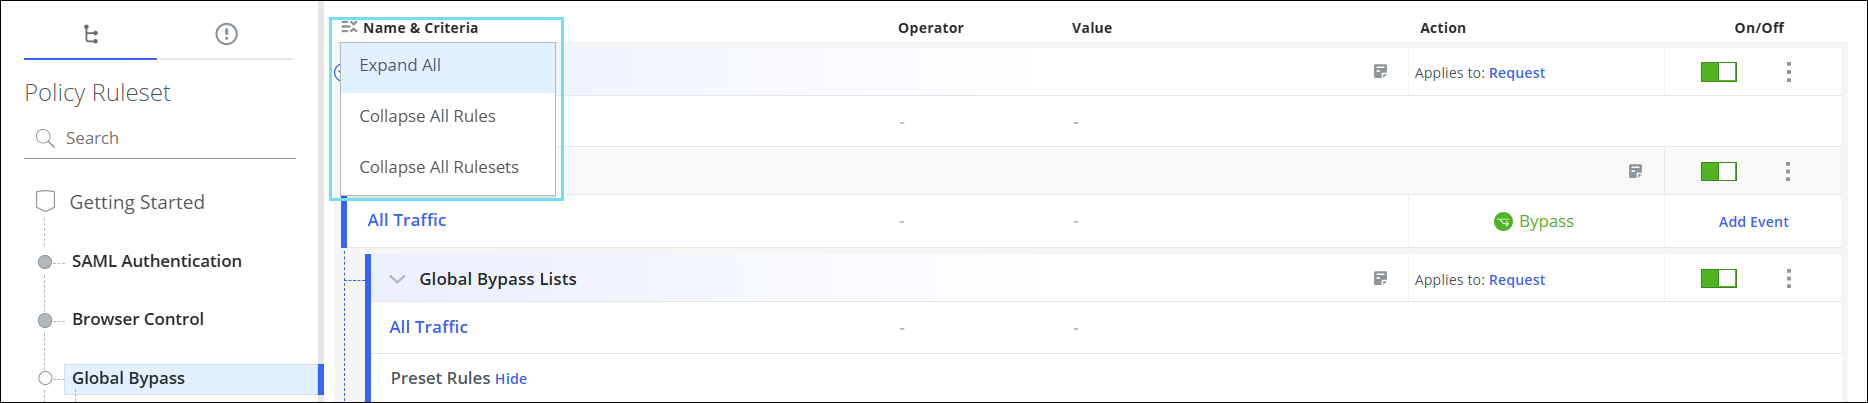
The screenshot below shows the quick menu icon, the collapse‑all icon, the collapse‑ruleset icon, the expand‑rule icon, and the collapse‑child‑ruleset icon.
![]()
These enhancements improve readability, streamline navigation, and help you manage complex rule sets more efficiently.
Manage Operator Precedence in Rule Building
Follow these steps to learn how Nest In and Nest Out control the application of AND and OR operators within rule expressions:
- Go to Policy > Web Policy > Policy > Global Bypass under the Web Rule tree.
- Click the three‑dot menu and go to Add Custom Rule > Via Rule Builder.

- Enter the Name for the Rule.
A Rule Tag appears, along with collapse and expand icons for managing visibility.

- Select a Criterion, Value, and an Action.
As soon as the rule becomes valid, the indicator changes from Amber to Blue.

- To add more rules, click
 the icon next to the value and add more criteria.

Previously, new criteria were always added at the end.
Now, when you click (![]() ) Add icon after a condition, the system inserts a new criterion at that position between existing ones.
) Add icon after a condition, the system inserts a new criterion at that position between existing ones.
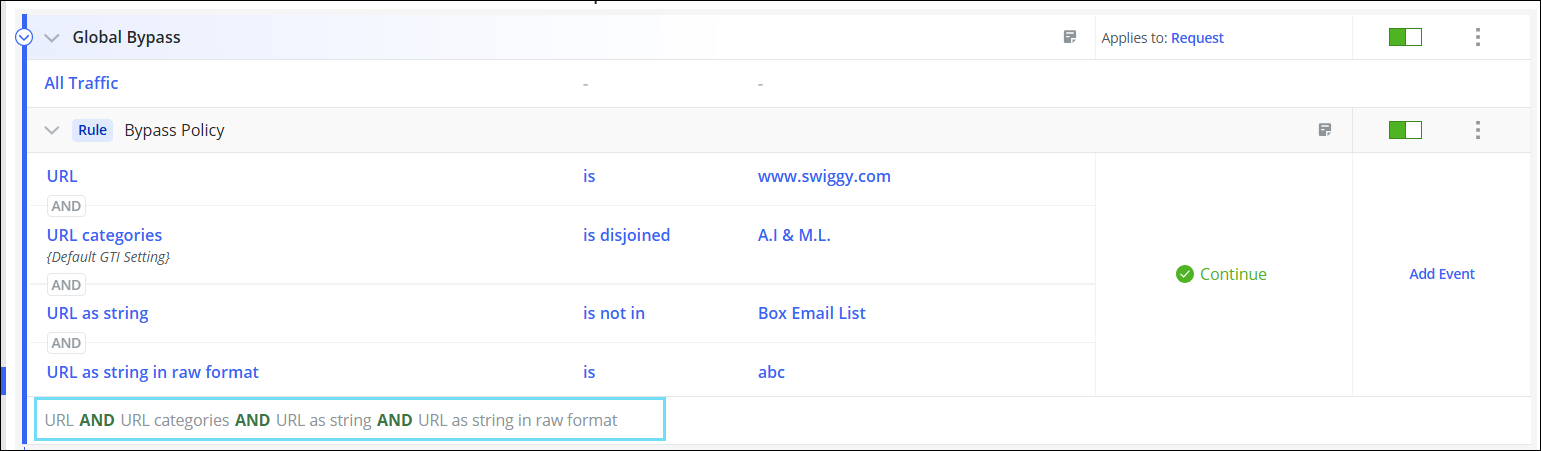
Example: Add three rule conditions with two operators.
-
At the end of the rule set, a string is displayed showing the expression logic.
As nesting changes, the string updates dynamically to reflect the new structure. For example,- Click an operator (example, AND). Options appear: OR, Nest Out, and Nest In.
- Nest Out: Changes the operator and lowers its precedence (moves outward/left).
- Nest In: Changes the operator and increases its precedence (moves inward/right).
- If all operators are the same, Nest In and Nest Out options are disabled.

- After performing Nest‑Out operations and changing the operators from AND to OR, the resulting expression logic is shown below:
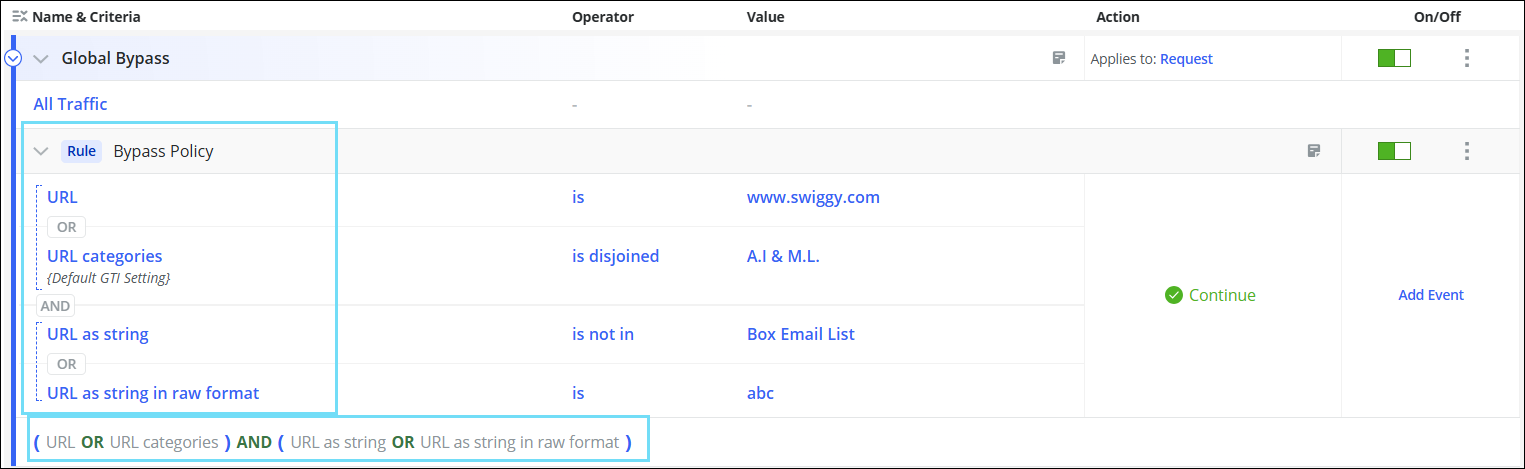
Expressions inside (OR) are solved first, reflecting higher precedence.
- AND and OR cannot exist on the same vertical level; they must alternate across nesting levels.
Use Cases
The following are the operations supported for a specific operator type:
- Same Type Nest-IN: Use Same Type Nest-IN to change evaluation order without changing operators, with grouping related conditions for clearer logic and higher-precedence execution in the rule builder UI.
- Switch Type Nest-IN: Use Switch Type Nest-IN to change evaluation order and operator type, with re-grouping conditions for simpler logic and higher-precedence execution in the rule builder UI.
- Same Type Nest-OUT: Use Same Type Nest-Out to reduce nesting without changing operators with ungrouping related conditions for simpler logic and lower-precedence execution in the rule builder UI.
- Switch Type Nest-OUT: Use Switch Type Nest-Out to reduce nesting and change the operator, with ungrouping conditions for simpler logic and lower-precedence execution in the rule builder UI.
The following example shows the different operators supported within a specific operator type:
Original Expression:

- To use Same Type Nest-IN, click the icon (
 ) to move the operator to its right side in the UI, while keeping the operator the same.

- To use Switch Type Nest-IN, click the icon (
 ) to move the operator to its right side in the UI, while switching the operator type.

- To use Switch Type Nest-Out, click the icon (
 ) to move the operator to its left side in the UI, while switching the operator type.

- To use Same Type Nest-Out, click the icon (
 )to move the operator to its left side in the UI, while switching the operator type.
