BIOS Installation Guide for Skyhigh Web Gateway Appliances
Mapping from EWS/MEG to WBG
Table helps to maps Email and Web Security models to Skyhigh Web Gateway models and to BIOS packages:
| Hardware Model | EWS Model | SWG Model |
|---|---|---|
| Dell CR100 | 3000 or 3100 | WW 500 |
| Dell R200 | 3200 | WW 1100 |
| Dell R610 | 3300 or 3400 | WG 5000 |
| Intel SR1530 | 3000 or 3100 | WBG-4000-B |
| Intel SR1625 | 3300 | WBG-5000-B |
| Intel SR1630 | 3200 | WBG-4500-B |
| Intel SR2625 | 3400 | WBG-5500-B |
Installing a New BIOS
Dell Hardware
To install a BIOS package on a Dell appliance, perform the following steps:
- Contact Skyhigh Support for a BIOS package for your model.
- Extract the ZIP file (if applicable, some versions are available as ISO image already).
- Burn the included ISO image to CD.
- Boot the appliance from the CD and follow the steps on the screen to install the BIOS.
Intel Hardware Models B and C are deprecated.
Intel Hardware Model B
Consider the version that will be installed and the appliance model the BIOS is being installed on and refer to the appropriate section below.
WBG-4000-B
For a WBG-4000 appliance, execute the following commands first and write down result. This will be needed during BIOS installation.
- dmidecode -s system-serial-number
- dmidecode -s chassis-serial-number
To install a BIOS package on a Intel appliance, perform the following steps:
- Contact Skyhigh Support for a BIOS package for your model.
- Extract the ZIP into the root directory of a USB drive that is formatted in Microsoft DOS mode.
- Attach the USB drive to your appliance.
- Restart your appliance.
- When prompted, press F2 to enter the setup menu.
- Navigate to Boot Manager and select EFI Shell. The appliance is restarted in EFI shell mode. The EFI shell mode runs the startup.nsh procedure from the USB drive which will install the BIOS package.
The process takes up to 30 minutes to complete. The BIOS installation process of a WBG-4000 appliance will prompt for the serial numbers you wrote down earlier.
WBG-4500-B, WBG-5000-B and WBG-5500-B
To install a BIOS package on a Intel appliance, perform the following steps:
- Contact Skyhigh Support for a BIOS package for your model.
- Extract the ZIP into the root directory of a USB drive that is formatted in Microsoft DOS mode.
- Attach the USB drive to your appliance.
- Restart your appliance.
- When prompted, press F6 to enter the boot menu.
- Select EFI Shell.
The appliance is restarted in EFI shell mode. The EFI shell mode runs the startup.nsh procedure from the USB drive which will install the BIOS package.
The process takes up to 30 minutes to complete.
WBG-5000-B and WBG-5500-B with BIOS Package 024, 034
If you enable RMM3 (Intel Remote Management Module 3/ Remote Access Card), do not log on to the Web User Interface of the RMM3 during the package installation as this may interrupt applying the firmware.
To upgrade the BIOS, perform the following steps:
- Contact Skyhigh Support for a BIOS package for your model.
- Extract the ZIP into the root directory of a USB drive that is formatted in Microsoft DOS mode. NOTE: FAT 12, 16, and 32 formats are supported.
- Attach the USB drive to your appliance.
- Restart your appliance.
- When prompted, press F6 to enter the boot menu.
- Select EFI Shell. The appliance is restarted in EFI shell mode. The EFI shell mode runs the startup.nsh procedure from the USB drive which will install the BIOS package.
- If the hardware validation fails, follow the instructions displayed in the screen. The validation can be retried twice. If it fails three times, then remove power for several minutes (see later)
The process takes up to 30 minutes to complete. When the EFI Shell prompt appears, the update process is finished.
There is a small chance, the SDR firmware update will stop responding. If you come across the issue, follow these steps to recover:
- Wait for about 30 minutes to confirm if the update has stopped responding.
- Press CTRL+ALT+DELETE and reboot the appliance.
- Return to step 5 and resume the package installation.
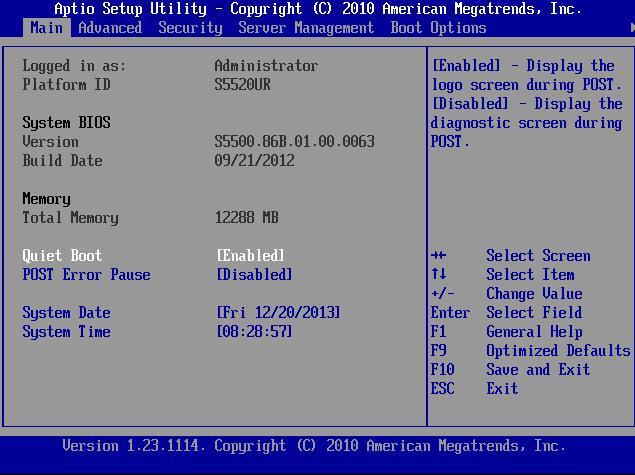
To confirm the BIOS version is correctly applied:
- At the boot screen, press F2 to enter Setup and go to the Main menu.
- See the Version and confirm if the BIOS firmware is S5500.86B.01.00.0063. The last 4 digits indicate that the BIOS firmware version installed is 0063.
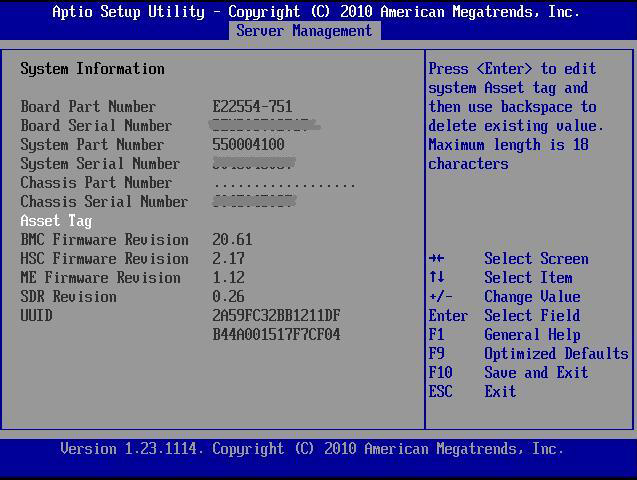
- Go to Server Management, System information.
- Locate HSC Firmware Revision and confirm that the HSC firmware version is 2.17.
Troubleshoot when the validation failure occurs afterthree times:
- Power down the appliance.
- Disconnect the power lead from the appliance and wait several minutes.
- Connect the power lead and power on the appliance.
- At the BIOS boot screen, enter boot menu by pressing F6. Select Internal EFI Shell and retry the BIOS package update again.
WBG-5000-B and WBG-5500-B with BIOS 035
This BIOS package is special as it contains only the BIOS cap to address INTEL-SA-00045. Before applying this packages, it is recommended to upgrade to version 034
first.
Perform the following steps to upgrade to version 034:
- Stage 1
- Reboot the appliance
- When prompted, press F6 to enter the boot menu.
- Select EFI Shell.
- The appliance is restarted in EFI shell mode. The EFI shell mode runs the startup.nsh procedure from the USB drive which will install the first stage BIOS after pressing a key.
- The system will reboot automatically.
- Stage 2
- When prompted, press F6 to enter the boot menu.
- Select EFI Shell.
The appliance is restarted in EFI shell mode. The EFI shell mode runs the startup.nsh procedure from the USB drive which will install the second
stage BIOS automatically. - The system will reboot automatically.
- Stage 3
- When prompted, press F6 to enter the boot menu.
- Select EFI Shell.
The appliance is restarted in EFI shell mode. The EFI shell mode runs the startup.nsh procedure from the USB drive which will install the third stage BIOS automatically. - When finished a prompt will appear. Remove USB key and restart.
The BIOS package did not allow to implement Skyhigh specific BIOS defaults. This means after loading optimized BIOS defaults in BIOS setup utility, the customizations have to be re-implemented manually:
- Boot Options -> USB boot priority = ”Disabled”
- Advanced -> USB Configuration -> Device Reset Timeout = 10s
- Server Management -> Resume on AC Power Loss = ”Reset”
- Server Management -> Console Redirection -> Baud Rate = ”19.2K”
- Server Management -> Console Redirection -> Console Redirection = ”Serial Port A”
Intel Hardware Model C
To install a BIOS package on a Intel appliance, perform the following steps:
- Contact Skyhigh Support for a BIOS package for your model.
- Extract the ZIP into the root directory of a USB drive that is formatted in Microsoft DOS mode.
- Attach the USB drive to your appliance.
- Restart your appliance.
- The appliance will automatically enter EFI Shell.
The EFI shell mode runs the startup.nsh procedure from the USB drive which will install the BIOS package. - In case the appliance will not automatically enter the EFI Shell, press F6 during boot to enter the boot menu and select Internal EFI Shell.
The process takes up to 30 minutes to complete.
WBG-5000-C and WBG-5500-C with BIOS 035
This BIOS version requires an Intel Active System Console (ASC) software version that is not supported with SWG. If you install this BIOS version you won’t be able to use ASC. The remote management module RMM4 will provide this functionality.
WBG-5000-C and WBG-5500-C with BIOS 039
This BIOS version requires a new SWG software version being installed prior to the BIOS upgrade
The following software versions are supported:
• Skyhigh Web Gateway >_ 7.7.2.7-24770
• Skyhigh Web Gateway >_ 7.8.0.2-24769
Installing this BIOS version with an SWG software version below the versions listed above is not supported.
Once a supported software version is installed you can continue with the normal BIOS upgrade process as described above . After successful completion of the BIOS upgrade remove the USB stick and reboot the system using CTRL-ALT-DEL or the front panel button. During OS boot an automatic reboot will occur to enable the SWG specific BIOS settings.
During the upgrade you might see some events logged in the System Event Log (SEL).These events can be savely ignored.
728 = 11/24/2017 12:21:43 BMC FW Health Management Subsystem Health > '' sensor has failed and may not be providing a valid reading - > Asserted
727 = c11/24/2017 12:21:42 BMC FW Health Management Subsystem Health > 'P2 Therm Margin' sensor has failed and may not be providing a > valid reading - Asserted
726 = 11/24/2017 12:21:42 BMC FW Health Management Subsystem Health > 'P1 Therm Margin' sensor has failed and may not be providing a > valid reading - Asserted
Intel Hardware Model D
To install a BIOS package on a Intel appliance, perform the following steps:
- Contact Skyhigh Support for a BIOS package for your model.
- Extract the ZIP into the root directory of a USB drive that is formatted in Microsoft DOS mode.
- Attach the USB drive to your appliance.
- Restart your appliance.
- During boot press F6 to enter the boot selection menu.
Select EFI Shell. - The EFI shell mode runs the startup.nsh procedure from the USB drive which will install the BIOS package.
- When the installation has finished you will be asked to remove the USB stick and reboot the Appliance.
Do not remove the power cables.
- The backup BIOS will be updated after the reboot. The screen will be blank for several minutes.
WBG-4500-D, WBG-5000-D and WBG-5500-D with >_ BIOS 037
For SWG appliances with MFE BIOS version >_ 037 we recommend to use the following SWG software versions:
| Appliance Model | MFE version | Intel version | SWG (>_) |
|---|---|---|---|
|
WBG-4500-D |
037 | 02.01.0049 | 7.5.2.12-22959 7.6.2.7-22954 7.7.1.1-23105 |
| WBG-5000-D | 037 | 01.01.0020 | 7.6.2.9.0-23104 7.7.1.1-23105 |
| WBG-5500-D | 037 | 01.01.0020 | 7.6.2.9.0-23104 7.7.1.1-23105 |
Previously for this appliance models released SWG versions will continue to work, but we recommend to use the versions listed above. If you plan to upgrade the appliance BIOS, we recommend to upgrade the SWG software version prior to the BIOS upgrade.
If you re-image an Appliance (with BIOS version greater than or equal to 037) with a SWG version that is lower than the recommended software version, you will get notification that the installation has failed at the end of the installation procedure.
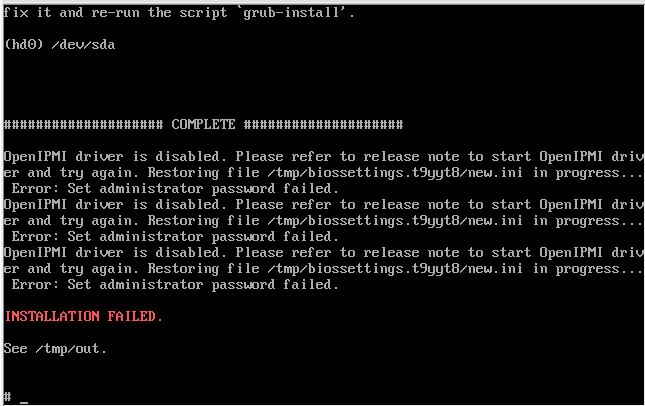
Despite of the error message you can see above, the installation procedure finished successfully and only restoring the BIOS settings has failed. You can remove the installation media and boot the Appliance. You can continue with the Appliance configuration wizard, as usual.
WBG-4500-D with BIOS 040
Execute the upgrade as described above mentioned steps. After step 8, the appliance will automatically boot to the EFI shell again. In the EFI shell, press CTRL-ALT-DEL to reboot the system, it will automatically boot to the OS.
WBG-5000-D and WBG-5500-D with BIOS 041
This BIOS version requires at least Intel version 01.01.0019 to be installed on the system. To check the currently installed Intel BIOS version, log on to the command-line of the system and execute the following command:
# dmidecode -s bios-version | cut -d. -f3-5
The output will look similar to this: 01.01.0019
In case the version is C 01.01.0019 you can safely upgrade to MFE BIOS package
041. If not, you’ll need to upgrade to MFE BIOS package 037 or 038 prior to the
actual upgrade.
Flash update procedure for model D
- Download the flash update tool here: https://www.intel.com/content/www/us/en/download/19032/intel-one-boot-flash-update-intel-ofu-utility-for-intel-server-boards-and-intel-server-systems-based-on-intel-62x-chipset.html
- Inside the ZIP file, you will find an RPM in Linux_x64 -> RHEL. Install that RPM on the target system's OS. rpm -i <package name>
- Contact support to get the customized BIOS ZIP file.
- Extract its contents.
- Run flashupdt -u flashupdt.cfg in the directory where BIOS package is extracted.
Intel Hardware Model E
To install a BIOS package on a Intel appliance, perform the following steps:
- Contact Skyhigh Support for a BIOS package for your model.
- Extract the ZIP into the root directory of a USB drive that is formatted in Microsoft DOS mode.
- Attach the USB drive to your appliance.
- Restart your appliance.
- During boot press F6 to enter the boot selection menu.
Select EFI Shell. - The EFI shell mode runs the startup.nsh procedure from the USB drive which will install the BIOS package.
- When the installation has finished you will be asked to remove the USB stick and reboot the Appliance.
Do not remove the power cables
- The backup BIOS will be updated after the reboot. The screen will be blank for several minutes.
Flash update procedure for model E
- Download the flash update tool here: https://www.intel.com/content/www/us/en/download/19032/intel-one-boot-flash-update-intel-ofu-utility-for-intel-server-boards-and-intel-server-systems-based-on-intel-62x-chipset.html
- Inside the ZIP file, you will find an RPM in Linux_x64 -> RHEL. Install that RPM on the target system's OS. rpm -i <package name>
- Contact support to get the customized BIOS ZIP file.
- Extract its contents.
- Run flashupdt -u flashupdt.cfg in the directory where BIOS package is extracted.
Steps for BIOS/FW upgrade for WBG-4500-E appliance
Steps to upgrade the BIOS package
- Contact Skyhigh Support for a BIOS package for your model. ( *_production.ROM is the BIOS package file to be installed)
- Download the Intel BIOS Tool [IntelAfuLnx64|https://www.
intel.com/content/www/us/en/ download/19550/afu-ami- firmware-update-utility-for- m10jnp2sb.html] - Execute the below command from the location where the IntelAFuLnx64 is installed
./IntelAfuLnx64 <Full path of *_Production.ROM > /B /P /N /K /L /R /ME- Below errors can be ignored
- Error: Cannot locate kernel source.
Error: gcc complier did not exist.
- Error: Cannot locate kernel source.
- Once the process is completed, reboot the appliance for the new BIOS to be loaded.
Steps to upgrade the BMC FW:
- Log in to RMM UI
- Navigate to Maintenance > Firmware update
upload the .ima_enc file and click start to update the firmware. This should upgrade the BMC
BIOs Versions and their supported SWG versions
Full compatibility is maintained between all SWG versions and BIOS versions across all appliance series.
| Model | BIOS Version | SWG version |
|---|---|---|
| WBG-5500-F | 2.7 | >= 12.2.18 |
| WBG-5000-F | 2.7 | >= 12.2.18 |
| WBG-5000-F | 2.3a | >=12.2.16 |
| WBG-5500-F | 2.3a | >=12.2.16 |
| WBG-5500-F | 1.a | >= 11.2.8 , >=12.2.2 |
| WBG-5000-F | 1.a | >= 11.2.8, >=12.2.2 |
| WBG-5000-E | 02.01.0017 | >= 12.2.17 |
| WBG-5500-E | 02.01.0017 | >= 12.2.17 |
| WBG-5000-E | 02.01.0016 | >=12.1.3, >=11.2.10 |
| WBG-5500-E | 02.01.0016 | >=12.1.3, >=11.2.10 |
| WBG-5000-E | 02.01.0015 | >=11.2.6, >= 12.0.1 |
| WBG-5500-E | 02.01.0015 | >=11.2.6, >= 12.0.1 |
| WBG-4500-E | V.220 | >= 12.2.17 |