Authenticate Deployment Methods
Introduction
This document will discuss the most common examples and shows the ruleset/rules in context for reference. This document will only discuss how the Secure Web Gateway obtains the credentials, also known as the authentication front-end. This article does not discuss how Secure Web Gateway validates the credentials also known as the authentication back-end (example of an authentication back-end would be NTLM, Kerberos, LDAP, eDirectory, etc).
Direct Proxy Auth vs Authentication Server Auth (for Transparent Setups)
Direct proxy authenticates every connection; the only browser change required is to the proxy settings. The authentication server is a session-based authentication. The authentication server requires a trust relationship with the browser.
Authentication Front-End vs Back-End
As described above, the Authentication front-end has to do with how Secure Web Gateway obtains the users credentials. The Authentication back-end has to do with how the Secure Web Gateway validates those credentials. The type of authentication front-end chosen dictates how the Secure Web Gateway is to interact with the user (this may mean the user gets prompted).
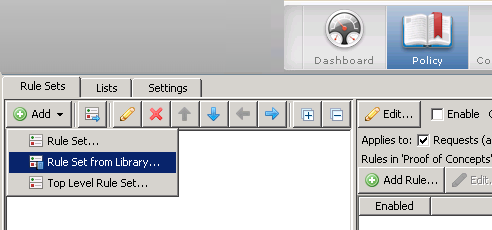
Ruleset Library
The ruleset library is a place to find example rulesets for use within your configuration. It can be accessed from within the rulesets tab under the Add button. When you select a ruleset to add, it may prompt you stating that conflicts exist, click Auto Solve Conflicts and then choose the option that works best for you (solve by referring to existing objects, or solve copying and renaming to suggested).
Common Authentication Examples by Deployment Method
Direct Proxy
The recommended authentication front-end for Direct Proxy is Direct Proxy Authentication and Authorization. This ruleset can be found in the ruleset library. When using NTLM or Kerberos direct proxy authentication is promptless (provided the browser supports it, Safari doesn't for example).
What it looks like (by default)
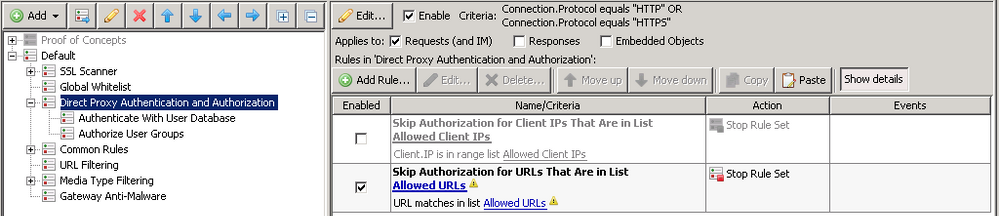
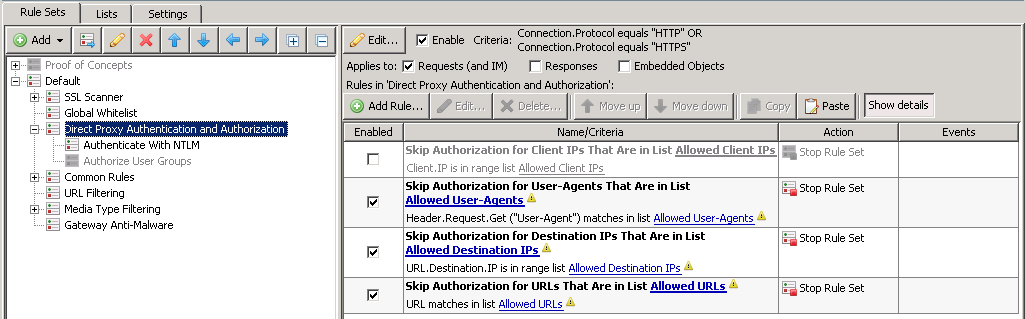
Direct Proxy Authentication and Authorization
The default ruleset has rules for creating exceptions based on the client IP and the destination URL.
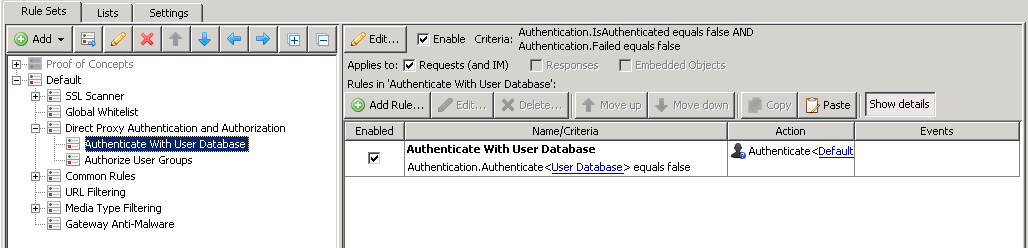
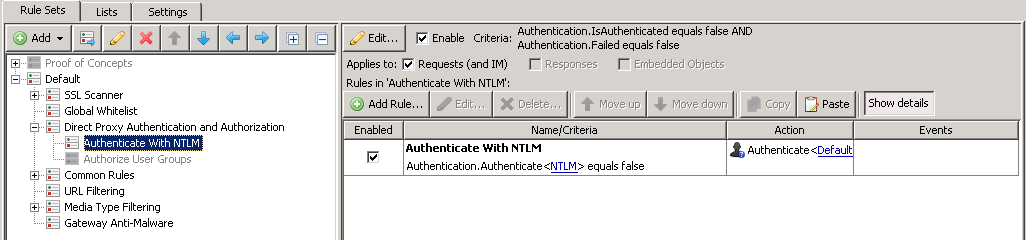
Authenticate With User Database
The authentication back-end used by default is the internal User database, this is almost always immediately swapped out for NTLM (see expected or likely modifications). This ruleset will only apply if the user has not already authenticated (Authentication.IsAuthenticated equals false) and they have not already failed authentication (Authentication. Failed equals false).
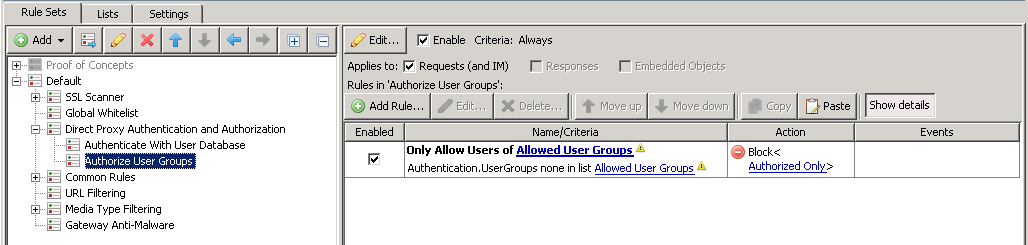
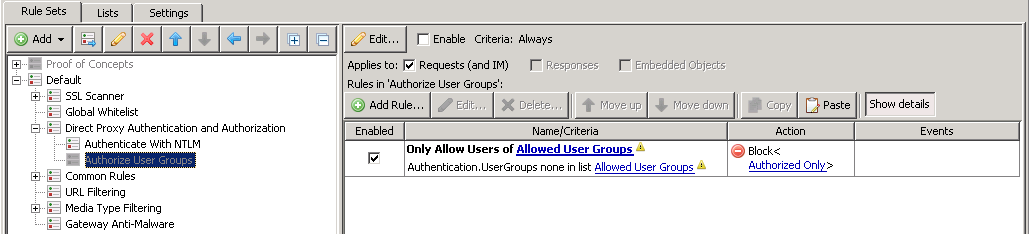
Authorize User Groups
The third ruleset is meant for restricting web access to a list of user groups. If the user is not in a specified internet access group, they will be blocked.
Expected or likely modifications
Change out the authentication back-end
As stated above, most customers will immediately swap out the default authentication back-end to use their internal resources (such as Active Directory via NTLM).
Modify or disable Authorize User Groups
Depending on your directory structure and company policy, you may need to define the groups that are allowed internet access. If you do not have such a policy then you may just end up disabling the ruleset altogether.
Add more exception rules
Depending on your needs, you may need to create more exception rules in order to accommodate applications or specific server IP ranges that do not authenticate correctly. In the screenshot above, you will see two new rules added, one based on User-Agent exceptions (Header.Request.Get("User-Agent)), another for the server IP(URL.Destination.IP).
Placement
Typically, Direct Proxy Authentication would be placed after the Global Allowlist, but before Common Rules. See screenshots above for more info. Placing the ruleset in this manner will allow for Global Allowlist entries to be allowed without authentication (common requirement).
Implementation Considerations
A direct proxy deployment with direct proxy authentication is a preferred deployment for Citrix or shared workstation environments.
Transparent Modes (Transparent Router or Transparent Bridge or WCCP)
The recommended authentication front-end for a transparent setup is the Authentication Server. The authentication server works by storing the user's information in a session database. For brevity's sake, a user's session consists of their IP address, username, and session expiration time. Each time a request is made, the session database is checked to see if a session exists for the user's IP. If a session exists, the request is passed through. If a session does not exist, a redirect is sent in response to the request. The requesting machine should follow the redirect, and authentication will be performed. If the user provides valid credentials, a session is stored and the Secure Web Gateway issues another redirect back to the originally requested URL.
What it looks like (by default)
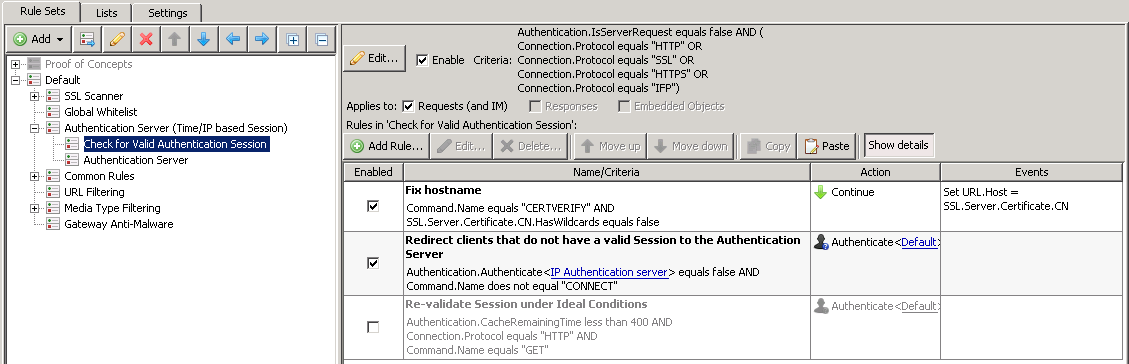
Authentication Server (Time/IP based Session)
The Authentication Server (Time/IP based Session) ruleset acts as a container for all of the authentication server rules.

Check for Valid Authentication Session
This ruleset will evaluate whether or not there is a session for the incoming IP address. If there is a session for the IP, then the user will be allowed. If there is NOT a session for the IP, the SWG will send a redirect to the Authentication Server (see below ruleset).
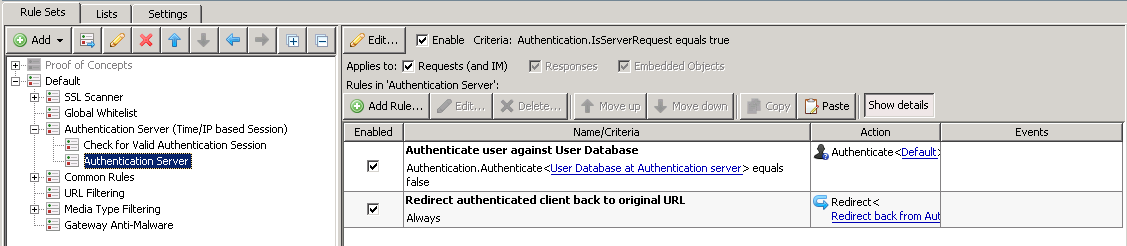
Authentication Server
This ruleset comes into play when the client makes a request for the Authentication Server. If the user successfully authenticates, SWG will create a session in its session database.
Expected or likely modifications
As the Secure Web Gateway issues a redirect to itself when a request is made, there are some client side settings that need to be changed in order to establish a trust relationship between the Secure Web Gateway and the client/browser (which will allow for promptless authentication when using NTLM or Kerberos).
Browser security settings
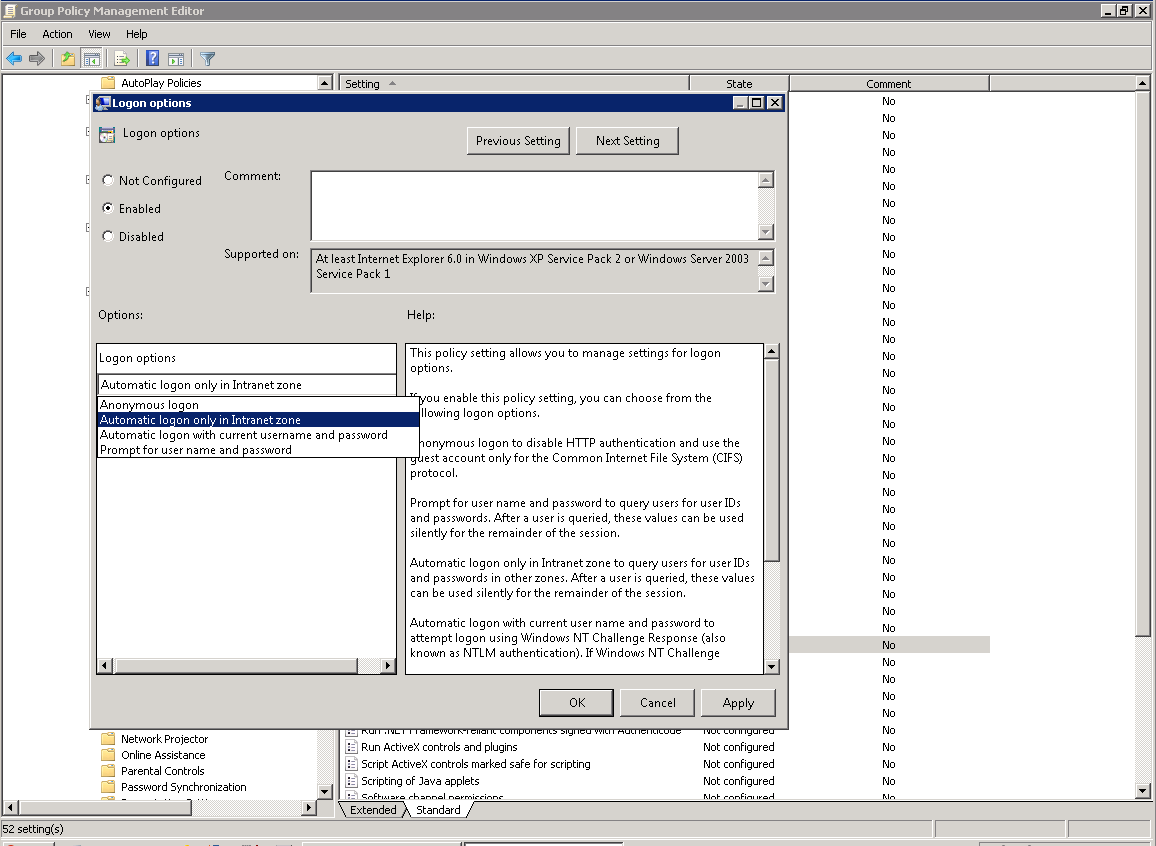
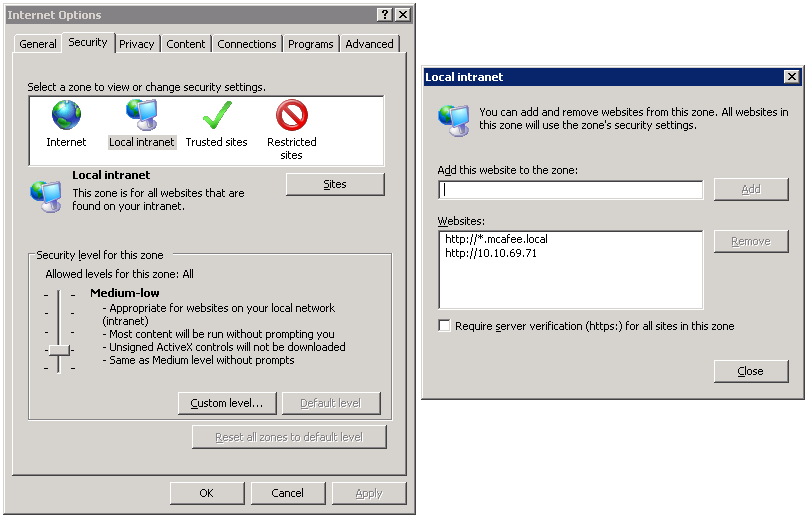
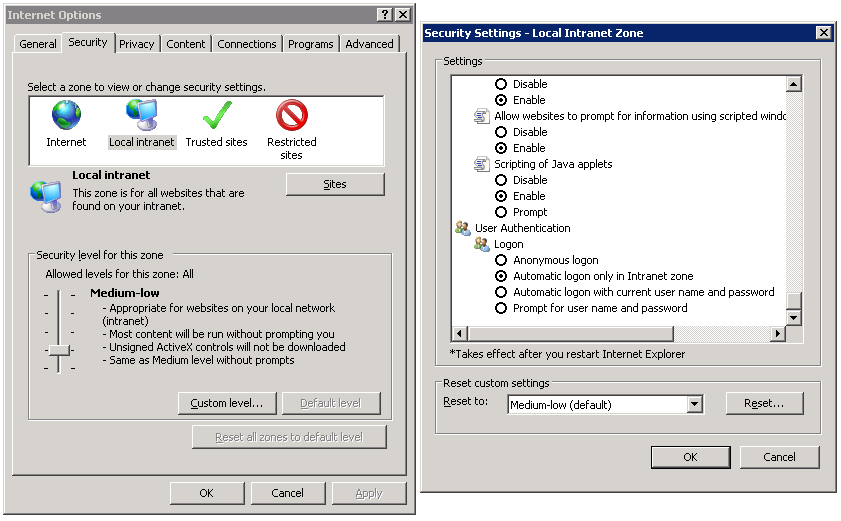
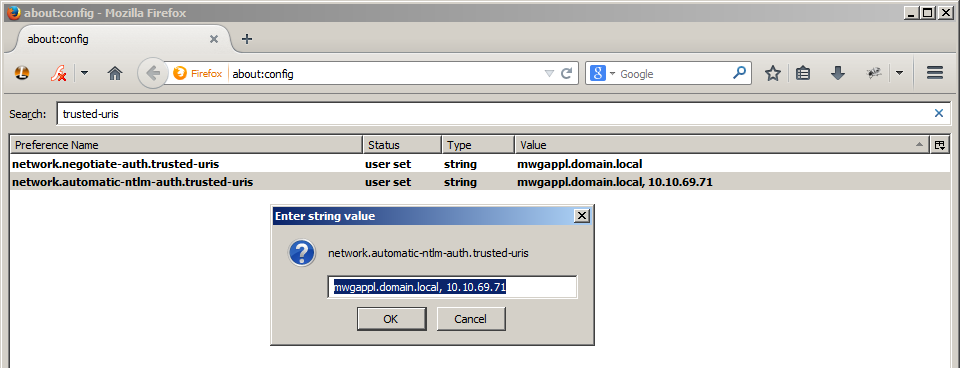
In order for authentication to be promptless (for NTLM or Kerberos), the appropriate security settings in place. Below are the minimum settings for authentication to take place without prompting the user. See below if you wish to modify IE settings using Group Policy. For Firefox, the about:config would need to be adjusted, see the settings for network.automatic-ntlm-auth.trusted-uris (for NTLM) or network.negotiate-auth.trusted-uris (for Kerberos). For Firefox, URLs need to be separated by commas or spaces (see:http://kb.mozillazine.org/Network.au...h.trusted-uris).
The Secure Web Gateway IP or fully qualified domain name needs to be added to a Security zone that allows for Automatic login. In the example, I have added the Secure Web Gateway's IP to the Intranet Zone, and set the zone to automatically log if the site has been found in the Intranet Zone.
Push browser settings via Group Policy
If you have the ability to push out group policy settings this is the easiest means to push out the appropriate browser security settings.
Adding sites to Intranet Zone and enabling Automatic login for Intranet Zone
http://technet.microsoft.com/en-us/l.../dd572939.aspx
Add sites to intranet zone: Computer Configuration > Policies > AdministrativeTemplates > Windows Components > Internet Explorer > Internet ControlPanel > Security Page, then find Site to Zone Assignment List. Here is a list of possible values that indicate the zone:
- Intranet zone – sites on your local network.
- Trusted Sites zone – sites that have been added to your trusted sites.
- Internet zone – sites that are on the Internet.
- Restricted Sites zone – sites that have been specifically added to your restricted sites.
Enabling automatic logon for Intranet Zone (on by default): ComputerConfiguration > Policies > Administrative Templates > Windows Components >Internet Explorer > Internet Control Panel > Security Page > Intranet Zone, find Logon options.