Skyhigh Security Cloud Release Notes 6.6.1 (April 2024)
Legends Used
|
General Availability |
Skyhigh Cloud Platform
Skyhigh Data Loss Prevention (DLP)
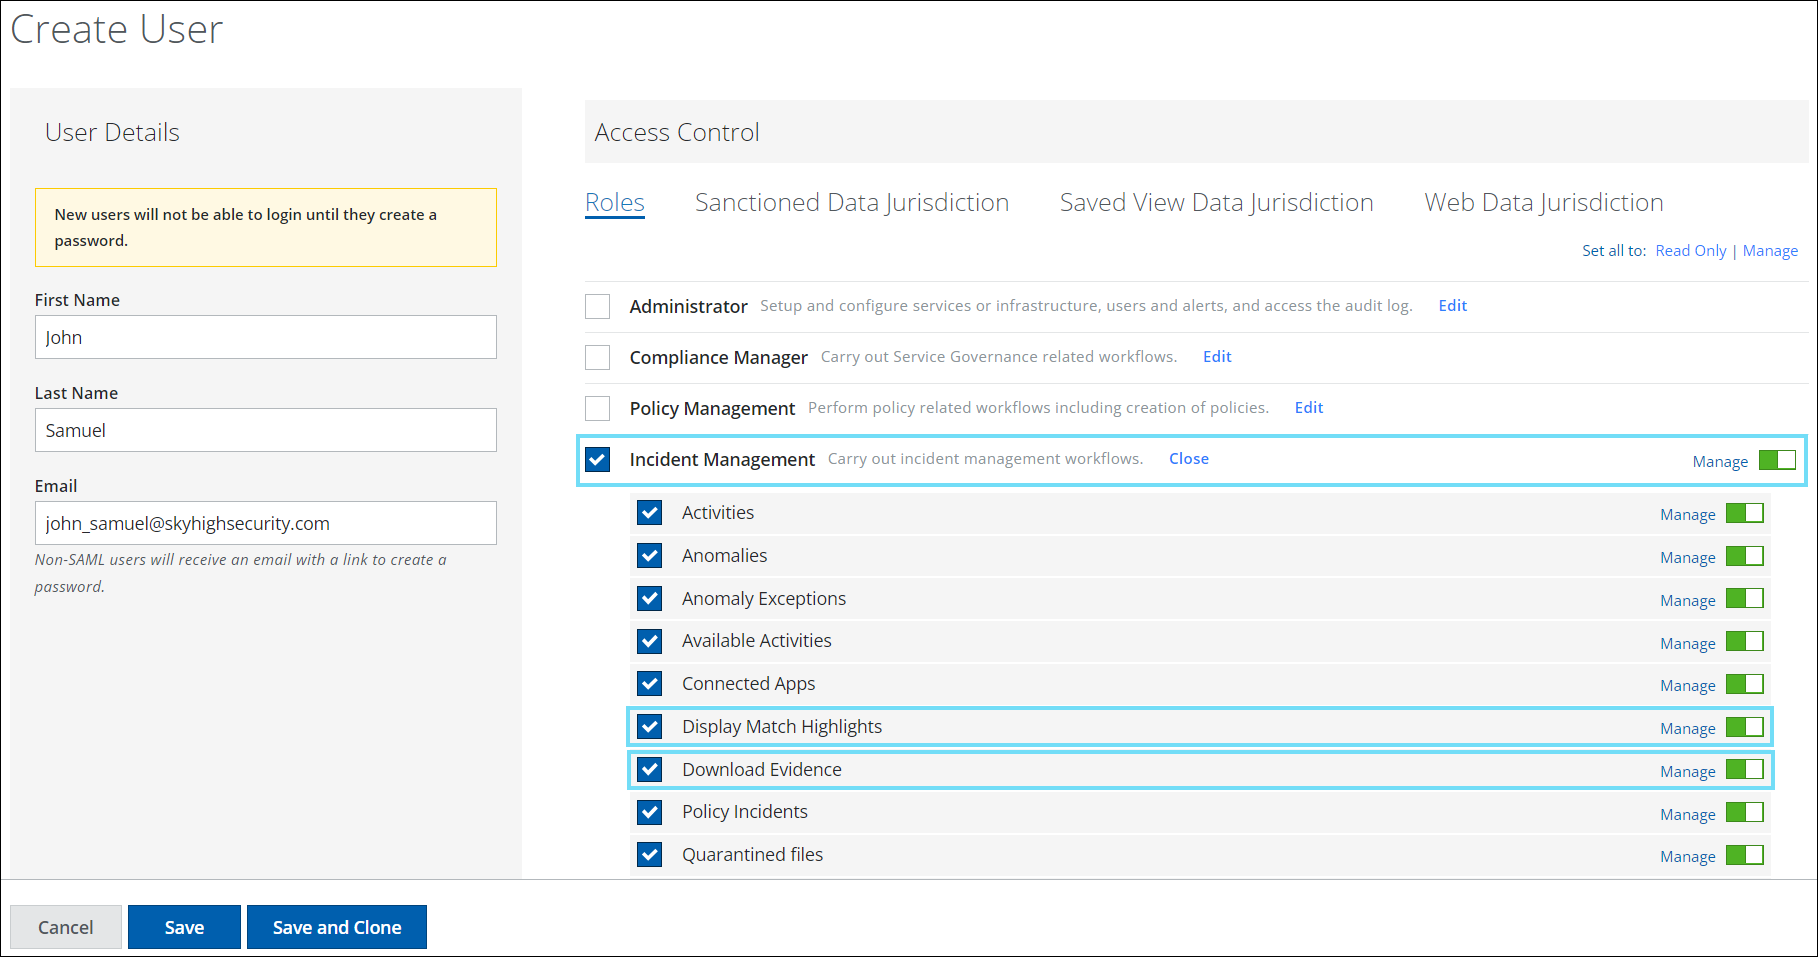
Controlled Access to Download Evidence Files and View Match Highlights for Sanctioned DLP Users via RBAC 
You can now apply Role-Based Access Control (RBAC) to secure and control the process of downloading evidence files or viewing match highlights from individual Sanctioned DLP incidents. RBAC ensures that only authorized users within a tenancy are granted access to download evidence files or view match highlights for Sanctioned DLP incidents, thereby providing an additional layer of security to the overall process. For details, see Download Sanctioned DLP Evidence and View Match Highlights for Sanctioned DLP Incidents.
To control the download of evidence files or visibility of match highlights for Sanctioned DLP incidents, you can assign users with the Incident Management role and the Download Evidence or Display Match Highlights permission via the following pages:
| Page Name | Navigation Details |
|---|---|
| Create User | Settings > User Management > Users > Actions > Create New User > Create User > Roles > Incident Management > Download Evidence or Display Match Highlights |
| Edit User | Settings > User Management > Users > Actions > Edit > Edit User > Roles > Incident Management > Download Evidence or Display Match Highlights |
| Bulk Edit – Roles | Settings > User Management > Users > select one or more users > Actions > Edit Roles > Bulk Edit – Roles > Add Roles or Overwrite Roles > Incident Management > Download Evidence or Display Match Highlights |
For example, a Security Operations Center (SOC) can restrict access to download evidence files or view match highlights for DLP incidents on the Policy Incidents page to designated users only. To achieve this use case, the SOC can assign the Incident Management role and the Download Evidence or Display Match Highlights permission to specific users, granting them the ability to download evidence files or view match highlights for DLP incidents. This way, only authorized users can access sensitive information related to DLP incidents, minimizing the risk of data breaches. For details, see About User Roles and Access Levels.
Classification Update: Add BIN Validator to Custom Advanced Patterns
The Custom Advanced Patterns condition introduces an additional feature called Add BIN Validator (found under Policy > DLP Policies > Classifications > Create Classification > Conditions > Advanced Patterns > New > No Validation > Add BIN Validator ).
NOTE: Before adding the BIN Validator, you must define regular expressions using Add RegEx or AI RegEx Generator.
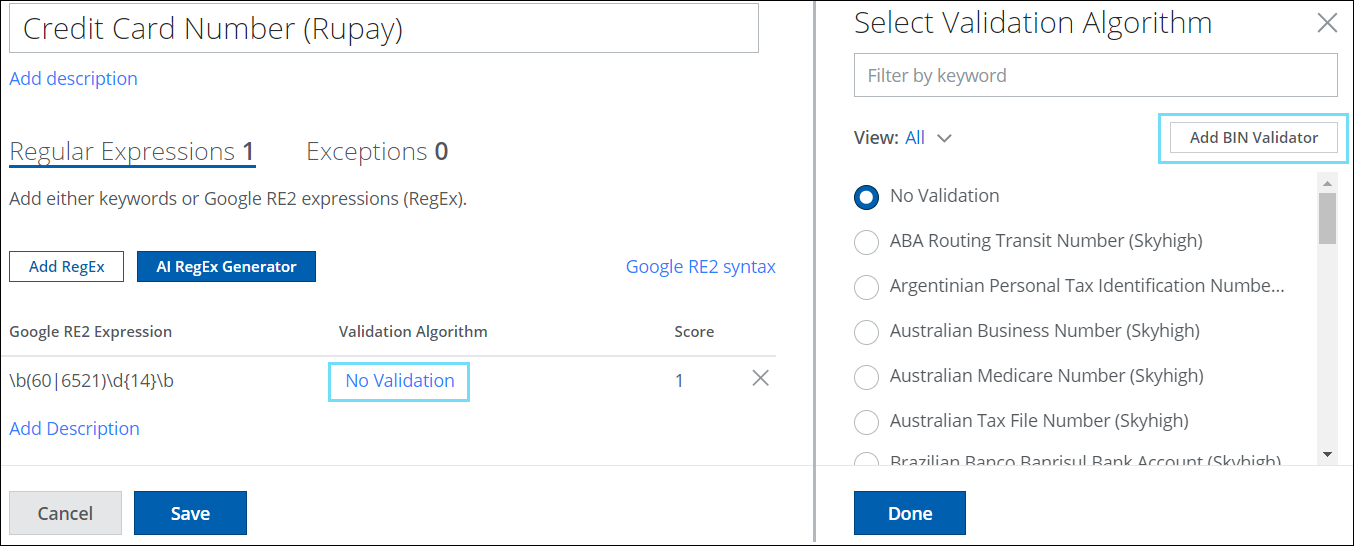
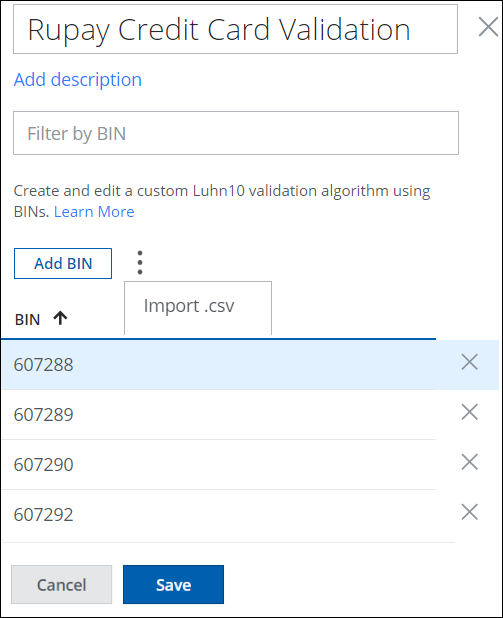
BIN Validator uses the Luhn 10 Validation Algorithm which helps to validate Bank Identification Numbers (BIN). BIN numbers are the first four to six-digit numbers on a payment card that identify the financial institution that issues the card. BINs can be found on various payment cards, including credit cards, charge cards, and debit cards. BIN Validator enables users to add individual BINs or import a maximum of 500 BINs from a CSV file. The Luhn 10 Validation Algorithm will then determine whether the provided BIN IDs are valid or invalid based on the following criteria:
- BIN must be an integer.
- BIN length must be between 1 to 6 digits.
- BIN must contain unique values and should not be duplicated.
Defining BINs in the Custom Advanced Pattern allows you to add the Luhn 10 Validation Algorithm to your custom regex patterns that identify, validate, manage, and classify sensitive data such as Credit Card or Debit Card Numbers. Applying Data Loss Prevention (DLP) policies for the custom classification protects sensitive data from unauthorized access and can help prevent fraudulent activities. For details, see Add BIN Validator.
Additional DLP Improvements
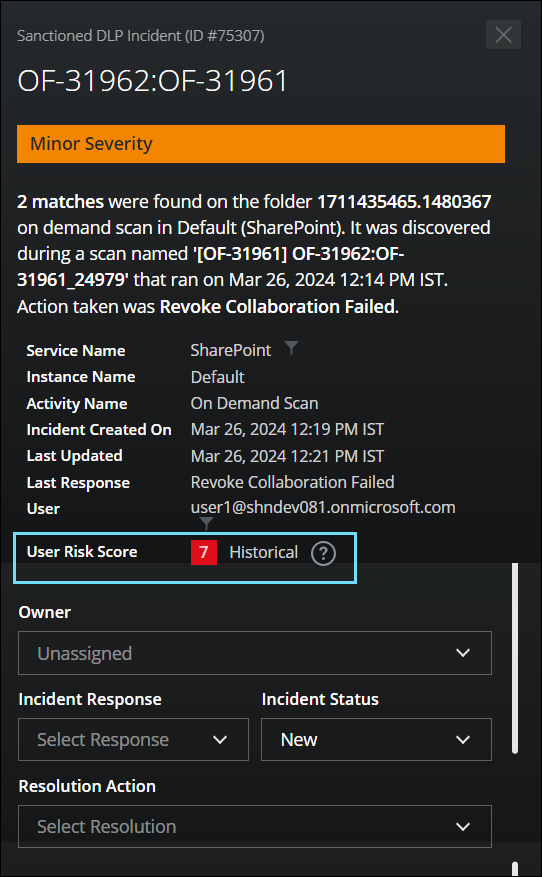
Historical User Risk Type Filter for Sanctioned DLP Incidents 
You can now filter and categorize your search results by Historical User Risk Type, based on the Low, Medium, and High-risk scores assigned to users for Sanctioned DLP Policy Incidents (found under Incidents > Policy Incidents > Policy Incidents > Filters > Incident Type > Sanctioned DLP).
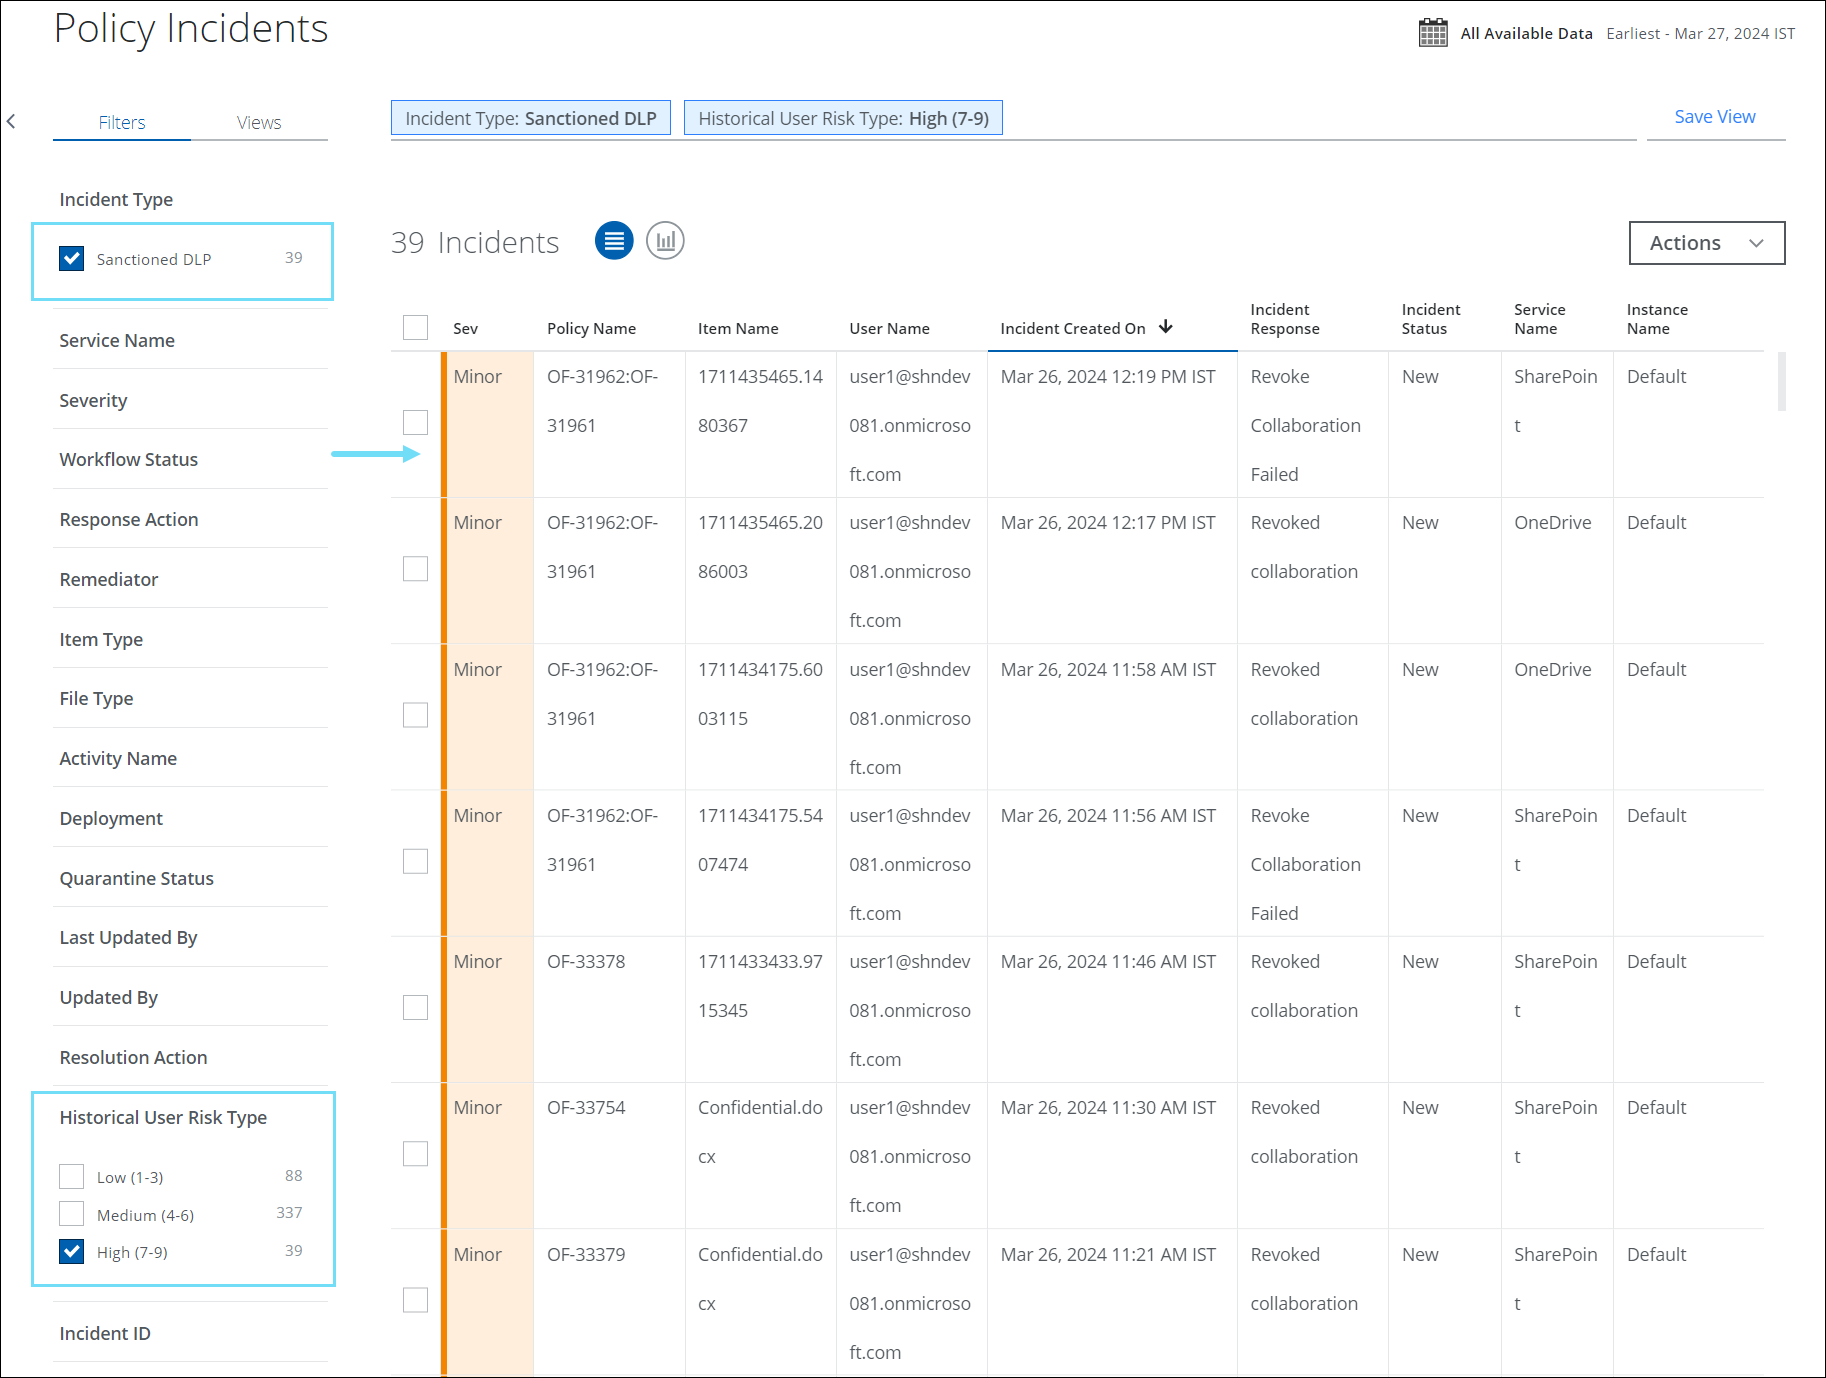
You can easily view the Historical User Risk Score of the user on the Sanctioned DLP Incidents cloud card. Historical User Risk Score is a risk score assigned to the user whenever the incident is created and it is rated on a scale of 1–9. This score is measured based on various factors such as the severity of the violation, the user’s security posture, and metadata about the user's overall compliance history. The score identifies the deviations as High (7-9), Medium (4-6), and Low-risk (1-3) types.
The Historical User risk score allows you to track and manage user’s typical usage patterns related to data security, and take necessary actions to strengthen the defense against potential threats in your organization. For details, see Historical User Risk Score.
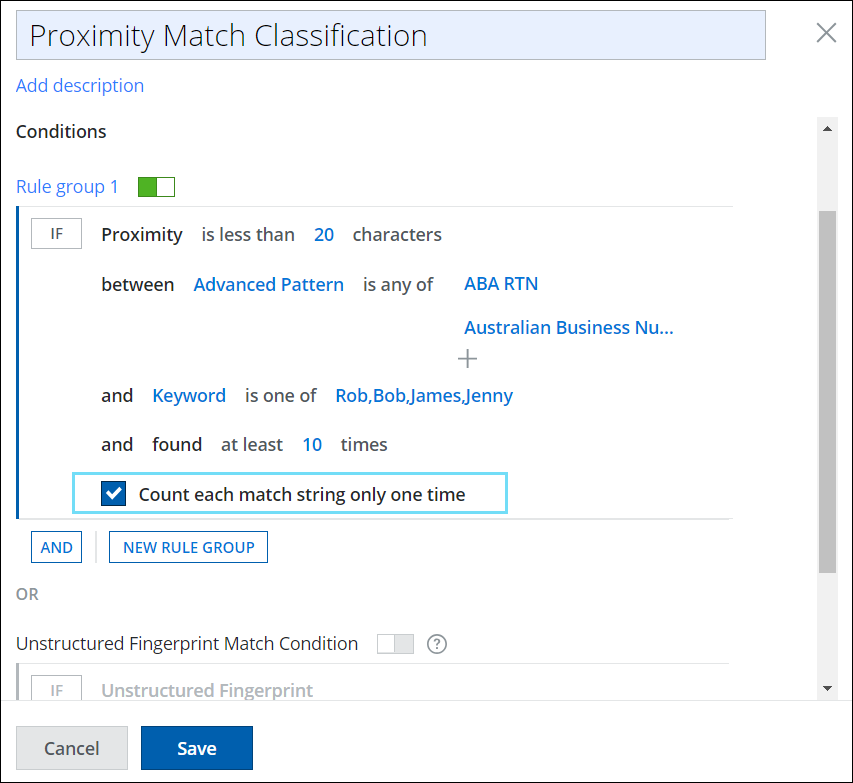
Classification Update: New Option to Count each String only once on Proximity
The Proximity classification is enhanced with a new option called Count each match string only one time. You can enable or disable this option to determine whether to count each matching string only once or multiple times in your Proximity classification. Activating this checkbox eliminates the duplicate match counts during the DLP Policy evaluation.
To access the new option on Proximity Classification, go to Policy > DLP Policies > Classification > Condition > Proximity. For details, see Create a Classification using Proximity.
Skyhigh SSE Products
Skyhigh Secure Web Gateway
Reviewing Configuration Changes When Working with Secure Web Gateway
When working with Secure Web Gateway on the user interface, you can now review your configuration changes before publishing them.
The changes can be related to your web policy. This includes changing rules and rule sets, lists, Feature Configurations, and End User Notification Pages. For example, if you enable a rule of your web policy that was not enabled before, you are notified of this change and can review it.
When you change the setup of the product, you are also informed about it. This information is provided in a general way. You are told that the setup has been updated.
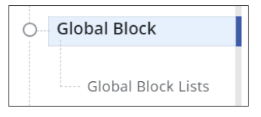
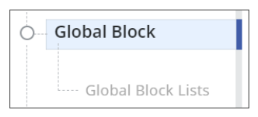
In the following, three rules of the Global Block Lists rule set are shown that are enabled and disabled, respectively, by default.

If you disable the Domains Blocklist rule and enable the Client IPs Blocklist rule, the beginning of the rule set looks like this:

A bar with options for handling configuration changes is then inserted.
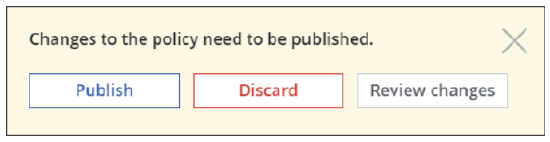
If you click Review changes, a page appears where the changes are listed that you have made in this example.
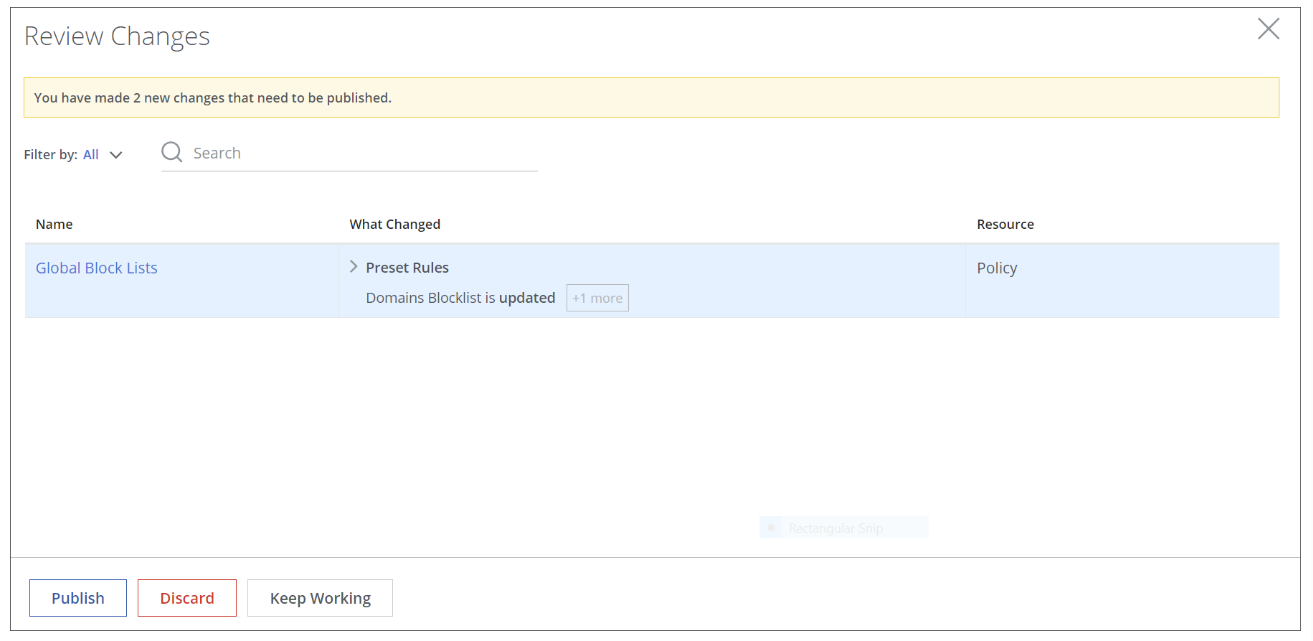
You can review your changes and publish or discard them or keep working and decide on how to handle them later on. For more information, see Review Configuration Changes When Working with Secure Web Gateway.
Showing a Rule Set as Disabled on the Policy Tree
If you disable a rule set on the user interface, it is not only shown as disabled in the configuration area, but also on the policy tree now.
For example, if you disable the Global Block Lists rule set using the toggle switch, the switch is grayed out, which means the green field on its left turns to white and the white field turns to gray.
 On the policy tree, the name of the rule set changes its color from full gray ...
.. to light gray.
For more information, see Configure a Rule Set for your Web Policy.
Disabling the Browser Isolation Pop-up
You can now disable the default pop-up message that appears on the user's browser when the Full Isolation or Risky Web version of browser isolation is applied to a web session. The message informs the user that this web security measure is being taken.
To access these rule sets, select Policy > Web Policy > Policy and expand Browser Isolation on the policy tree. The browser settings for the Full Isolation version of browser isolation, for example, look like this:

If you do not select Disable Browser isolation pop-up here, a pop-up message will continue to appear in the user's browser to indicate that browser isolation is being applied to a web session.
For more information, see Risky Web — Use Browser Isolation for Websites Considered a Risk and Full Isolation — Use Browser Isolation for Websites Based on Your Own Selection.
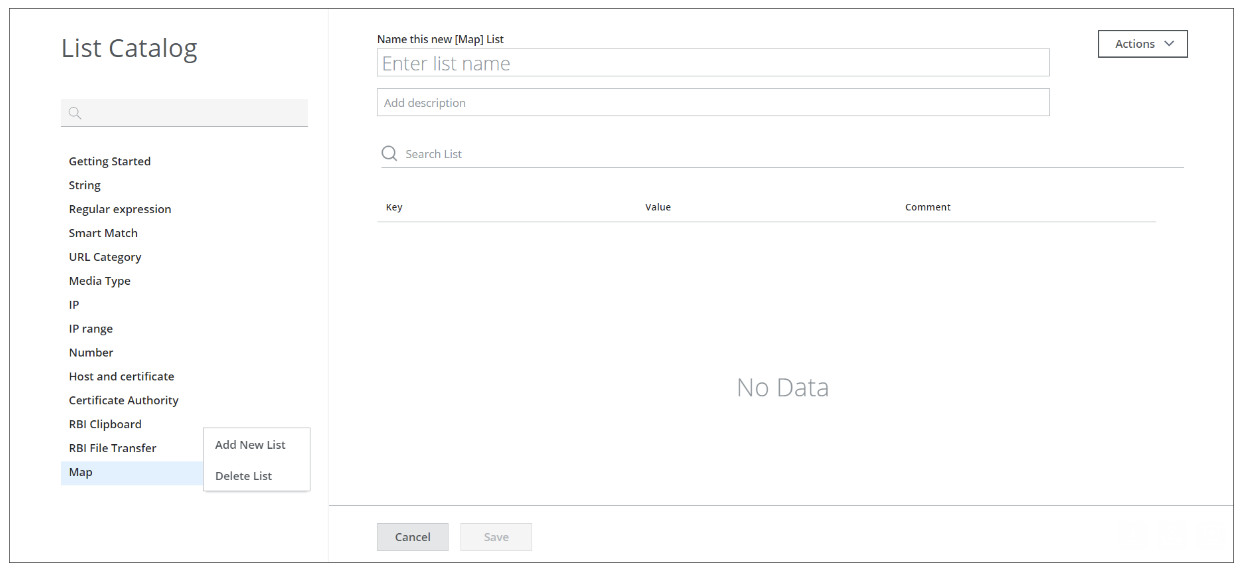
Map Type Lists Added as Another Type to the List Catalog
You can now use lists of the Map type when configuring rules for your web policy, as this list type has been added to the list catalog.
To access the list catalog, go to Policy > Web Policy > List Catalog on the user interface. On the List Catalog page that appears, the available lists are shown on the left, grouped according to their types.
Clicking the three dots next to Map opens a menu with options for adding a list of the Map type and deleting an existing list of this type.
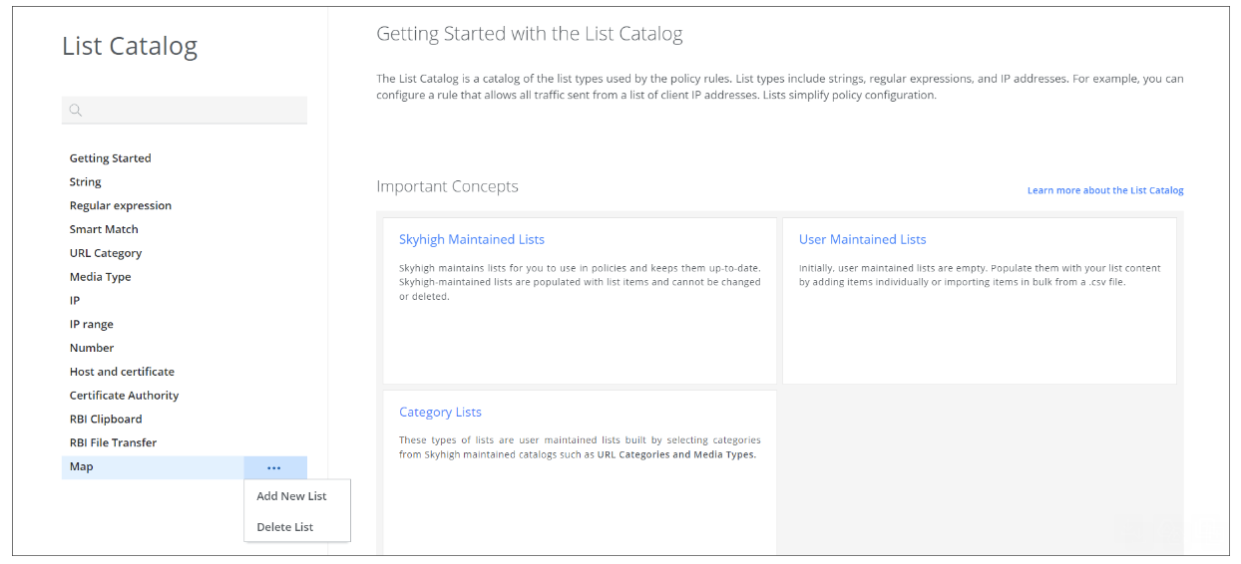
If you select Add New List from the menu, options for adding a list of the Map type and configuring its settings are provided on the right.
For more information, see List Catalog Page.
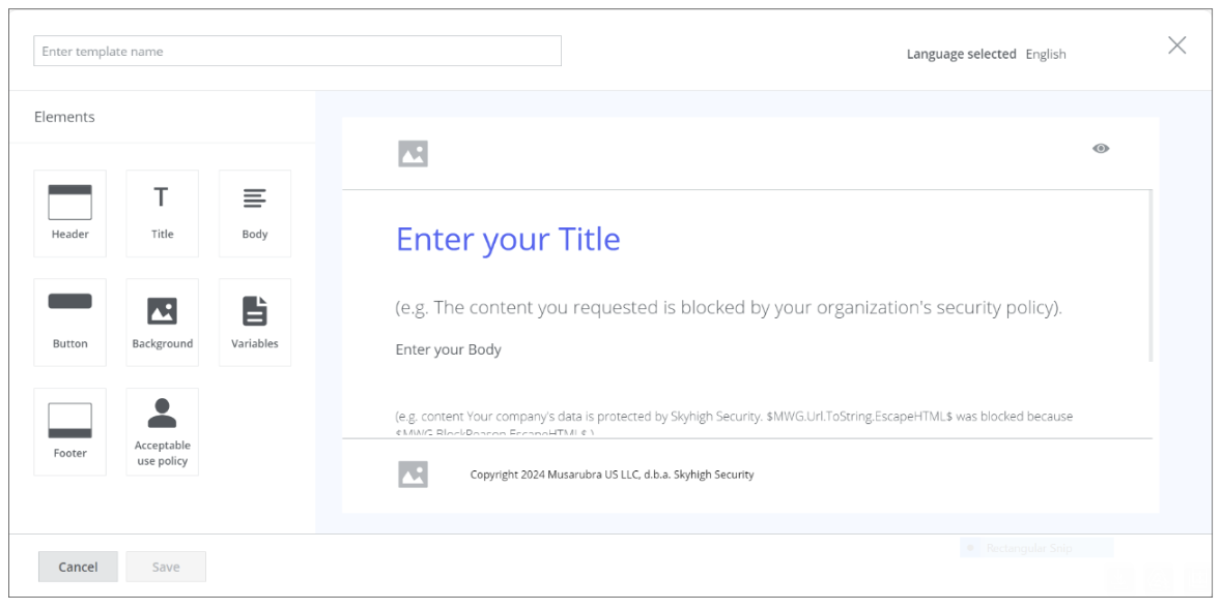
Configuring the Language of a Template for an End User Notification Page
When creating or importing a template for an End User Notification Page on the user interface, you can now configure a language for this template. The End User Notification Page that uses the template will be sent to the end user in this language.
For example, to create a template, you select Policy > Web Policy > End User Notification Pages. From the Actions menu on the page that appears, you select Create Template, which opens a window where you can configure a language.
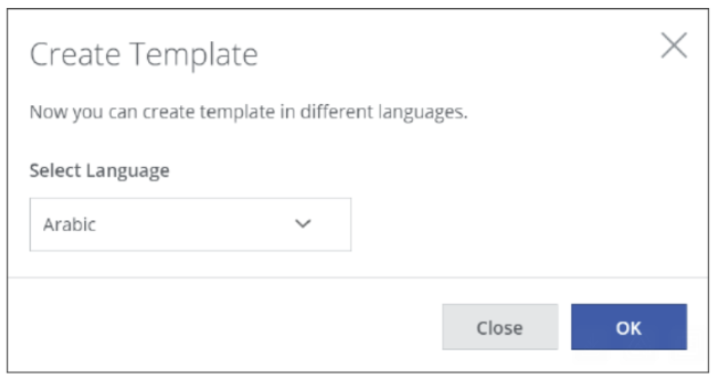
When you continue to configure more settings for the template, the language that you have selected is shown in the top-right corner of the configuration page.
For more information, see Create a Template for an End User Notification Page and Import an HTML Template For an End User Notification Page.
All Block Page Settings Configurable for Web Policy Rules
When configuring a block page for a web policy rule, you can now select any of the settings that exist under Secure Web Gateway for this page. There is no block page with hard-coded settings anymore.
For example, in the past, you could not configure the block page settings for the rules in the Anti-Malware rule set. To configure them now, you can go to Policy > Web Policy > Policy on the user interface for Secure Web Gateway and then select Threat Protection > Anti-Malware from the policy tree.
These rules use the default Virus Found setting for block pages.

Upon clicking Virus Found, a list of the settings that you can configure for block pages opens. You can select any of these settings, including those you have created yourself, for example, Virus Found Settings of My Own.
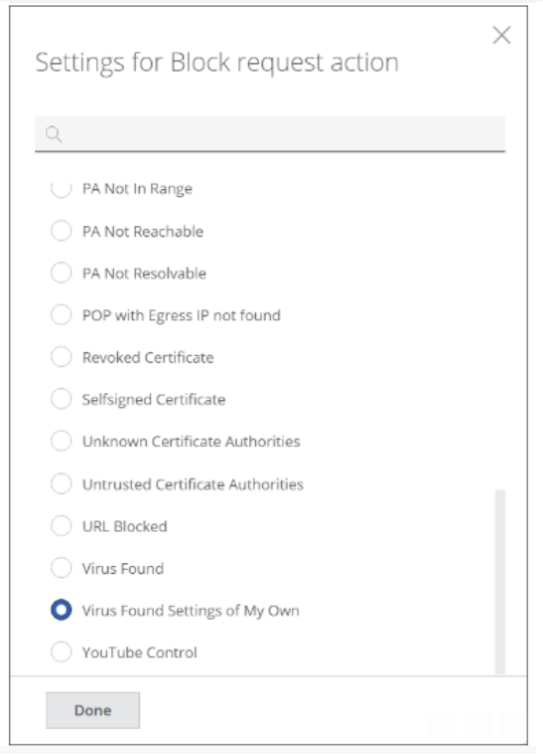
For more information, see Modify a Default Template and Use It To Configure a Block Action.
Skyhigh Private Access
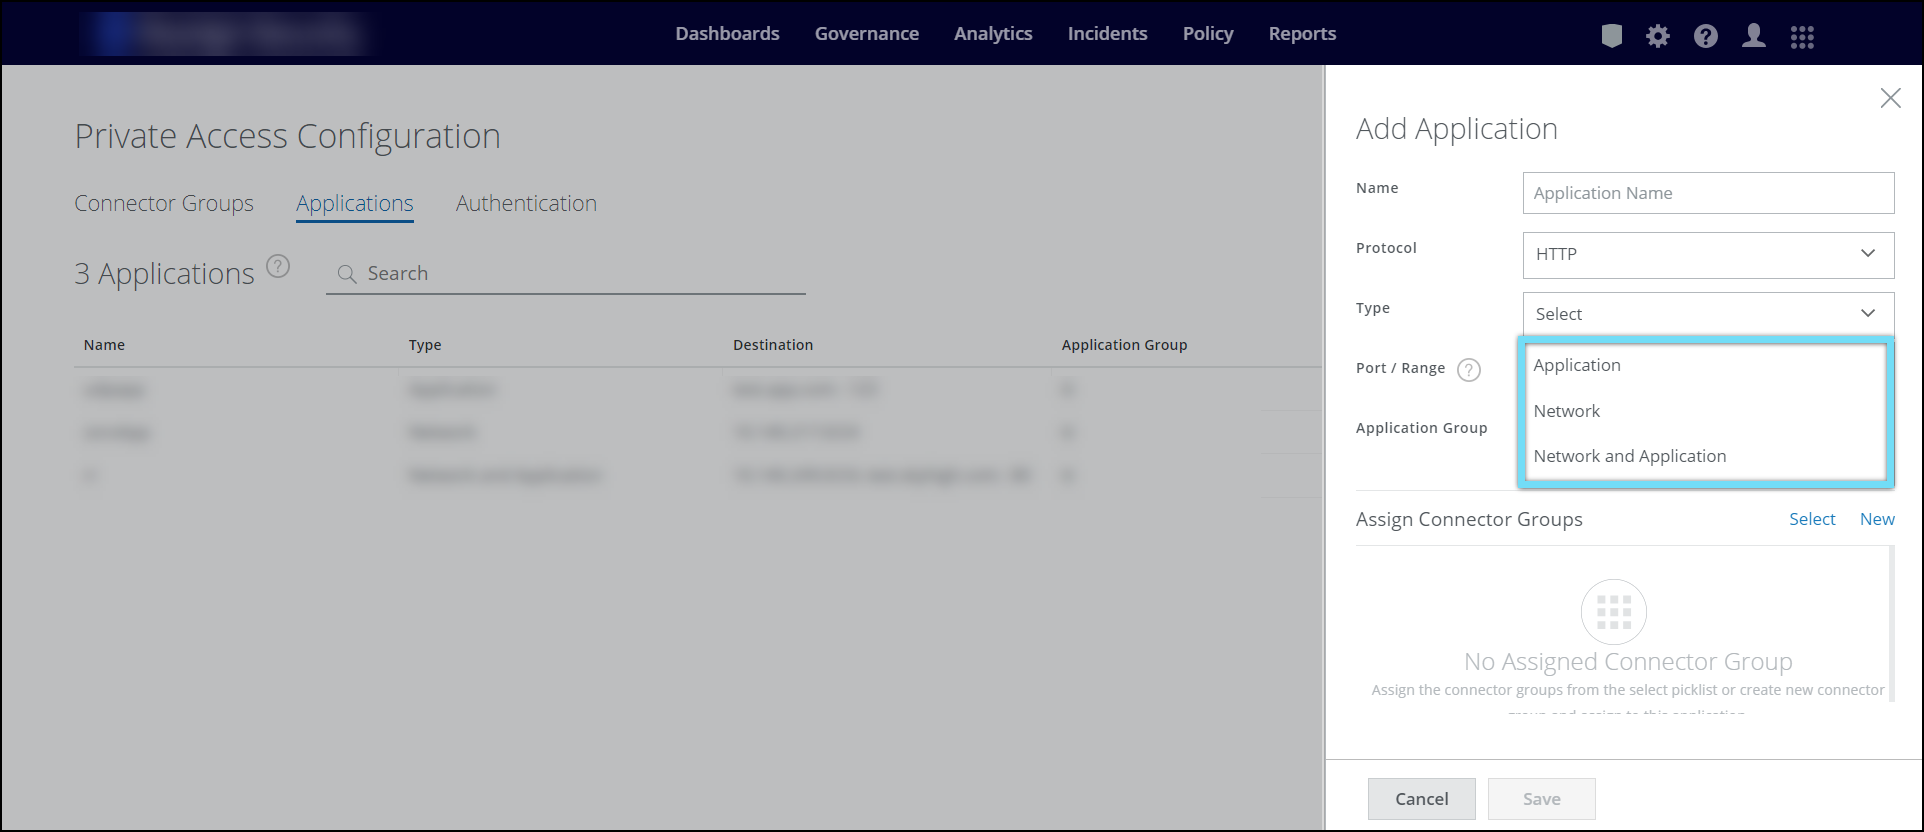
Network Level Access: Enabling Legacy VPN Migrations
Private Access now supports relevant use cases fulfilled by traditional VPNs using Network Level Access (NLA) by securely opening the network like a VPN but based on zero trust principles. NLA supports network types such as subnet, IP, and domain wildcards in addition to domains, enabling easy migration from legacy VPNs. To enable the vpn protocols, see Add Applications.
Private Apps Isolation on Clientless Devices using User-based Policies
You can now access private applications through isolated browser sessions on clientless devices to ensure controlled access to specific users or user groups. Configure the Private Access policies (found under Settings> Policy > Access Control > Private Access Policy) to specify the User Name and User Group criteria. For details, see Configure Private Access Policy Rules.
Skyhigh CASB
Low and Medium User Risk Filters on the Threats and Anomalies
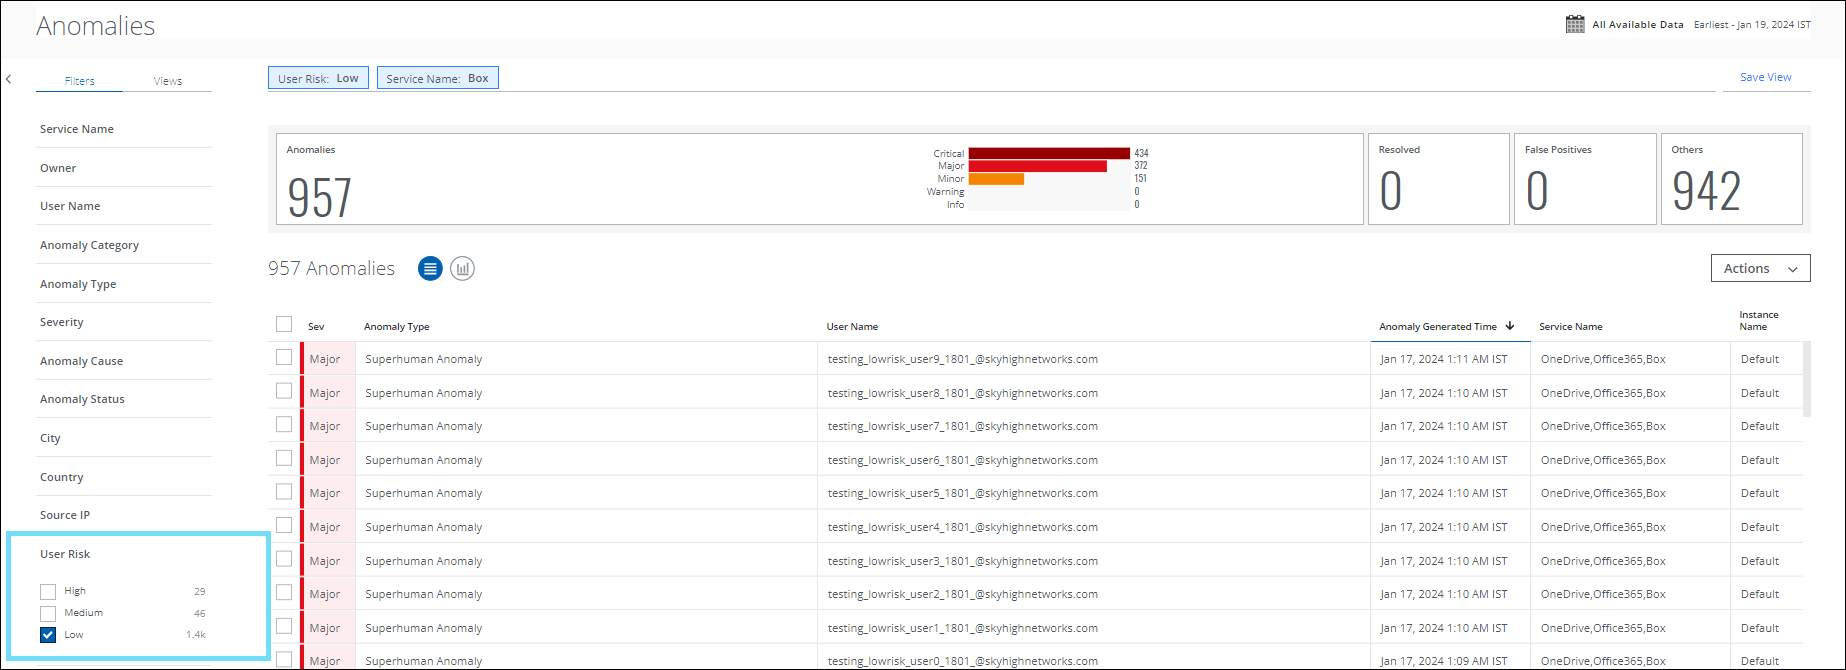
The User Risk filter has been enhanced with two more options, Low and Medium in addition to the existing filter (High). You can now filter and categorize your search by User Risk score for Low, Medium, and High-risk users on the Threats (found under Incidents > Threats) and Anomalies (found under Incidents > Anomalies > Anomalies) pages. For details, see the Threats Page and About Anomalies pages.
For example, to view the low-risk users on the Anomalies page, select the User Risk filter as Low. If there are no anomalies detected for low-risk users in your tenant, then no anomalies will be displayed.
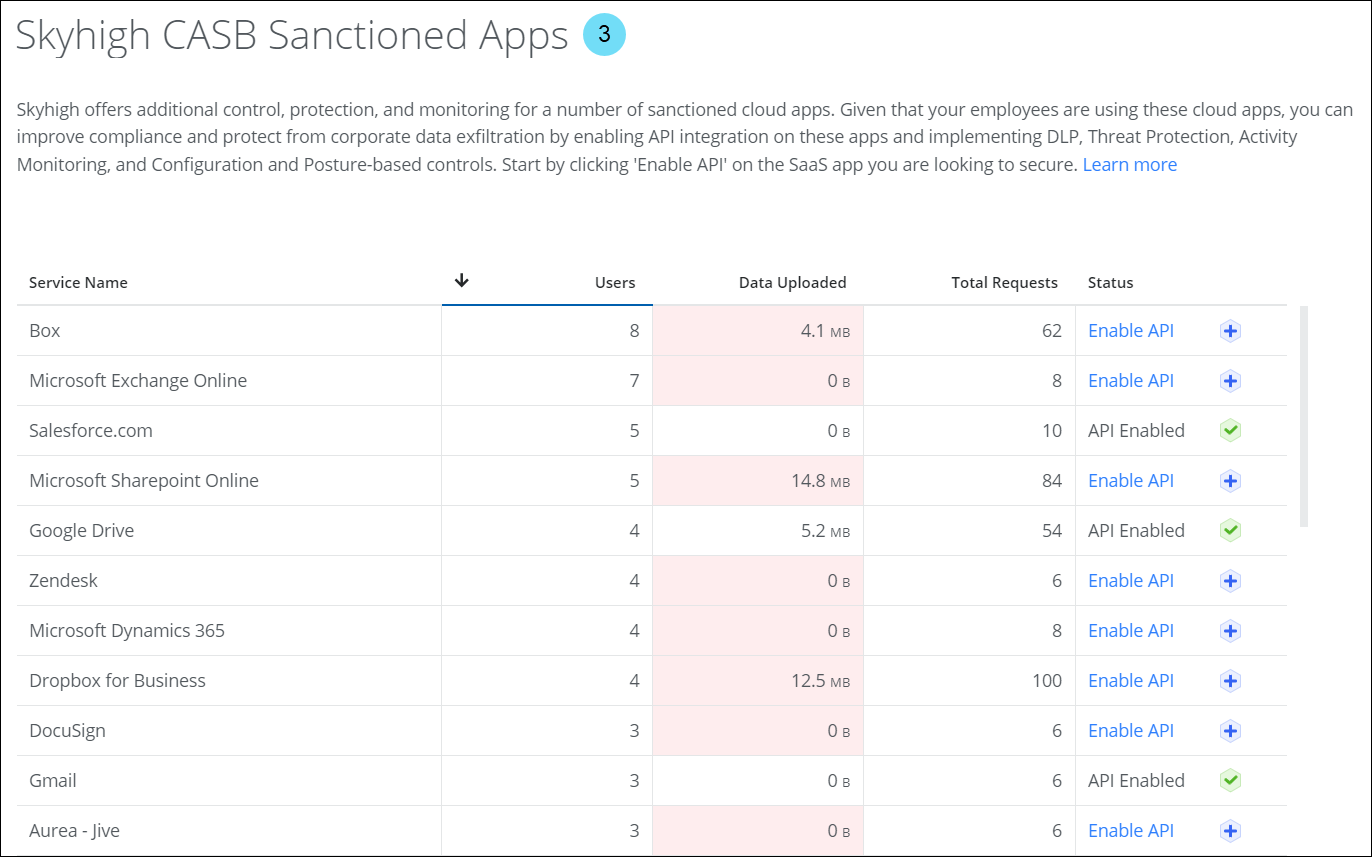
Enable API Integration for Unsecured Sanctioned Services
Skyhigh CASB enables API integration for unsecured sanctioned services. This integration allows you to apply security controls such as Data Loss Prevention (DLP), Threat Protection, Activity Monitoring, and Configuration and Posture-based controls to secure your corporate data from exfiltration and ensure compliance. To enable API integration for unsecured sanctioned services, you can use the following pages:
| Page Name | Navigation Details |
|---|---|
| Services | Analytics > Services (About Services) |
| Cloud Registry | Governance > Cloud Registry (About the Cloud Registry) |
| Service Details | Analytics > Services > Service Name > Service Details (View Service Details) |
| Compare Cloud Services | Analytics > Services > Select up to four Sanctioned Services > Actions > Compare Cloud Services (Compare Cloud Services) |
For details about enabling API integration for unsecured sanctioned services, see Enable API Integration for Unsecured Sanctioned Services.
Additional Enhancements for Sanctioned Services
Skyhigh CASB now provides granular visibility into the usage of sanctioned services within your organization with these enhancements:
- Sanctioned SaaS filter (found under Services or Cloud Registry page). Identifies the sanctioned services that are supported for API integration.
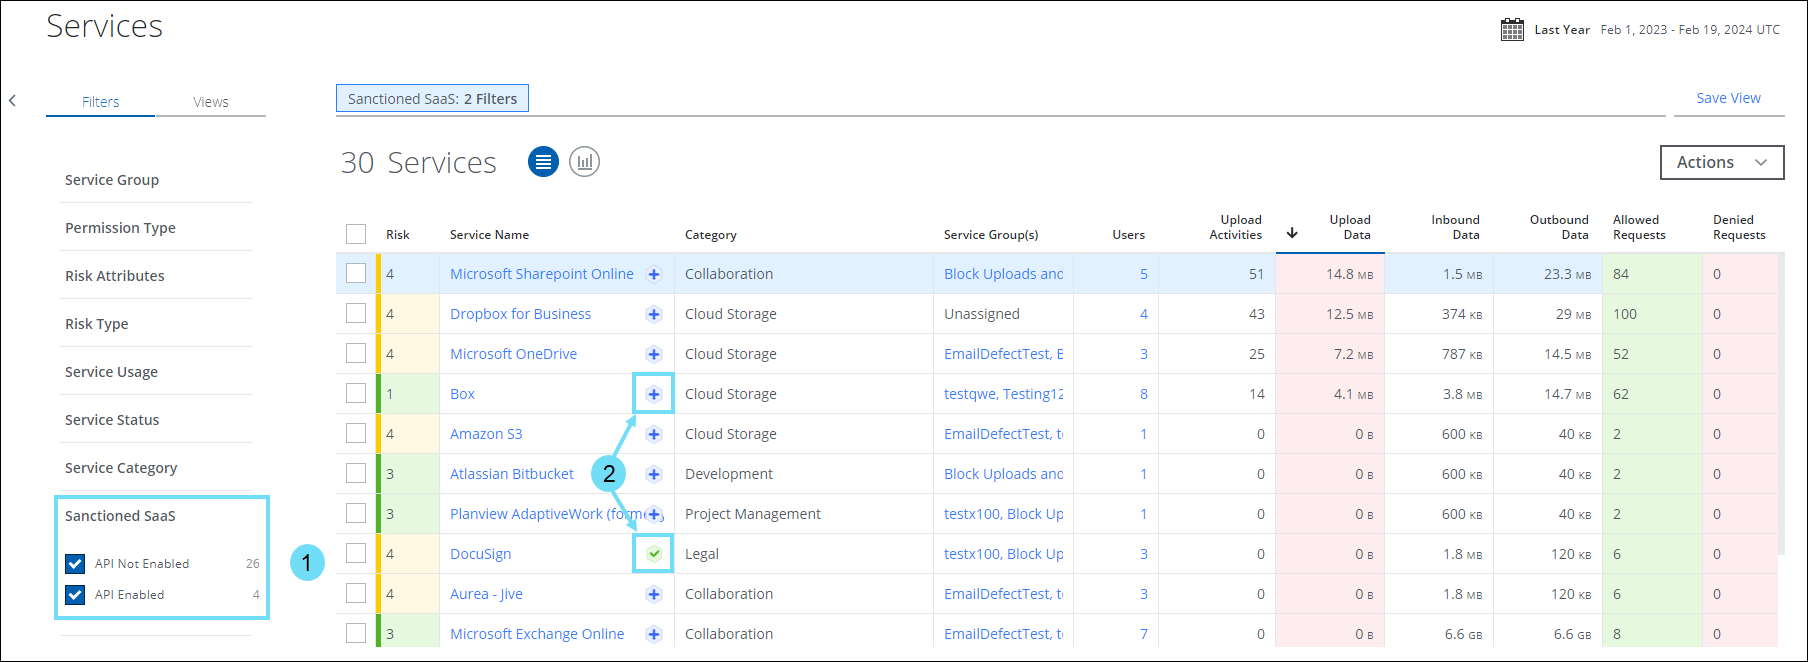
- API Status Icons. Click any of the following API status icons next to the Service Name to view the list of sanctioned services that are supported for API integration.
API Status Icon Icon Significance 
API integration is not enabled for the sanctioned service. Click to enable API integration for the sanctioned service. 
API integration is enabled for the sanctioned service. - Skyhigh CASB Sanctioned Apps modal. Analyze usage metrics of sanctioned services, identify sanctioned services that are secured/unsecured via API integration, and enable API integration for sanctioned services. For details, see Manage Sanctioned Services via Skyhigh CASB.
ServiceNow Vancouver Q4 2023 Support
Skyhigh CASB now supports ServiceNow Vancouver Q4 2023. For details, see Supported Versions of Structured Apps.
Scheduled Report Enhancements
On the Report Manager, the Scheduled Reports table is enhanced with additional fields to get deeper insights about a report, and the Edit Report page is upgraded with a new Saved View menu to enrich the capability to edit the scheduled reports.
Additional Fields on the Scheduled Reports
- On the Scheduled Reports table (found under Reports > Report Manager > Scheduled Reports tab), the following fields are added to view the selected search filters and the status of the corresponding report:
- Active Filters. Displays the filters associated with the corresponding report.
- Status. Indicates the current status of a report generation process; whether the report is generated (Active), or the process is stopped (Inactive).
- On the Actions, you can start and stop the report generation process:
- Activate. Generates the report.
- Deactivate. Stops generating the report.
For details, see Scheduled Reports.

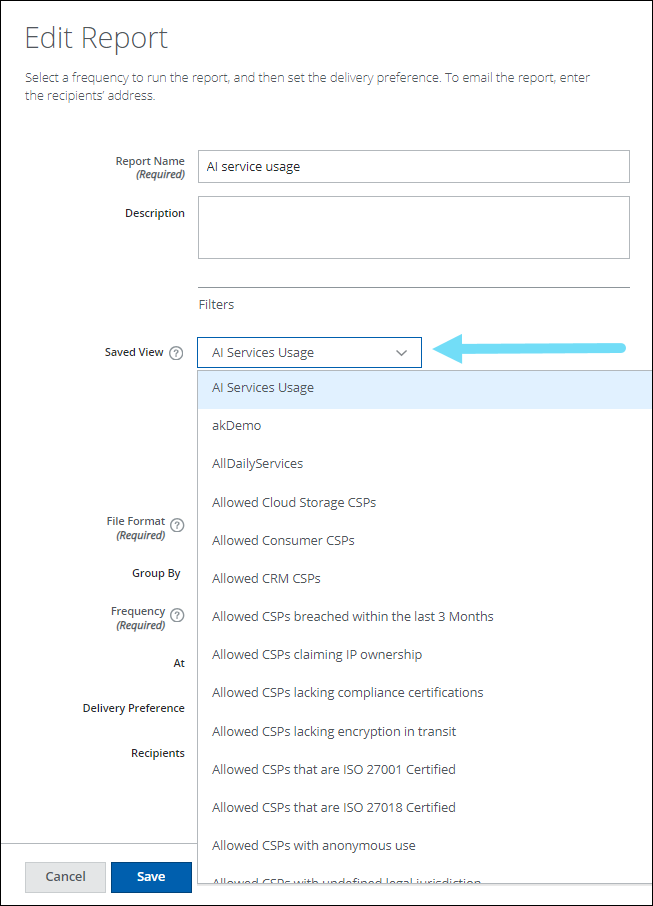
Saved View on the Edit Report
The scheduled reports are now linked with the saved views to enhance the report editing efficiency. A new Saved View menu has been added to the Edit Report page (found under Reports > Report Manager > Scheduled Reports >Actions > Edit). Use the Saved View menu to select a desired saved view from the list and generate the scheduled report with the newly selected saved view. For details, see Edit a Report.
For example, if you have scheduled a report with the AI Service Usage saved view and edit the report by selecting the Allowed Cloud Storage CSPs saved view from the menu, the report will be generated with the Allowed Cloud Storage CSPs saved view.
NOTES:
- If you modify the filters or a saved view associated with the scheduled report and save it, the report will be generated with the updated changes.
- The Saved View menu lists the saved views corresponding to the type of the report. For example, If the report type is Services, the saved views related only to Services are listed.
- If you modify the information related to Saved Views or Recipients, the events will be recorded within the audit log (found under Settings > Audit Log).
Skyhigh CNAPP
Deprecated Policy Template for Azure
The Azure Policy Template named AKS: Do not admit containers with NET_RAW capabilities in Pod Security Policies is deprecated in Skyhigh CASB. For deprecated Policy Templates, see Policy Templates for Azure - DEPRECATED.
Resolved and Known Issues
 Click here to view Resolved and Known Issues
- For details, see Skyhigh Security Cloud Bug Fixes and Known Issues.