Skyhigh Security Cloud Release Notes 6.5.0 (Oct 2023)
|
Legends used: General Availability |
Skyhigh Cloud Platform
Skyhigh Data Loss Prevention (DLP)
AI Regular Expression Generator for Custom Advanced Patterns 
- The Advanced Patterns Classification method (found under Policy > DLP Policies > Classifications > Create Classification > Conditions > Advanced Patterns > New) now includes an AI-based RegEx Generator available for Custom Advanced Patterns.
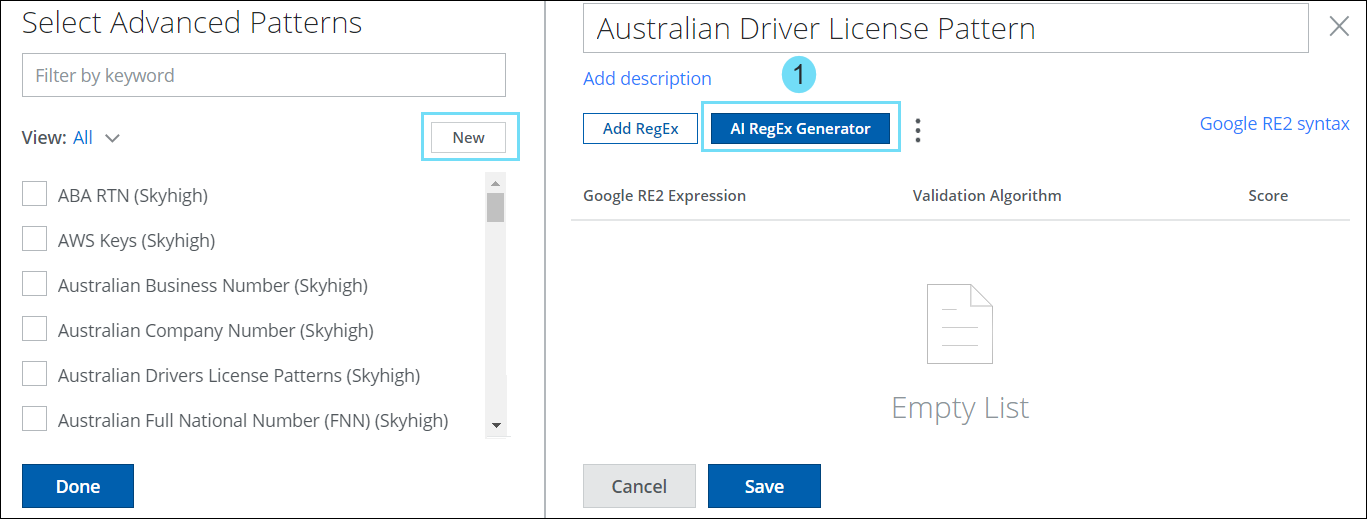
- It generates expressions for scenarios where Skyhigh’s predefined classifications are absent.

- The AI-based regular expression generator simplifies the task of building complex expressions by providing the following benefits. For details, see AI RegEx Generator for Custom Advanced Patterns.
| AI Regex Generator Benefits |
|---|
| AI-Powered Expression Building. Harness the power of AI to create intricate expressions effortlessly |
| Conversational Approach. Seamlessly construct and comprehend complex expressions through a conversation-based interface |
| Rapid Expression Generation. Quickly produces expressions for scenarios where Skyhigh's predefined classifications are absent |
| Tailored Regular Expression Assistance. Specialized in addressing queries solely related to regular expression |
| Precise RE2 Format Suggestions. Provide customers with accurate expression recommendations, exclusively in the Google RE2 format |
| Risk Reduction. Minimize the risk of inaccurate expressions, preventing false positives/negatives |
| Mitigate App Blockages. Overcome organizational app restrictions, boosting the data administrators' productivity |
Full Match Highlights Support for Web DLP Incidents (API Downloadable) 
Match Highlights displays the content that violated a Web DLP policy detected during the policy evaluation. Match Highlights enables users to focus on content that violated the policy rather than reviewing the entire document. These match highlights can now be stored on the AWS S3 bucket along with the web evidence files which allows you to perform additional forensics on generated Web DLP incidents. Additionally, you can automate the match highlights downloading in bulk using the provided APIs. For a detailed API specification to download full match highlights using API, see Retrieve Evidence API.
Bulk Incidents Remediation
Previously, the Policy Incidents page had a restriction of remediating only up to 100 incidents in bulk. But now you can remediate an unlimited number of incidents simultaneously without any restrictions on the Policy Incidents page (found under Incidents > Policy Incidents > Policy Incidents).
The several benefits include:
- Accomplish Bulk Actions. You can perform bulk actions to resolve incidents. To apply bulk remediation, select the incidents you wish to remediate on the Policy Incidents page, then click Actions > Select Response. For details, see Bulk Incidents Remediation.
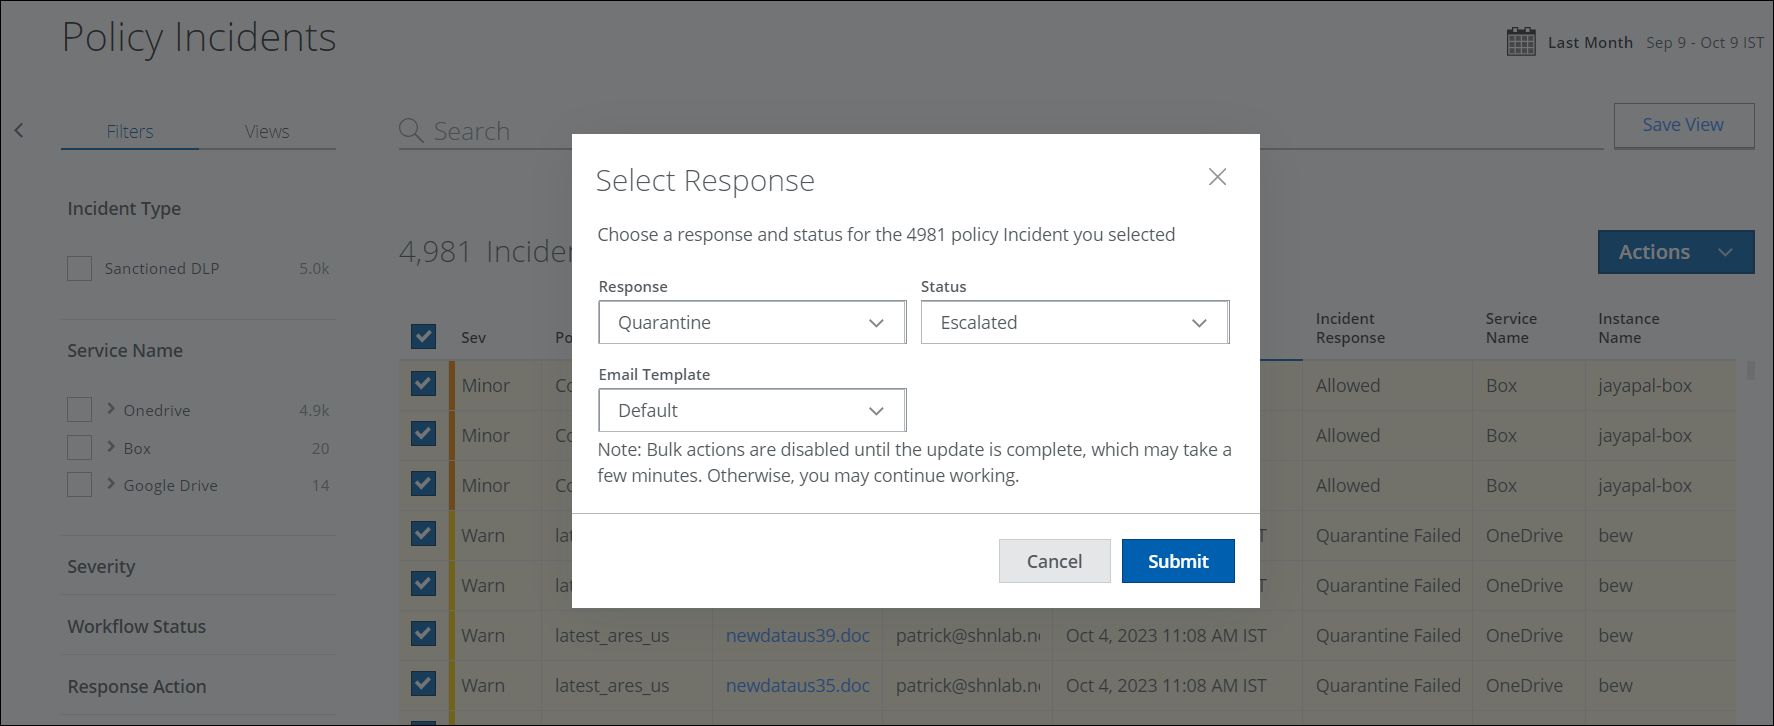
- Experience Improved Handling Efficiency. The efficiency of SOC has been significantly increased by the latest solution, allowing greater ease and efficacy, leading to optimized resource utilization and exceptional outcomes. This saves valuable time and reduces costs associated with incident remediation.
- Ensures Comprehensive Security. Users can address all potential threats promptly which enhances overall security posture.
Additional DLP Improvements
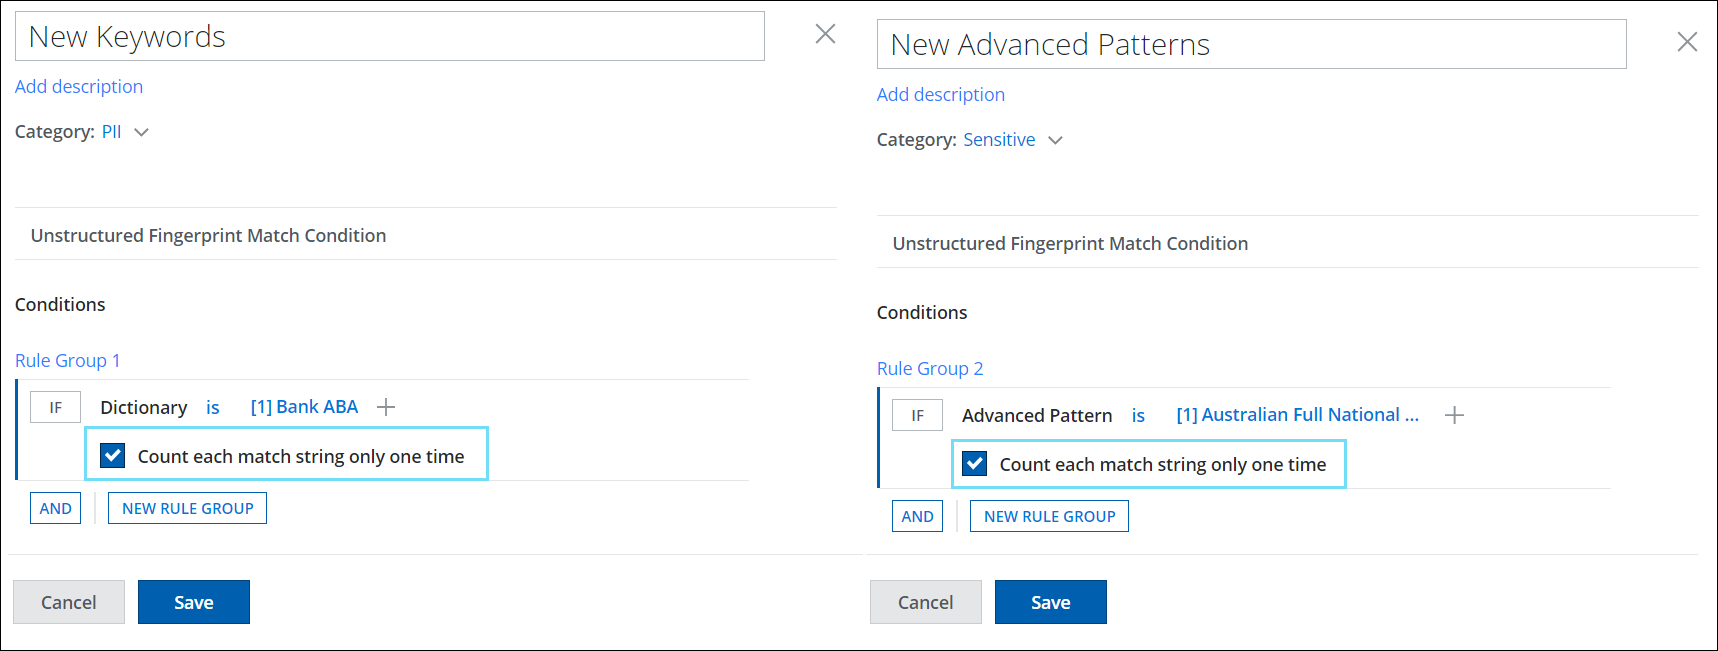
Classifications Update: Option to Count each String only once in Dictionary and Advanced Patterns
When creating Classifications (found under Policy > DLP Policies > Classification) for Dictionary and Advanced Pattern, a new checkbox named Count each match string only one time is now available. This checkbox can be enabled or disabled to determine whether to count each matching string only once or multiple times. Activating this checkbox can help minimize the occurrence of false positives for match counts during the DLP Policy evaluation. For details, see Create Custom Advanced Patterns and Create Custom Dictionary.
IDM Exact File Match (Non-text / Digest Based)
With the Unified IDM, you can now fingerprint non-text-based files such as images. With these files, there is no text to extract instead, a digest match is performed for an exact match during policy evaluation. For details, see About Enhanced IDM Fingerprint.
Skyhigh SSE Products
Skyhigh Secure Web Gateway Cloud
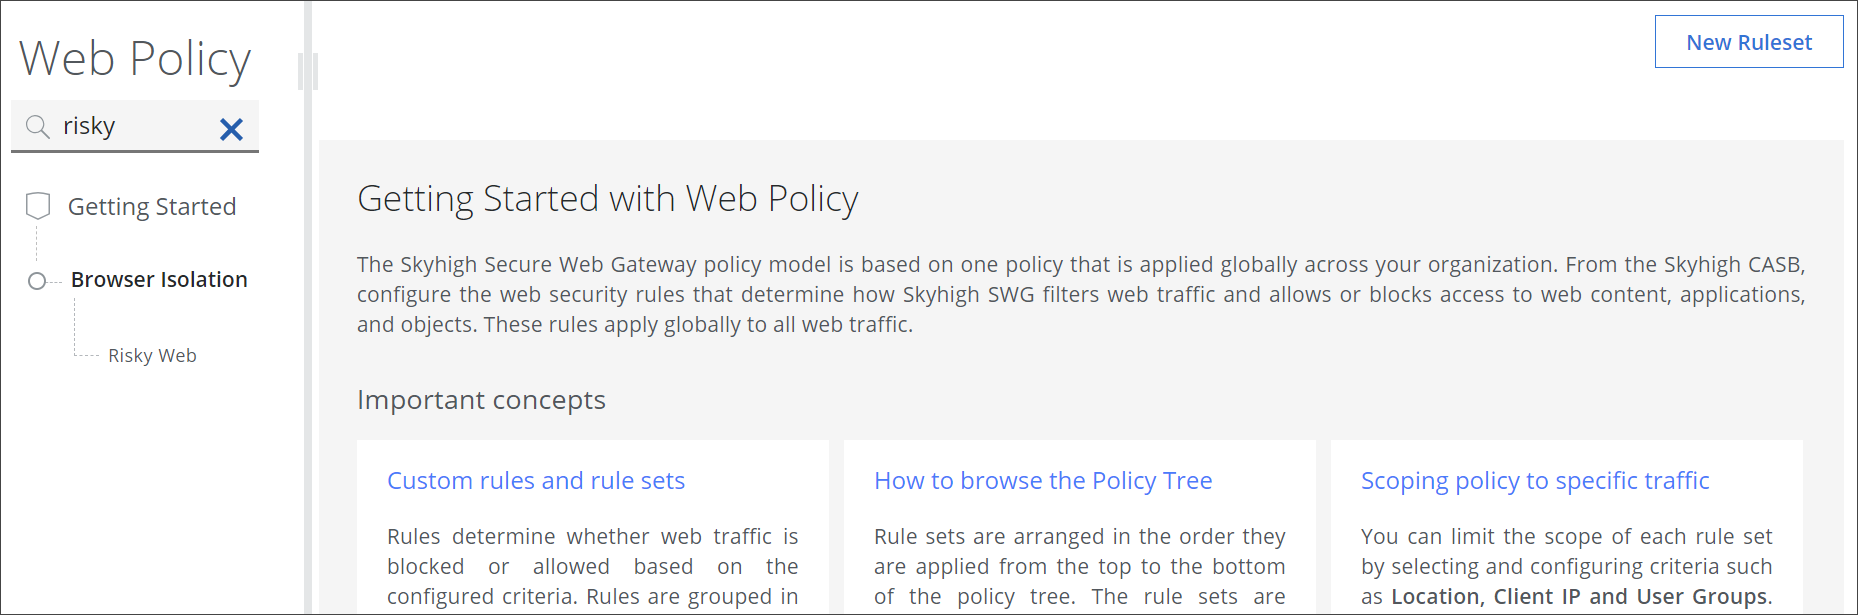
Rule Set Search Field on the Policy Tree
You can now use a search field to find a rule set on the policy tree of the Web Policy page.
To work with this search field, navigate to Policy > Web Policy > Policy on the user interface for Secure Web Gateway. The policy tree is shown under Web Policy on the left and the search field is on top of it.
Upon entering a search term here, for example, risky, the rule set that has this term in its name shows up. In this example, it is the Risky Web rule set.
For more information, see Find a Rule Set on the Policy Tree.
Options for Working with Templates for End User Notification Pages
Secure Web Gateway sends end-user notification pages to users if their requests for web access are impacted by actions in the rules of your web policy.
For example, if a rule blocks a user's request for web access, a notification is sent that informs the user about the blocking and explains why the request was blocked.
The pages are sent based on templates that determine what to show the user. For example, there can be a URL field in the template for a page that is sent to a user who had a request blocked. When the page is sent, the URL field is filled with the URL from the user's request.
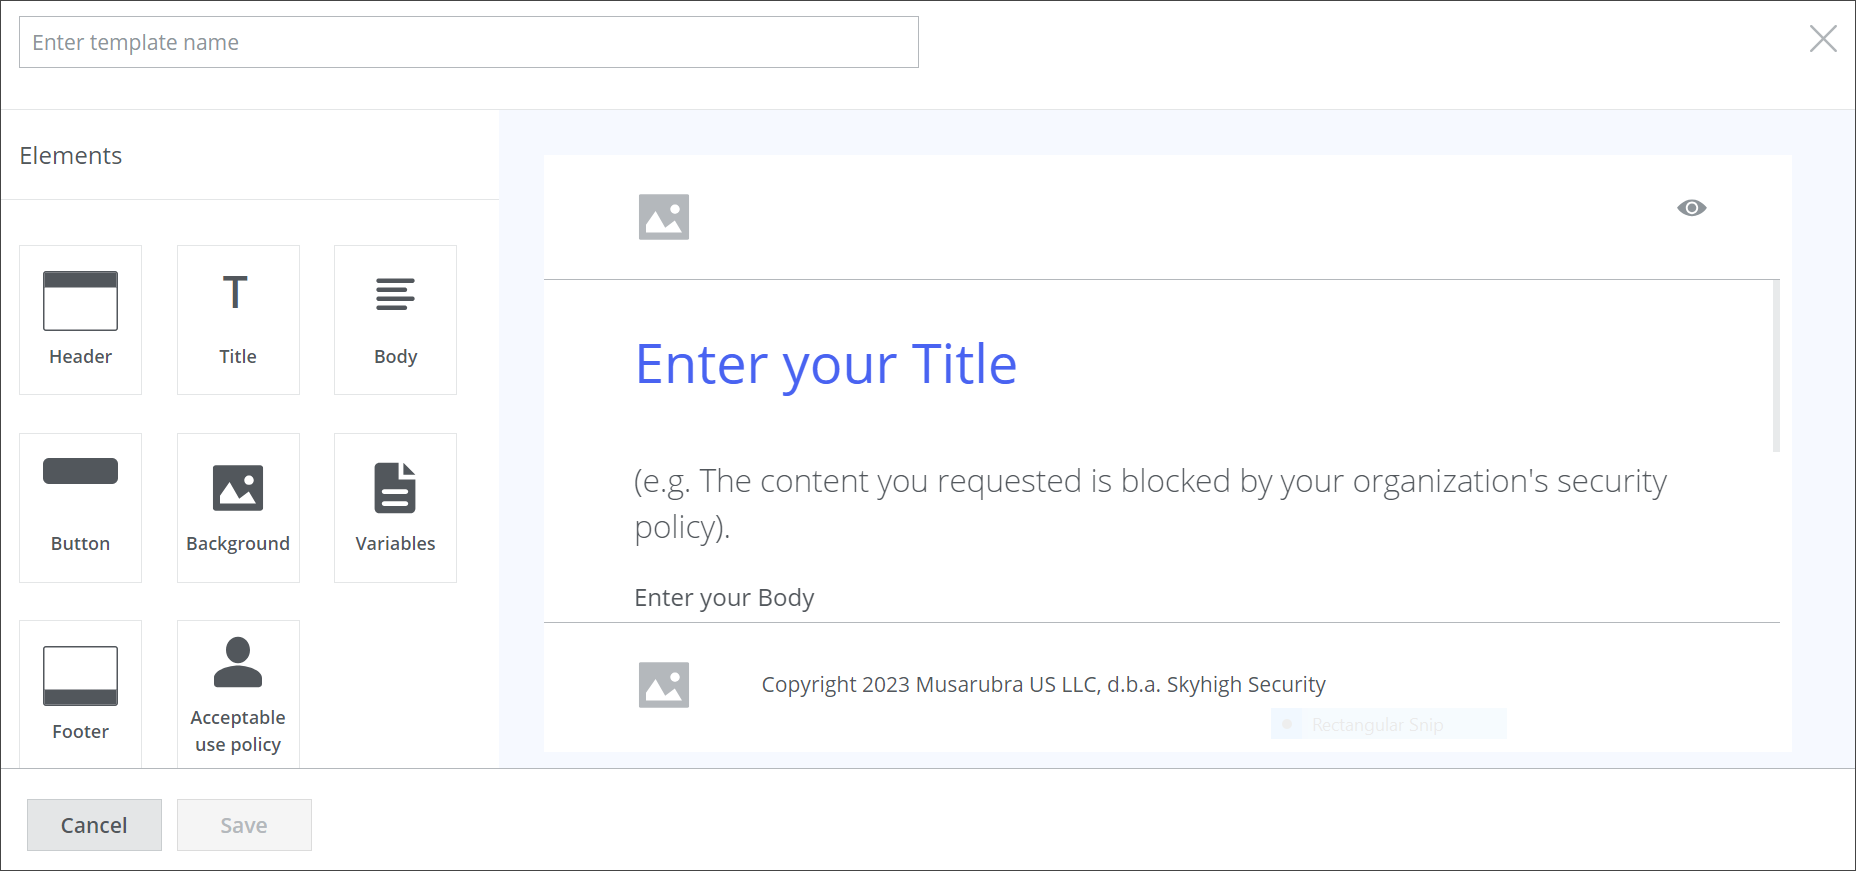
You can work with these templates as follows:
-
Create a template for an end-user notification page
-
Copy (clone) a default template and modify it
- Import a template in HTML format
When working with a template, you can create or modify its title, header, body, footer, background, buttons, and other elements.
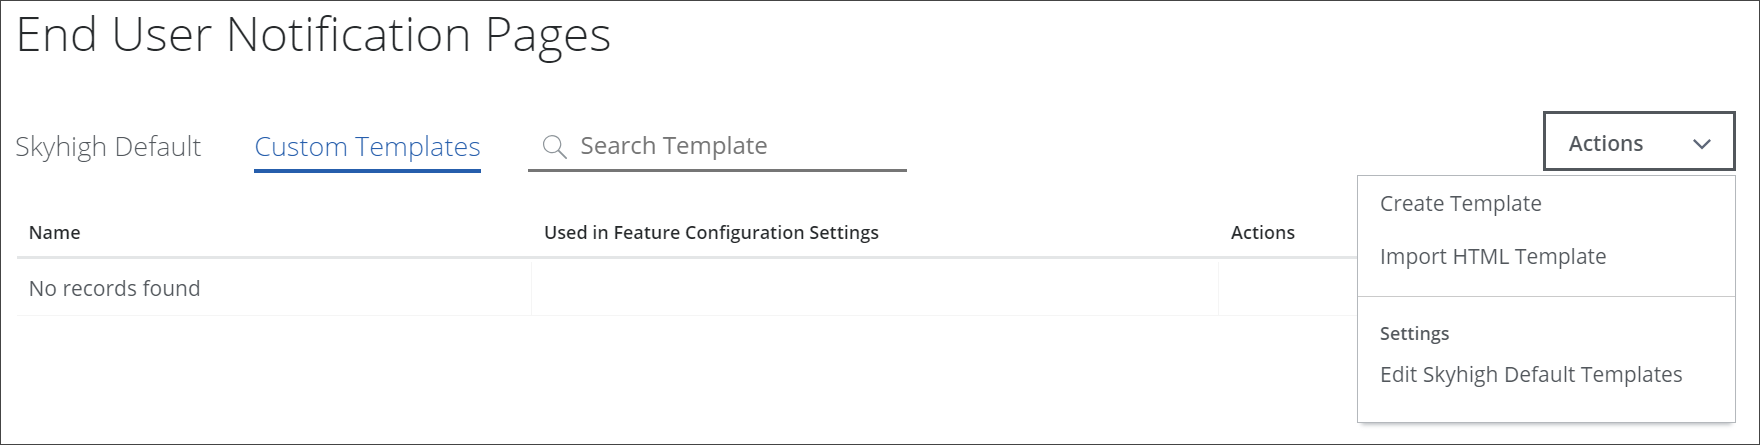
To complete any of these activities, navigate to Policy > Web Policy > End User Notification Pages on the user interface for Secure Web Gateway.
On the page that appears, click Actions and select, for example, Create Template.
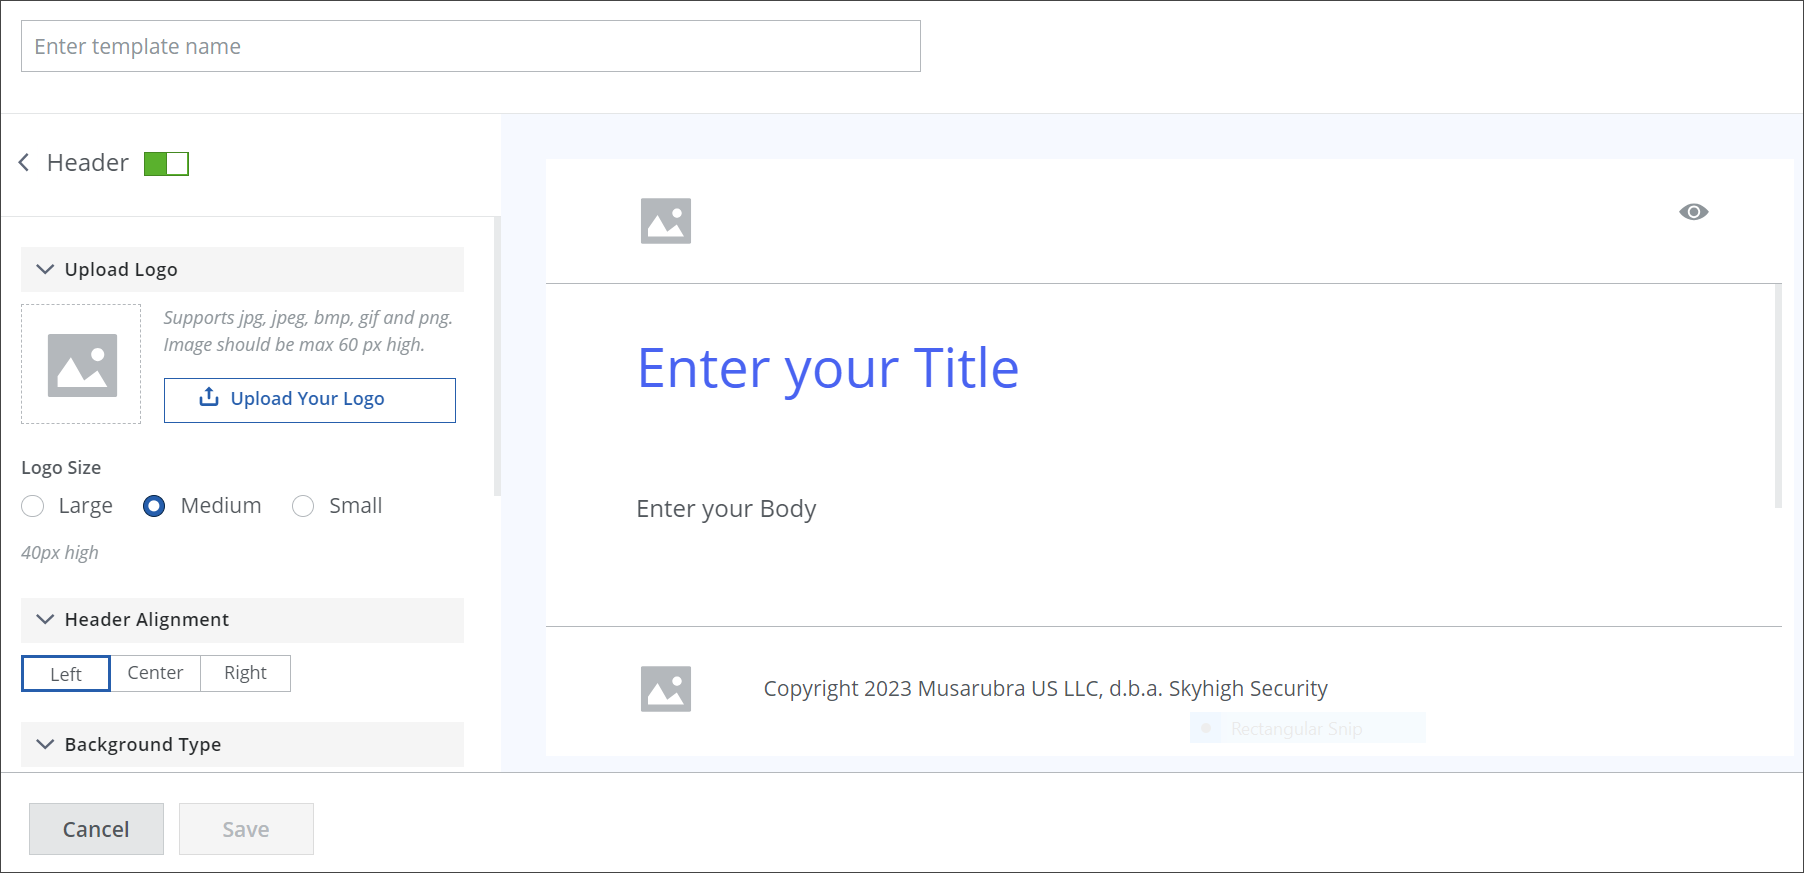
From the page that appears then, select options for creating the elements of the template, for example, the option for creating a header.
The next page offers you the particular options needed to create a template header, for example, an option to upload a logo.
For more information, see About End User Notification Pages.
Skyhigh Cloud Firewall
Geolocation Based Cloud Firewall Policy
You now have the option to choose Geolocation, i.e., Source Country (or) Destination Country as a criteria (found under Policy > Cloud Firewall > Policy > New Rule) on the Cloud Firewall Policy page. For details, see Configure Cloud Firewall Policy.
The Source Country criteria option in the policy allows for the restriction of traffic from specific countries (in case you do not have any offices, users, or businesses there) without the need to forward any traffic from there.
The Destination Country criteria option in the policy prevents users from sending any traffic to a destination server/endpoint (such as a Command and Control server) in a specific country.
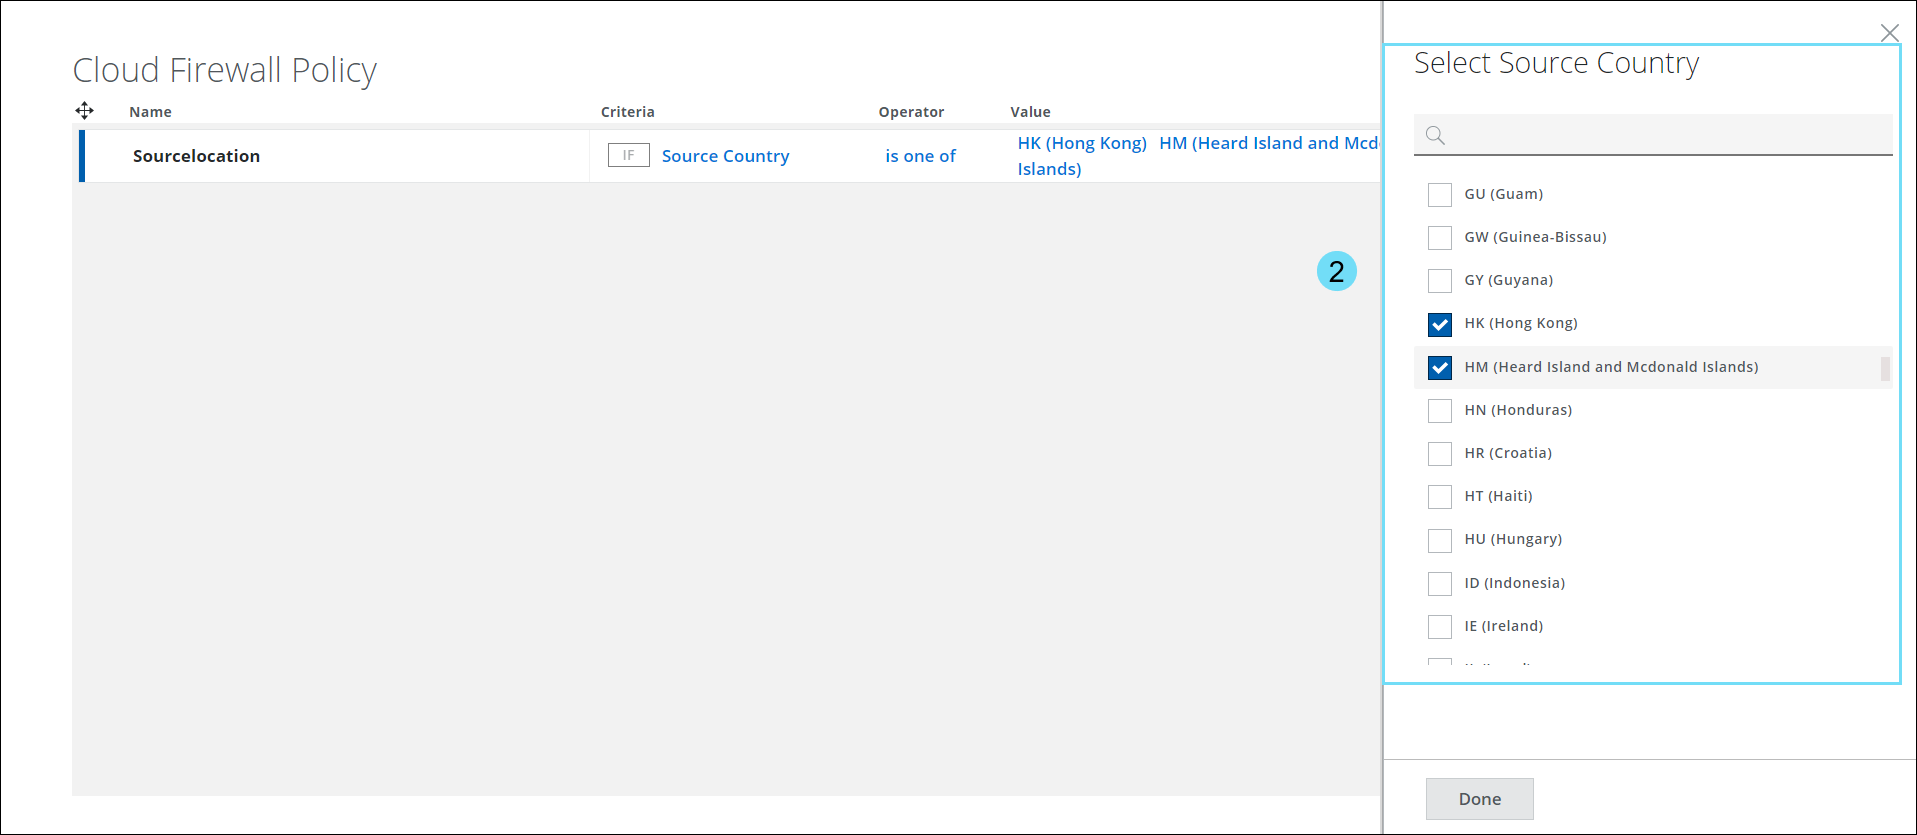
Select Source Country
The Select Source Country panel on the Cloud Firewall Policy page provides a list of countries. You can use this criteria to Allow/Allow with Web Policy/Block/Drop all user generated traffic originating from a particular country. For details, see Configure Cloud Firewall Policy.
- In the Criteria option, select Source Country and click Select Value to view the Select Source Country side panel.
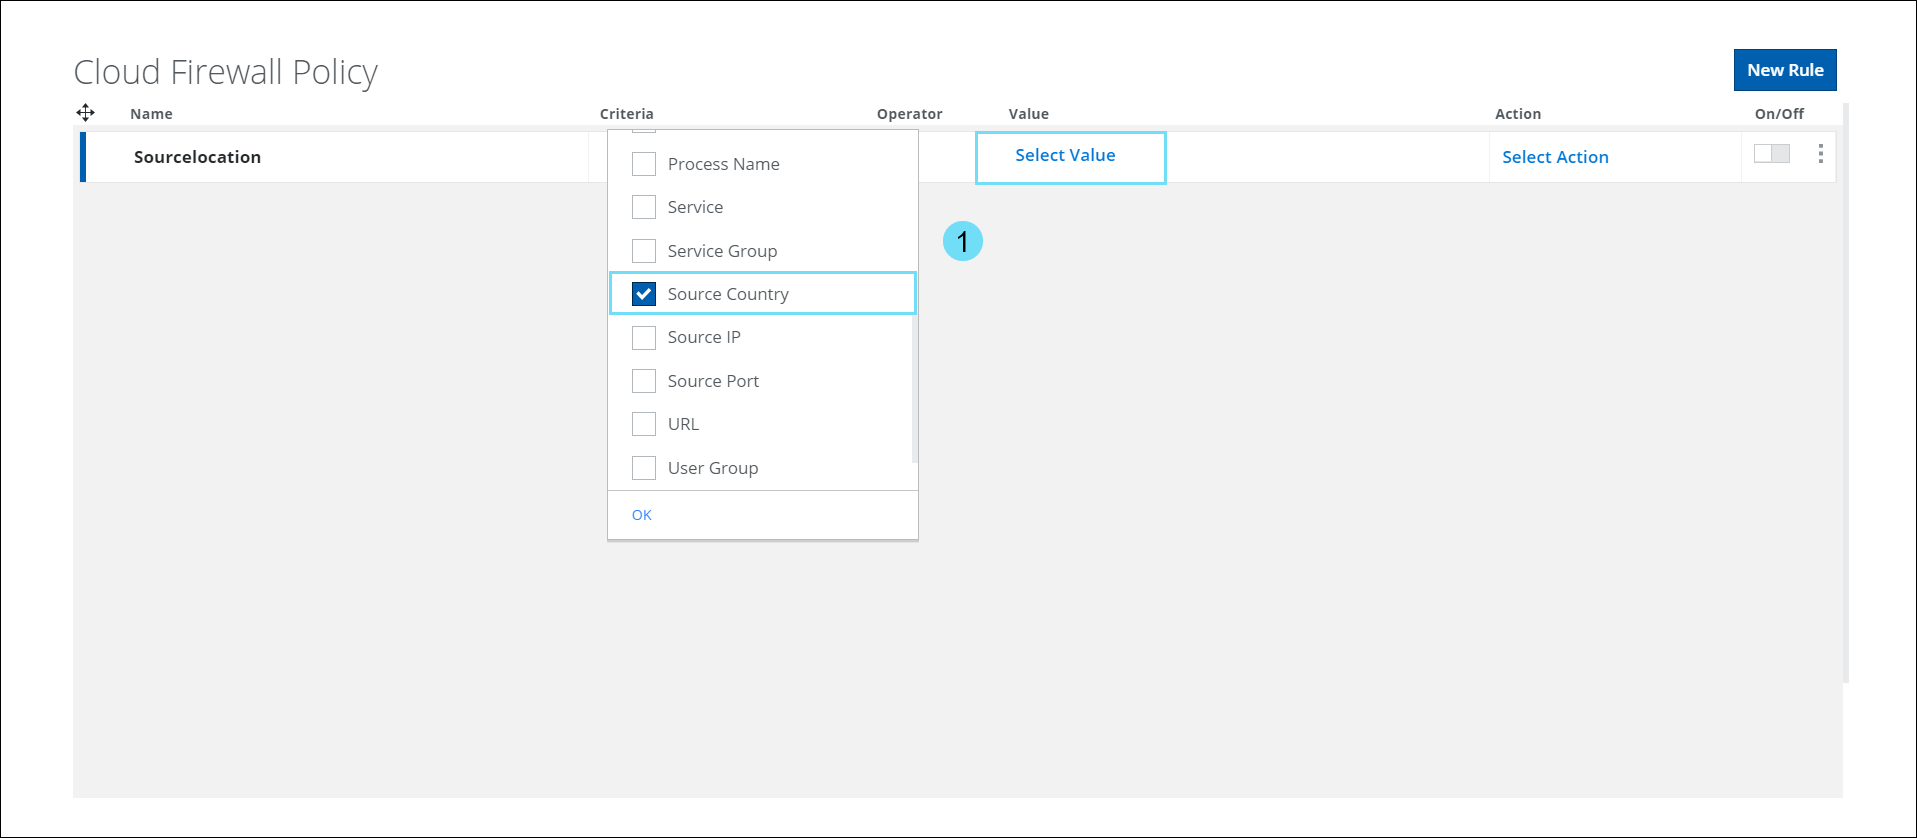
- The Select Source Country panel displays a list of countries in the world. Use the checkbox to select the required Country in the Cloud Firewall Policy.
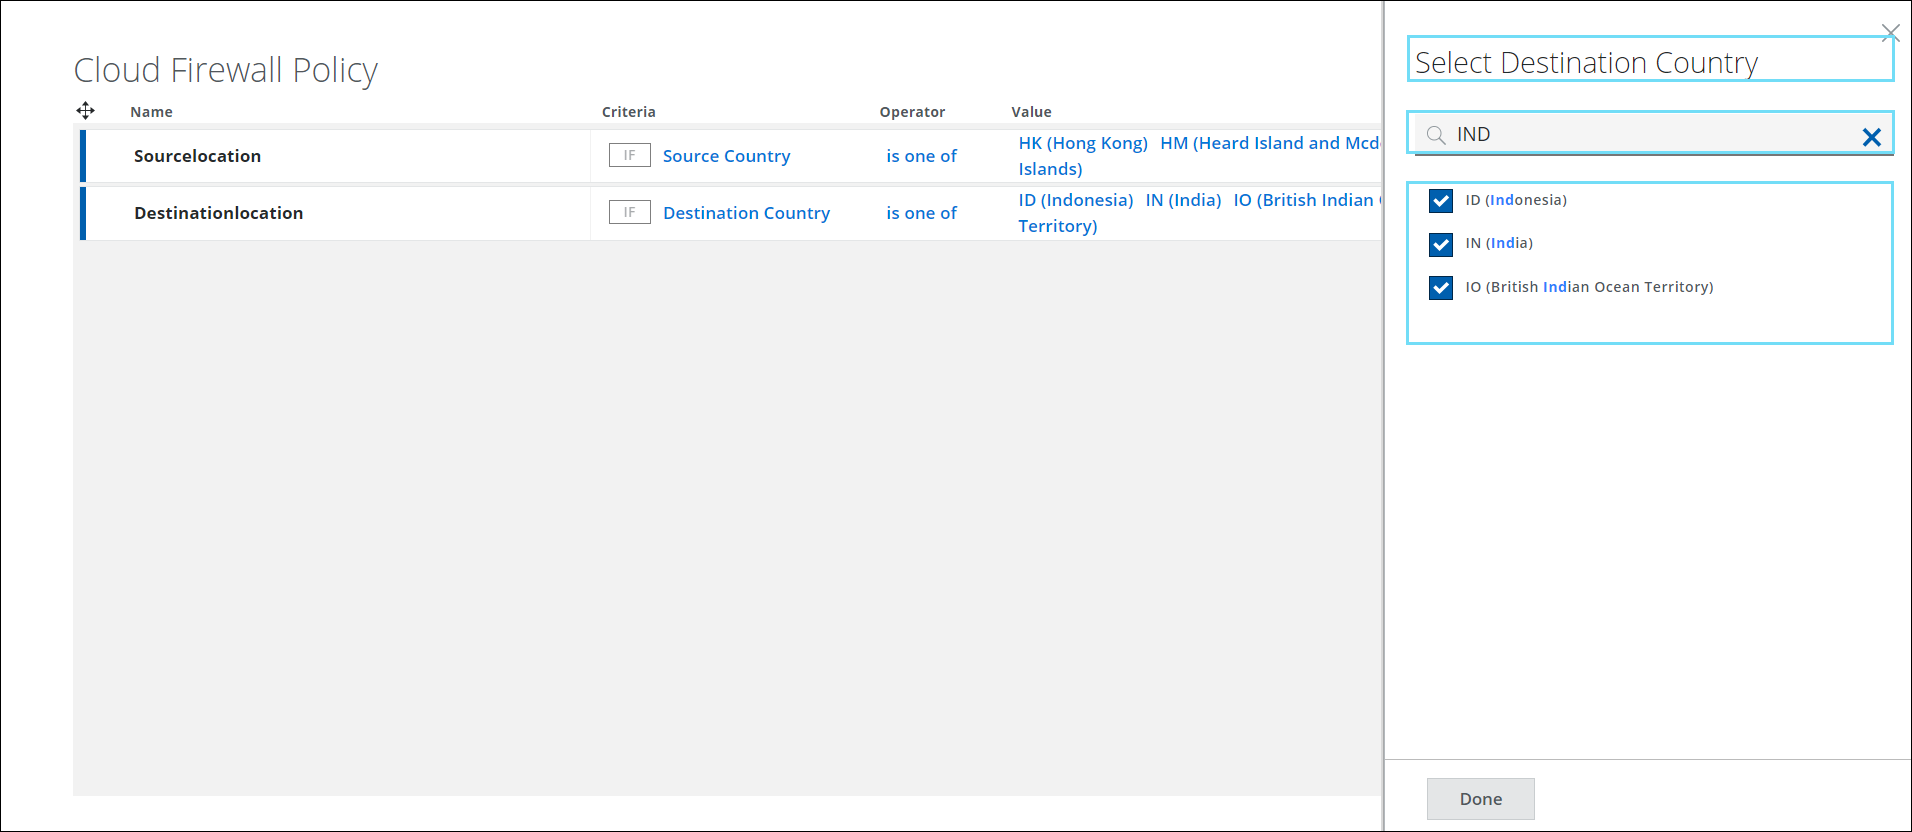
Select Destination Country
The Select Destination Country panel on the Cloud Firewall Policy page provides a list of countries. You can use this criteria to Allow/Allow with Web Policy/Block/Drop all traffic destined for a particular country. For details, see Configure Cloud Firewall Policy.
- In the Criteria option, select Destination Country and click Select Value to view the Select Destination Country side panel.
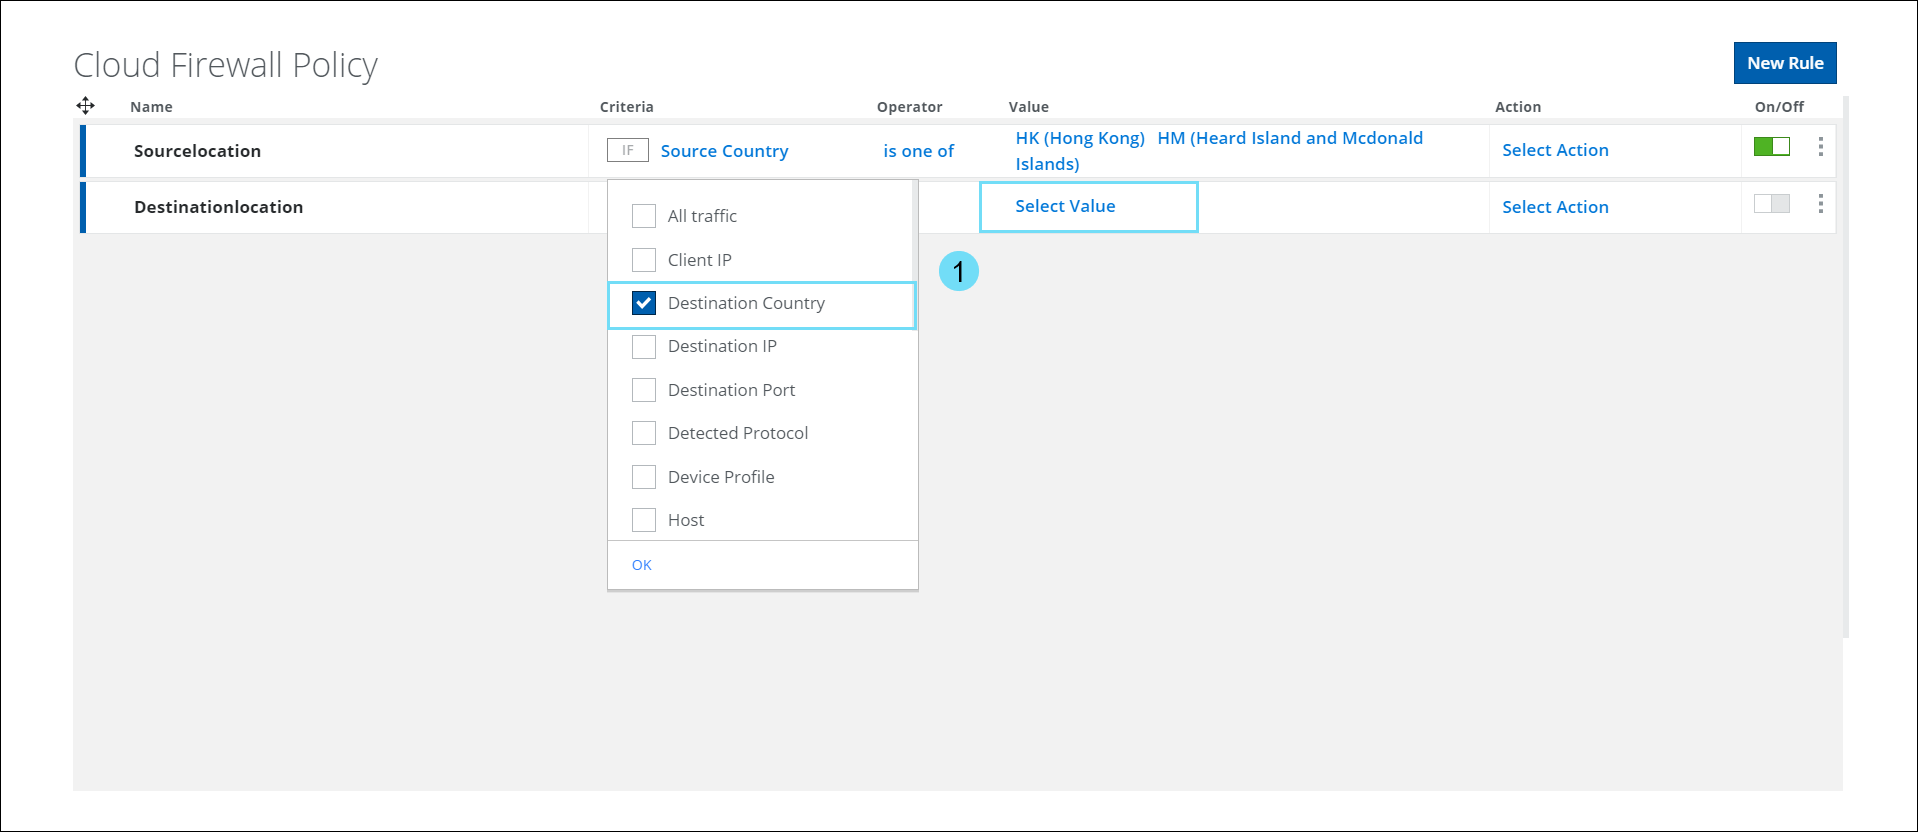
- The Select Destination Country panel displays a list of countries in the world. Use the checkbox to select the required Country in the Cloud Firewall Policy.
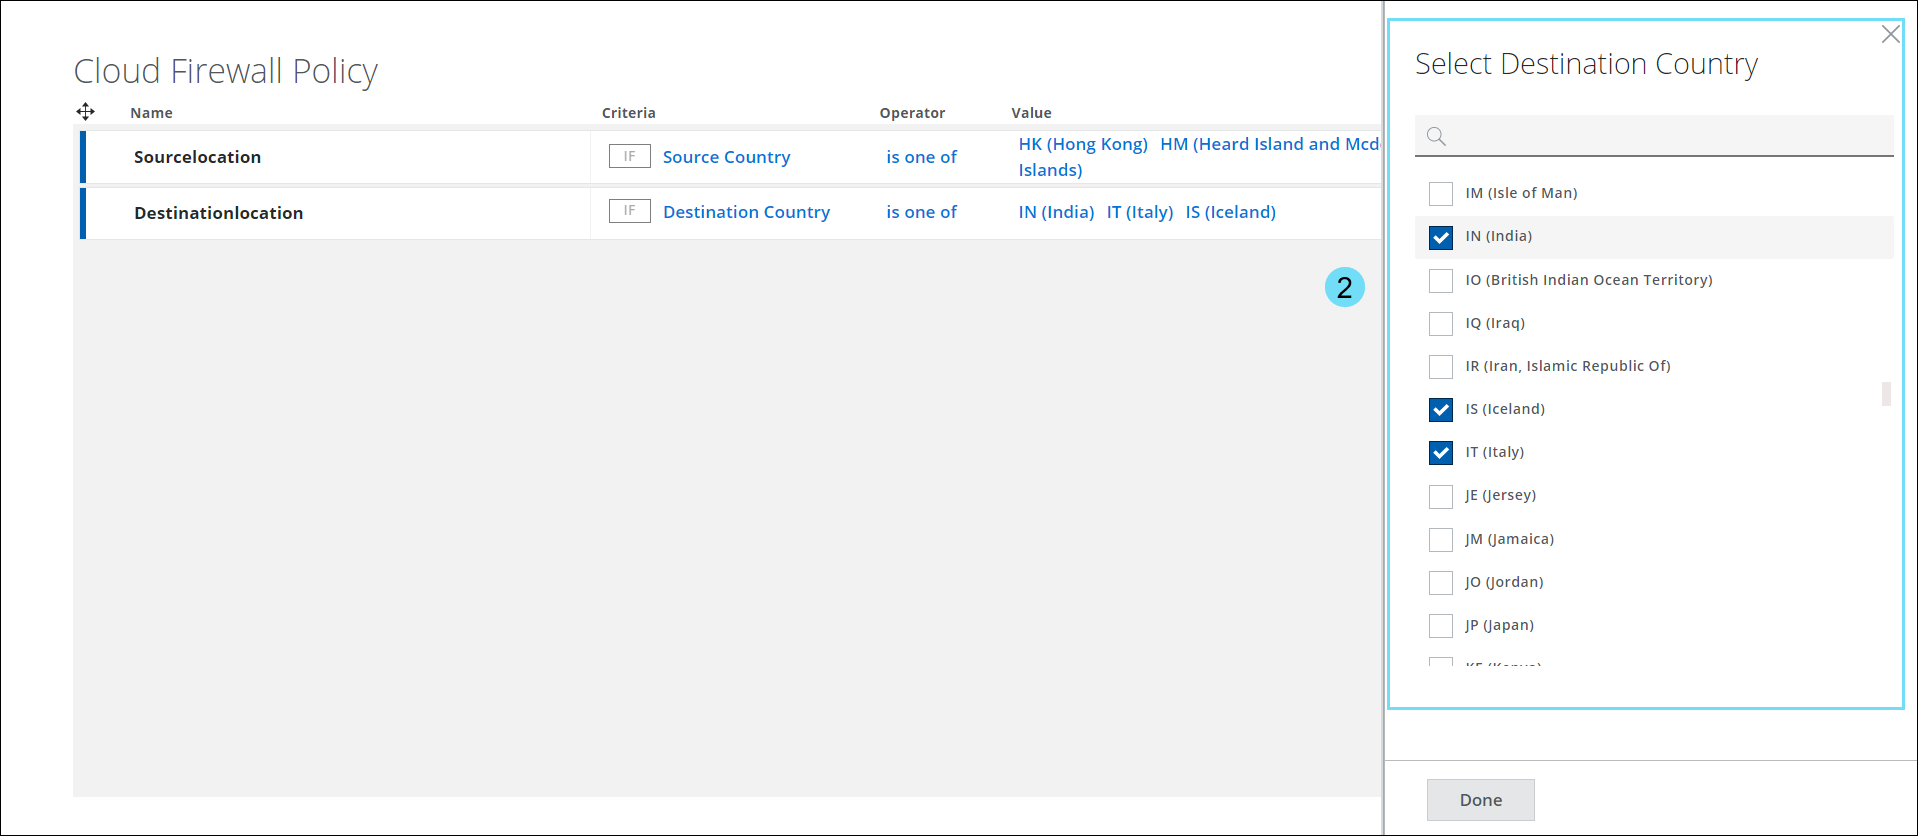
NOTE: To narrow your search results on the Select Source Country/Select Destination Country panel, you must enter at least three letters of the country name.
CrowdStrike Integration in Device Profile
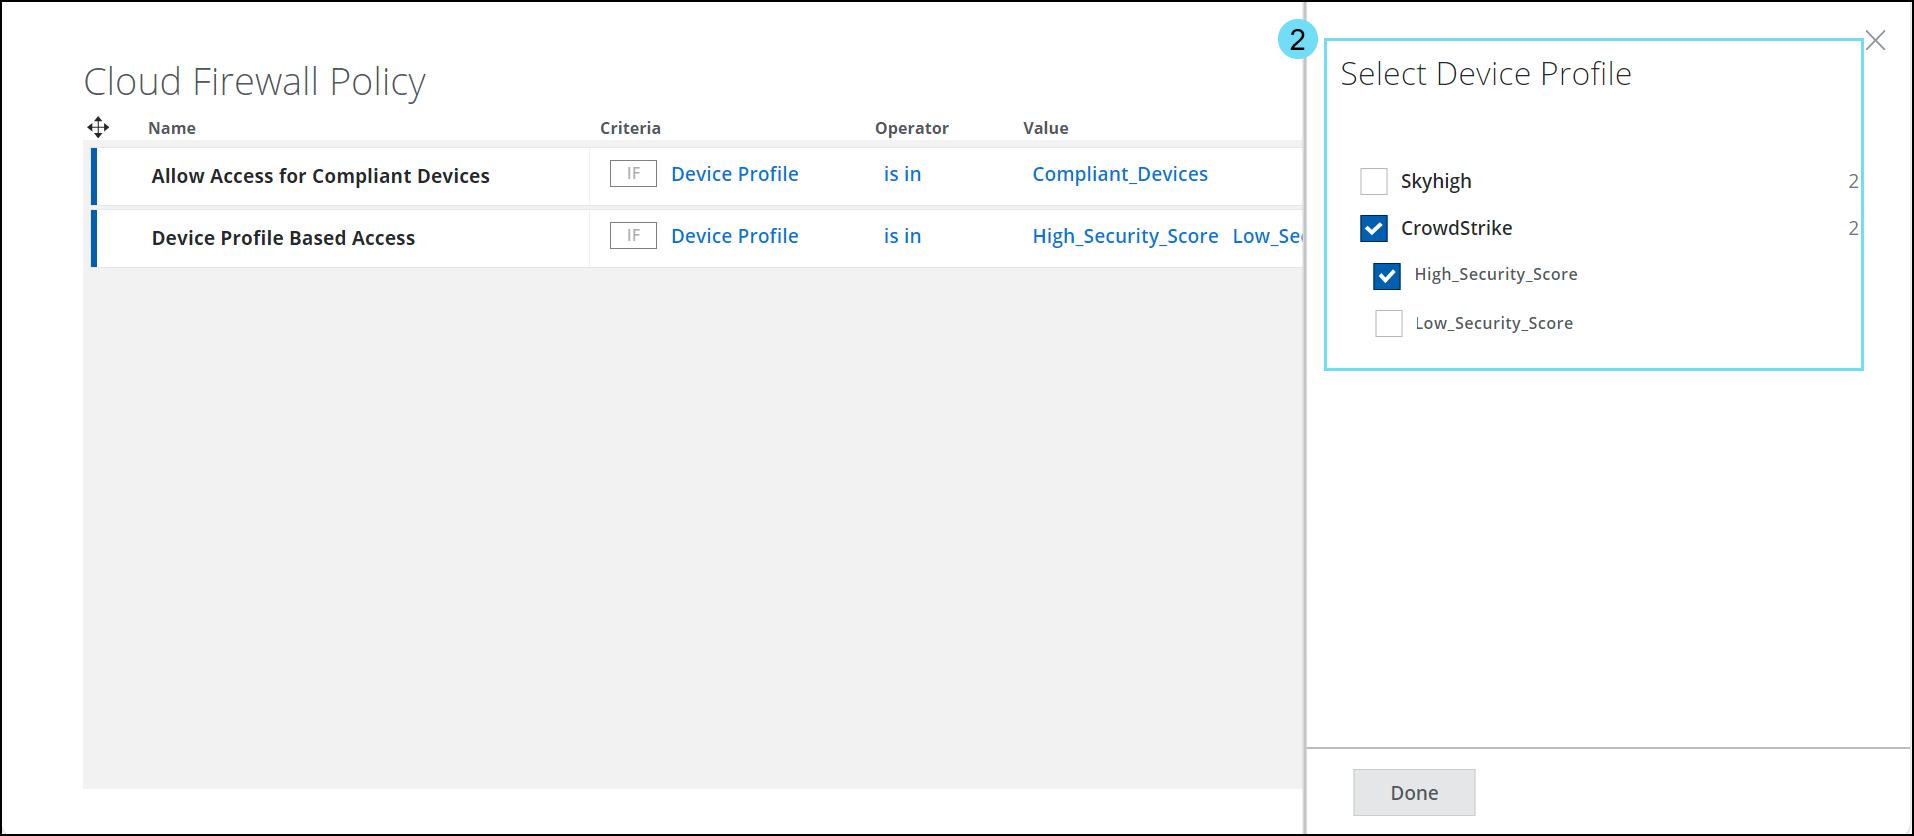
We now support CrowdStrike risk score-based Device Profile which can be selected in the Device Profile criteria (found under Policy > Cloud Firewall > Policy > New Rule) which was earlier released in the Cloud Firewall Policy page. Client Proxy now supports enabling of CrowdStrike integration with Skyhigh Cloud Firewall to leverage the zero trust assessment score. Skyhigh Cloud Firewall uses CrowdStrike’s device posture score to allow only compliant endpoints to access selected applications. CrowdStrike performs a zero trust assessment and provides various scores, like the OS score, sensor score, and overall score of the client. By using a combination of these scores, you can enforce effective device profile policies. For details, see Configure Device Profiles - CrowdStrike.
NOTE: Whenever you modify the device profile, make sure to update the SCP policy to apply the changes.
- In the criteria, select Device Profile and click Select Value to view the Select Device Profile side panel.
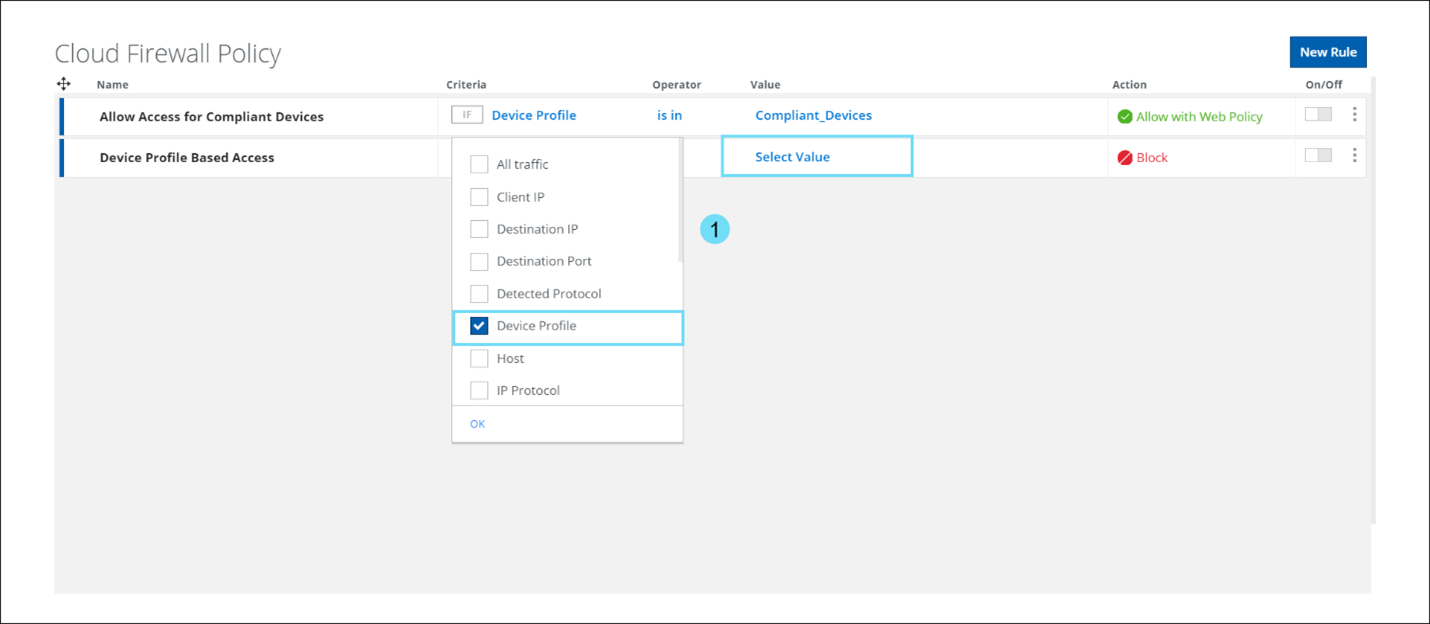
- The Select Device Profile panel displays a list of configured device profiles. Use the checkbox to select the required CrowdStrike profile in the Cloud Firewall Policy.
Skyhigh CASB
Slack Canvas Support
Skyhigh CASB for Slack enables organizations to extend their existing data loss prevention (DLP) policies to Slack Canvas, which are used to set up meeting notes, project briefs, checklists, and more with internal or external users via channels, direct messages (DMs), Huddles and more within Slack. For details, see About Skyhigh CASB for Slack.
Skyhigh CASB API Integration for Slack Canvas supports the following use cases:
Supported Content-based Use Cases for Slack Canvas
| Content-based Use Cases | Supported | DLP Protection | DLP Policy Response Actions |
|---|---|---|---|
| Messages | Yes | Messages sent in Canvas comments |
|
| Files | Yes |
Files uploaded to Canvas and in Canvas comments |
|
| Text added to the Canvas | No | API Limitation | N/A |
| Canvas embedded into a Canvas | No | API Limitation | N/A |
Supported Content-aware Collaboration Use Cases for Slack Canvas
| Content-aware Collaboration Use Cases | Supported | DLP Protection | DLP Policy Response Actions |
|---|---|---|---|
| Canvas shared via Slack Channels (Public/Private/Shared) | Yes | Files uploaded to Canvas |
|
| Canvas shared via Direct Messages (DMs) | Yes | Files uploaded to Canvas |
|
| Canvas shared via Multi-Party DMs (MPDM) | Yes | Files uploaded to Canvas |
|
| Canvas shared via Slack Connect connections | Yes | Files uploaded to Canvas |
|
| Canvas shared via Huddles | Partially | Files uploaded to newly created Canvas |
|
| Canvas shared via Copy Links | No | API Limitation |
N/A |
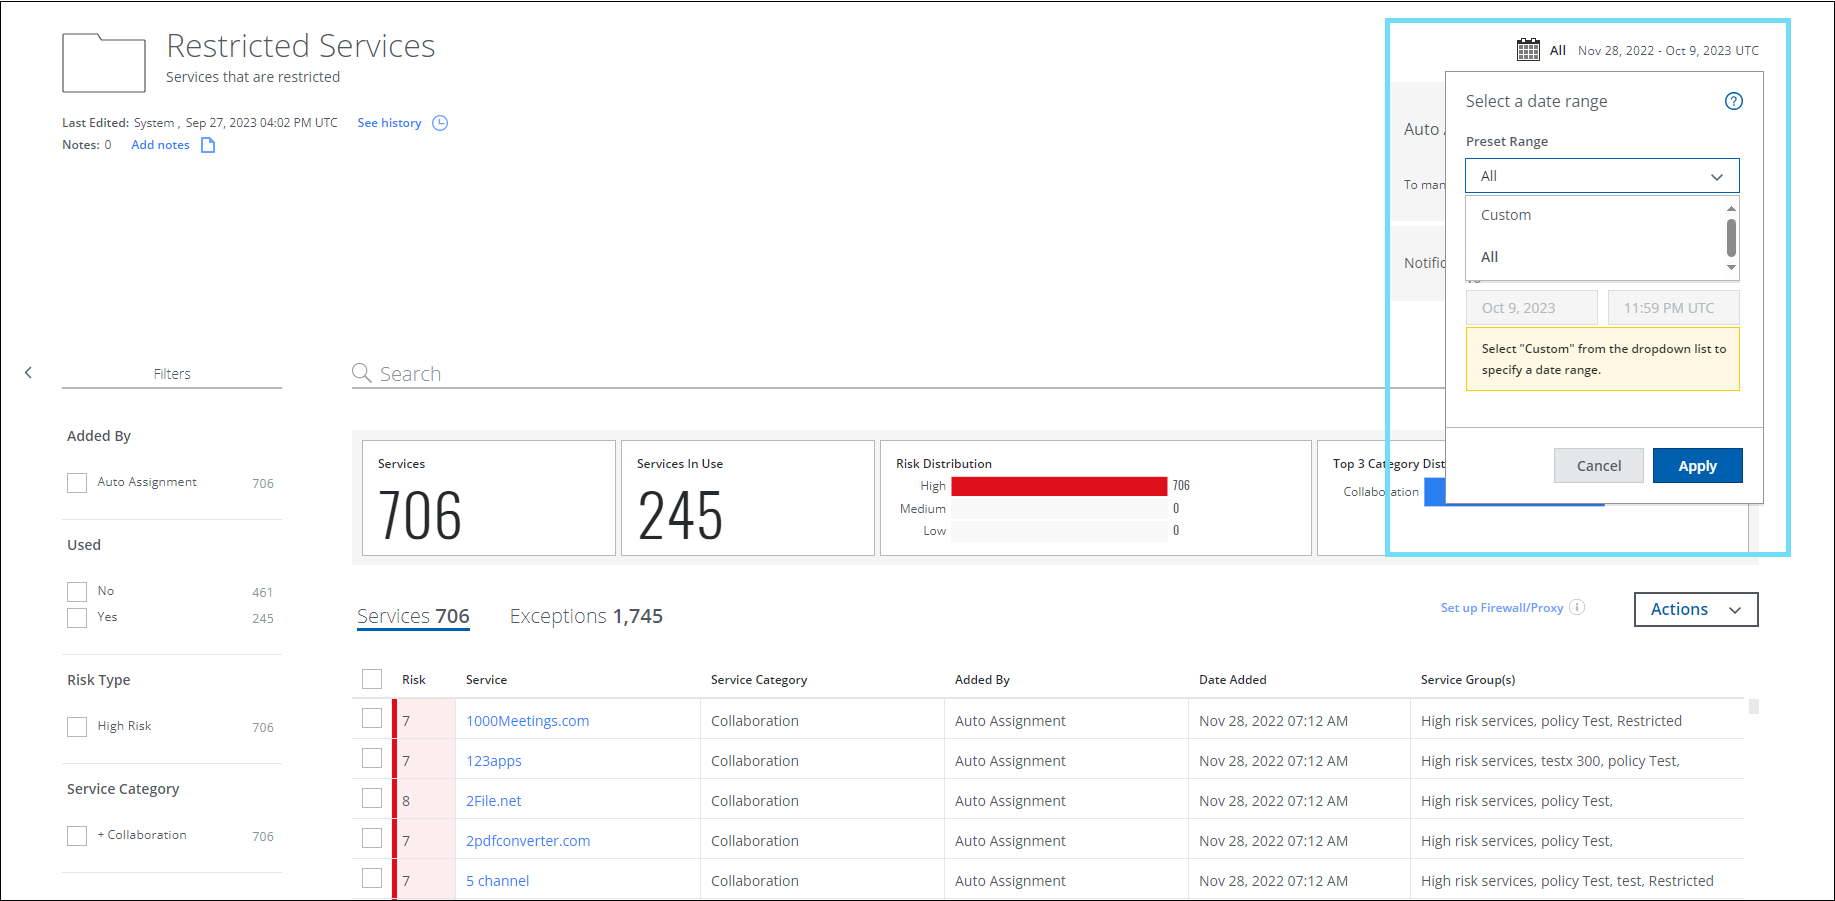
Date Range Filter for Service Group
You can now use the date range filter while editing the Service Groups (found under Governance > Service Groups) to select a date range from the Preset Range menu. The Preset Range menu includes the following options:
- All. Displays all services added to the Service Group between the dates when the first and last service is added to the Service Group.
- Custom. Displays all services added to the Service Group within the selected time duration.
Use this filter to view the services added to a Service Group during the selected date range. The date range filter is applied to the data for the selected Service Group. You can also download the services into a CSV file for further analysis. For details, see Manage Service Groups.
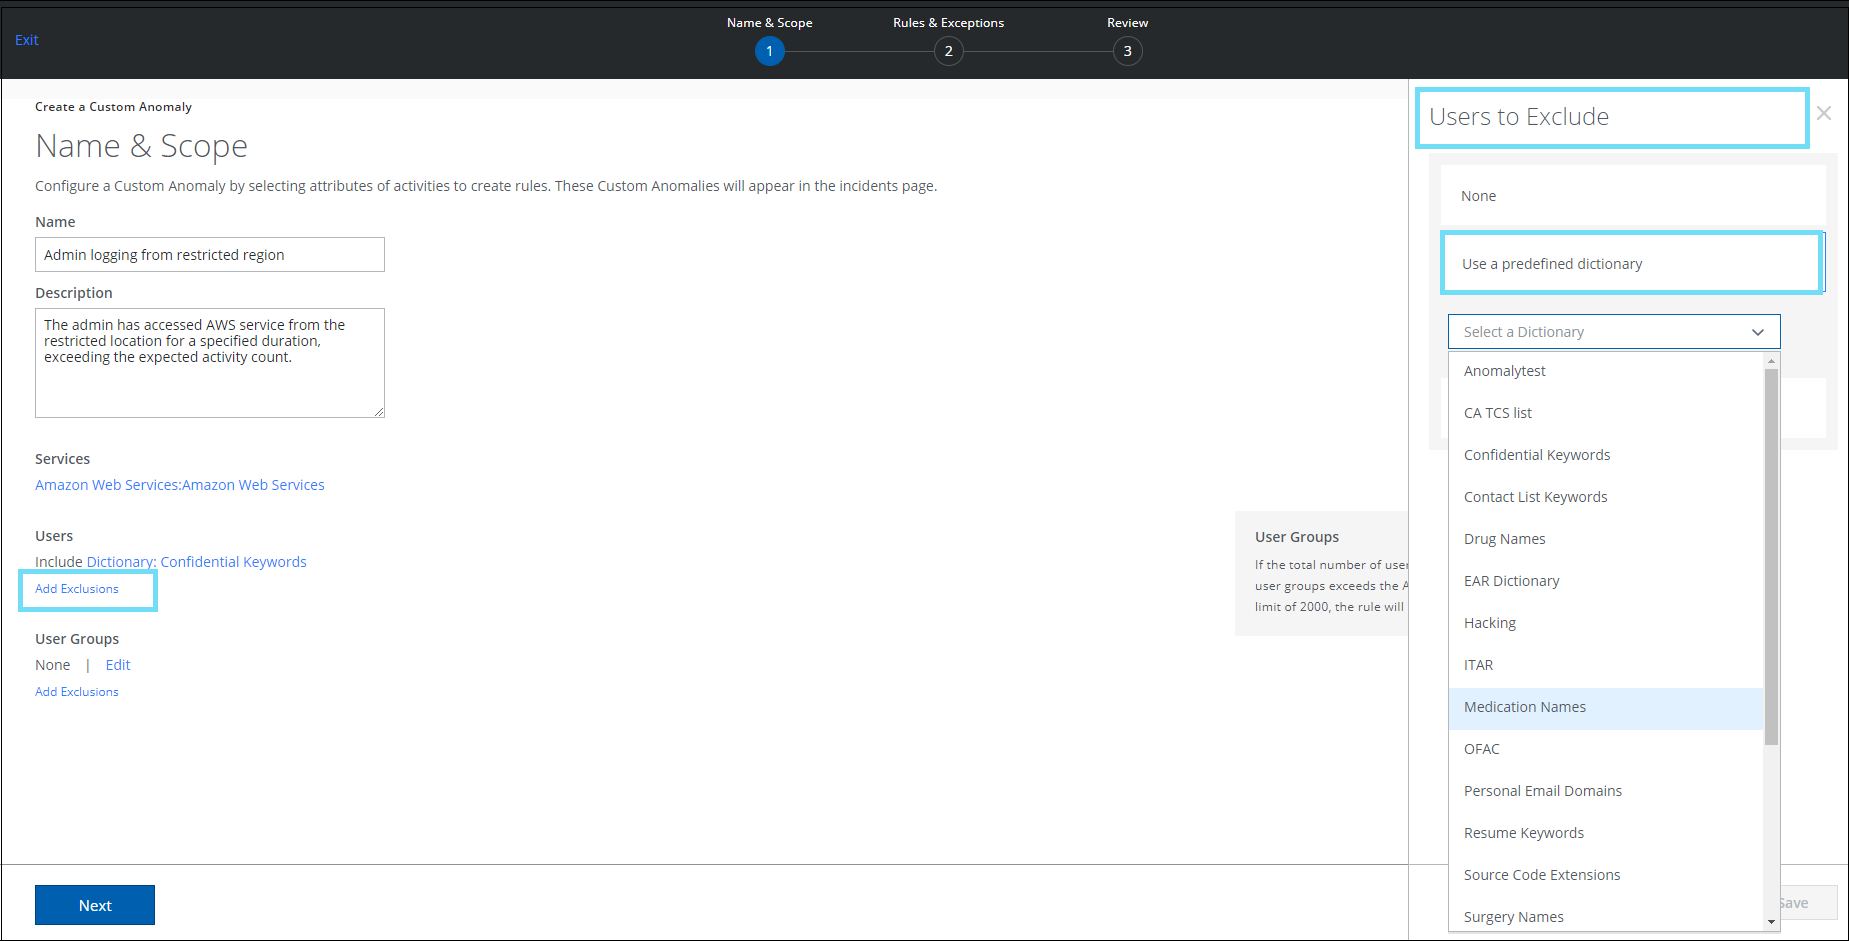
Dictionary Support for Custom Anomaly
On the Create a Custom Anomaly page (found under Incidents > Anomalies > Anomaly Settings > Actions > Create a Custom Anomaly > Name & Scope), a new option called Use a predefined dictionary has been added. This allows you to include or exclude dictionaries to a custom anomaly rule. The use of a predefined dictionary eliminates the need for manual intervention of adding individual email addresses to a list each time a custom anomaly rule is created. A dictionary contains a list of unique users. For details, see Create a Custom Anomaly.
NOTES:
- From the list of predefined dictionaries, only one dictionary can be selected for inclusion and exclusion.
- Include and Exclude options must not have the same predefined dictionary in the rules.
- Select a predefined dictionary to include a group of users in a rule.
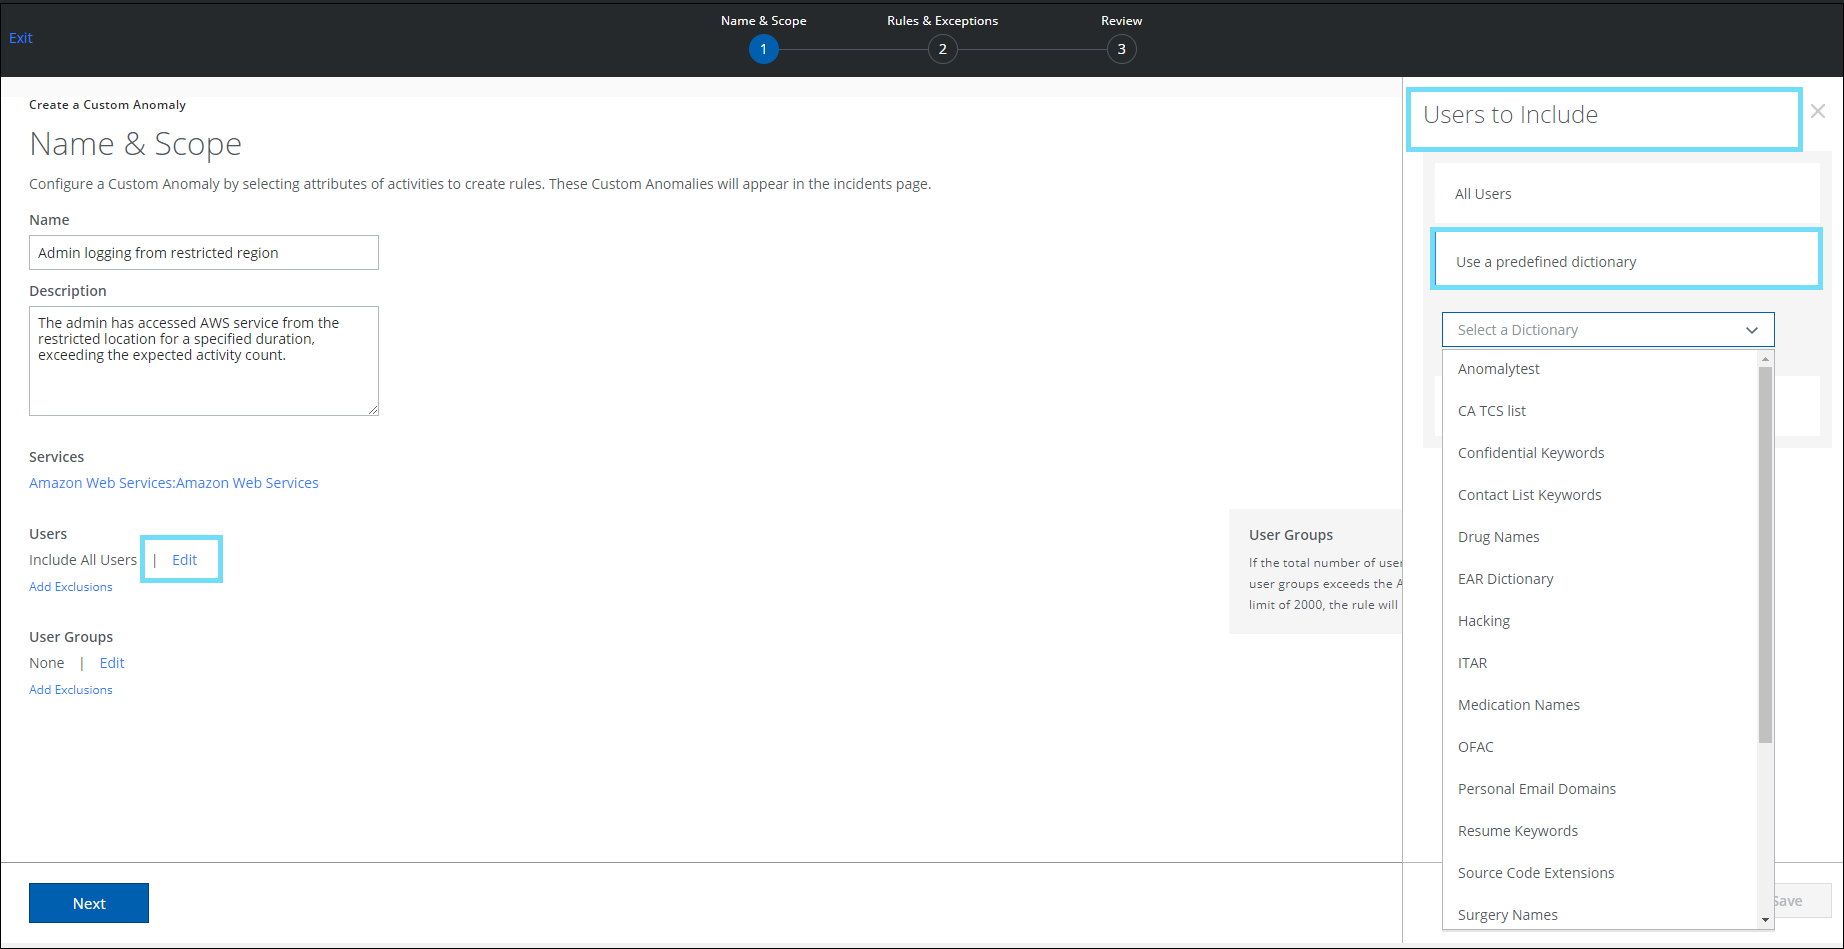
- Select a predefined dictionary to exclude a group of users in a rule.
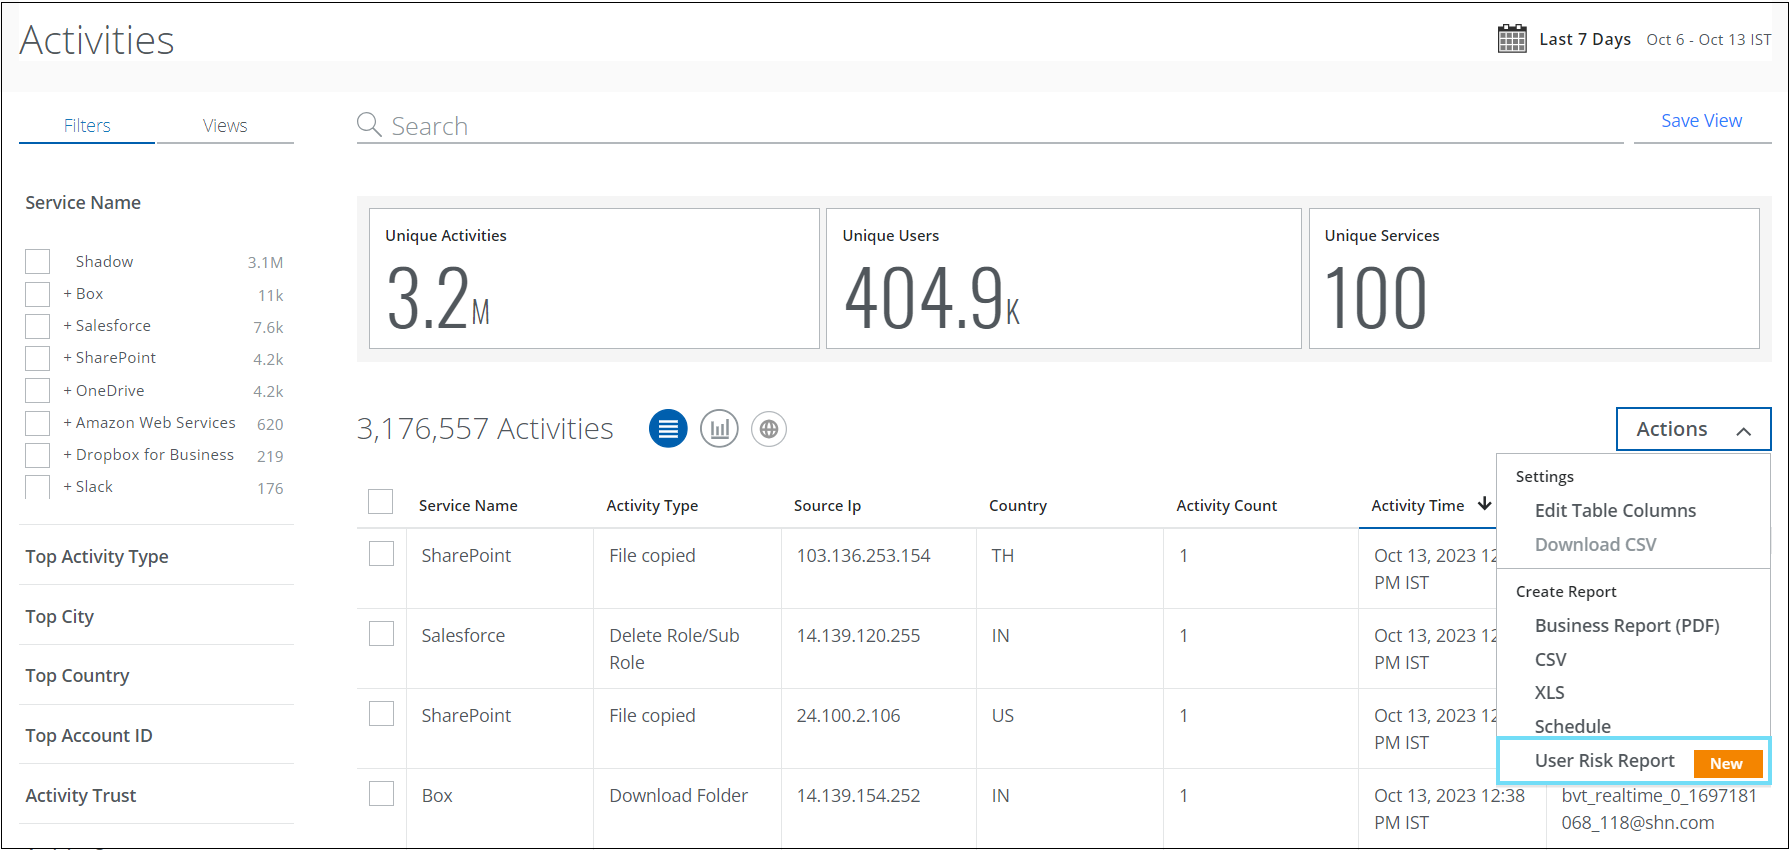
Sanctioned User Risk Report
You can now generate and download the User Risk Report for sanctioned cloud services from the Policy Incidents, Activities, Threats, and Anomalies pages. This report allows you to identify high, medium, and low-risk users in your organization. You can generate a report or schedule a frequency to run the report.
To access this report, go to:
- Incidents > Policy Incidents > Policy Incidents > Actions > User Risk Report
- Incidents > User Activity > Activities > Actions > User Risk Report
- Incidents > Threats > Actions > User Risk Report
- Incidents > Anomalies > Anomalies > Actions > User Risk Report
You can generate and download the report in the CSV or XLSX format. After report generation, an email is sent to the recipients with a link to download the report from the Report Manager, and the report is attached to the email only if the size is less than 25 MB. The report includes user details such as username, user email, user risk score, number of incidents, threats, anomalies, activities, Active Directory (AD) attributes, and more.
For details, see Policy Incidents Page, About Activities, Threats Page, and About Anomalies.
NOTE: User Risk Report includes data from the last 100 days.
Resolved and Known Issues
 Click here to view Resolved and Known Issues
- For details, see Skyhigh Security Cloud Bug Fixes and Known Issues.