Skyhigh Security Cloud 6.6.2 Release Notes (May 2024)
Legends Used
|
General Availability |
IMPORTANT: The Skyhigh Security Cloud 6.6.2 release addresses significant library updates for enhancing security and stability. For additional information about these fixes and updates, contact Skyhigh Support.
Skyhigh Cloud Platform
Skyhigh Data Loss Prevention (DLP)
Enhanced Content Scanning for Structured and Encapsulated Data in Sanctioned and Web DLP 
Skyhigh has enhanced its ability to detect structured content and encapsulated data in Sanctioned and Web DLP, allowing Skyhigh to scan this content and trigger classifications accurately.
This improved functionality applies to data encoded in formats such as application/x-www-form-urlencoded, JSON, and Base64. When Skyhigh detects these data types, it attempts to identify embedded HTML, JSON, and Base64 encoded objects for further decoding and processing recursively.
For example, certain generative AI (GenAI) applications such as ChatGPT may use multiple layers of JSON escaping and encoding during data uploads. Previously, a regular expression matching on word boundaries might not have triggered on such escaped JSON. With this enhancement (available in SSE 6.6.2 onwards), Skyhigh can precisely detect and decode such encoded data.
Bulk Incident Remediation for Linked Incidents
You can now use bulk incident remediation on the Policy Incidents page (found under Incidents > Policy Incidents > Policy Incidents) for multiple incidents, which automatically remediates the linked incidents containing the same files. This eliminates the need to manually remediate linked incidents individually.
For example, a Security Operations Center (SOC) may want to apply remediation actions such as quarantine for multiple DLP incidents with the same files on the Policy Incidents page. To achieve this, the SOC can select Quarantine as the Response to automatically quarantine the same files for multiple DLP incidents concurrently. This enables admins to mitigate linked incidents that contain the same files simultaneously, thereby reducing overall response time and improving operational efficiency in incident management.
Several benefits include:
- Accomplish Bulk Actions. You can perform bulk actions to resolve incidents. To apply bulk remediation, select the incidents you wish to remediate on the Policy Incidents page, then click Actions > Select Response. For details, see Bulk Incidents Remediation.

- Experience Improved Handling Efficiency. The efficiency of SOC has been significantly increased by the latest solution, allowing greater ease and efficacy, leading to optimized resource utilization and exceptional outcomes. This saves valuable time and reduces costs associated with incident remediation.
- Ensures Comprehensive Security. You can address all potential threats for the same files simultaneously which enhances overall security posture.
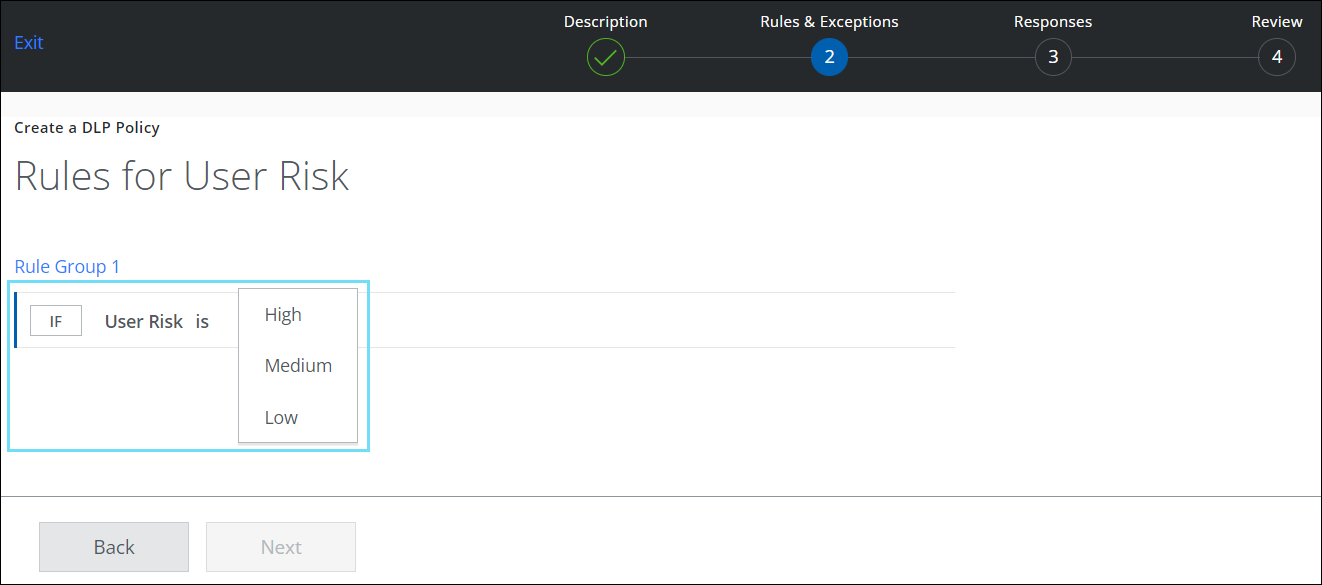
User Risk-Based Sanctioned DLP Policy 
User risk rule is a new sanctioned DLP policy rule on the Rules & Exceptions page (found under Policy > DLP Policies > DLP Policies > Actions > Sanctioned Policy > Create New Policy > Description > Rules & Exceptions) of the sanctioned DLP policy wizard. This rule enables you to define DLP policies based on the risk types of users identified in sanctioned cloud services.
You can define DLP policies by configuring the rule with the available risk parameters such as low, medium, and high-risk users. The risk type of a user is determined by their current user risk score for sanctioned DLP incidents and it is rated on a scale of Low (1-3), Medium (4-6), and High-risk (7-9) types. User Risk rule allows you to apply the necessary controls to mitigate potential threats in your organization and protect your most sensitive information even from low-risk users. For details, see User Risk Rules.
Skyhigh SSE Products
Skyhigh Secure Web Gateway
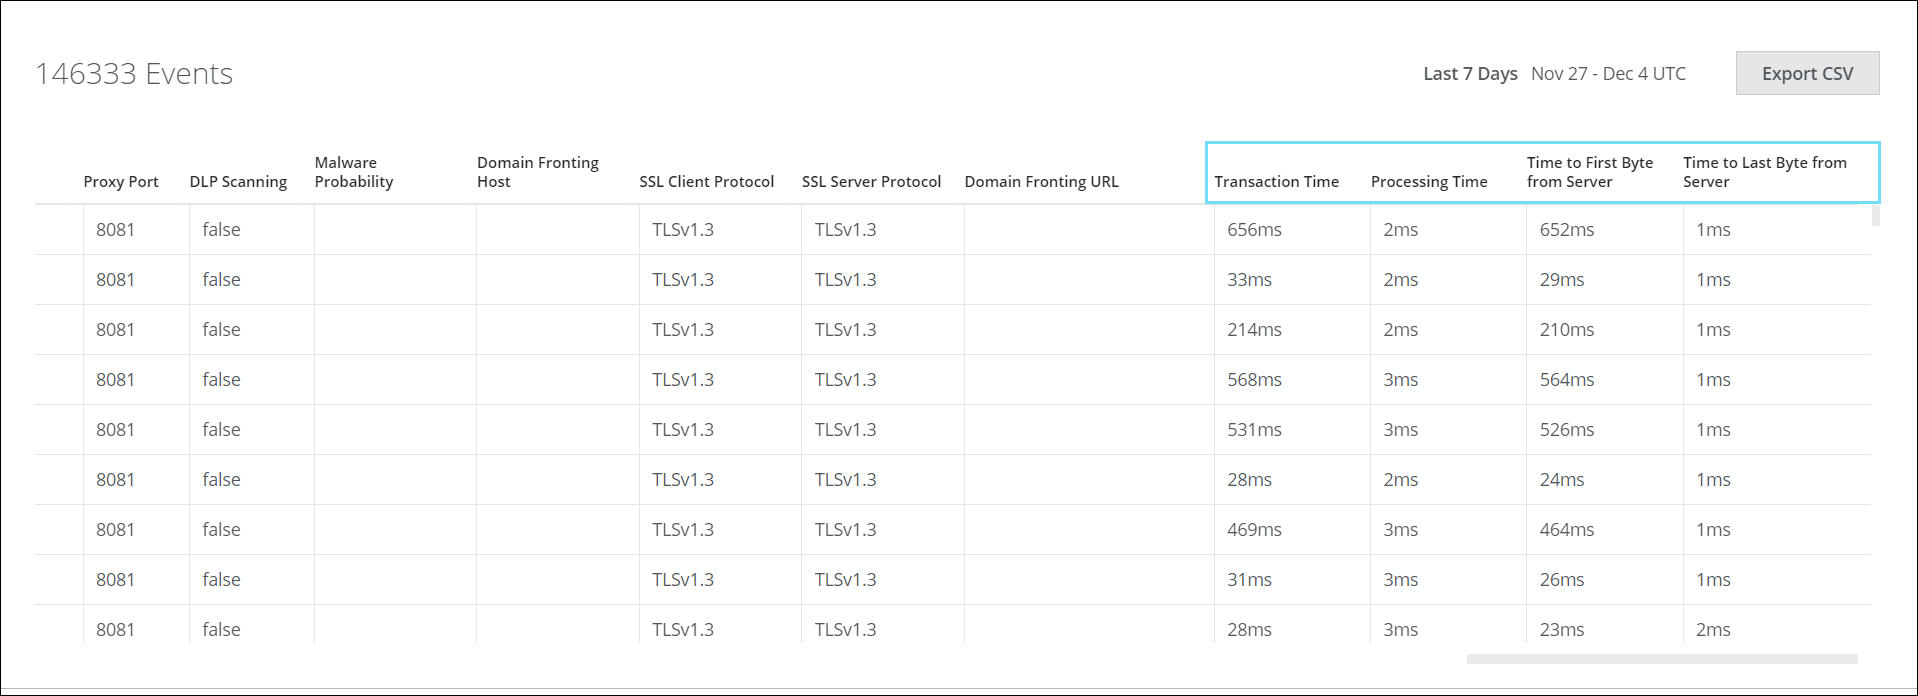
Troubleshooting Connectivity Issues with Digital Experience Capabilities
When working with Secure Web Gateway, you can now analyze Time-Stamp information to identify network or application-related issues. Secure Web Gateway now provides Transaction Time, Processing Time, Time to First Byte From Server, and Time to Last Byte From Server in the reporting which may track the duration of a task and identify any potential errors. For details, see Troubleshooting Connectivity Issues with Digital Experience Capabilities.
To access the time stamp information, go to Analytics > Web > Web Traffic and click on the request count.
.png?revision=1)
Reviewing Configuration Changes Made to the Setup
When working with Secure Web Gateway on the user interface, you can review your configuration changes before publishing them to the cloud. You can now also review changes made to the setup of the product.
To change this setup, you place your pointer over the settings icon on the user interface and navigate to Infrastructure > Web Gateway Setup. On the Secure Web Gateway Setup Page, you scroll down to the section where you want to make changes, for example, to the Log Data Residency section.
Log data for the Asia Pacific region is by default stored in North America. Now you configure it to be stored in Australia.

After you have saved this change, the color of the shield icon for change management turns from gray to yellow.

If you click it, a bar with options for handling changes is inserted.

After selecting Review changes, the Review Changes page appears. It shows a change has been made to the settings for log data residency that still needs to be published to the cloud.
 Using one of the options at the bottom of the page, you can publish your change, discard it, or keep working and decide on publishing or discarding later.
For more information, see Review Configuration Changes When Working with Secure Web Gateway.
Configuring an Email Option for an End User Notification Page
When configuring a template for an End User Notification Page, you can now include an option on this page that allows an end user to send an email to an email address that you have configured.
An End User Notification Page is displayed to an end user, for example, when this user submitted a request to access a website that was blocked by a rule of your web policy.
The email that the end user sends to the configured email address will provide useful information about the blocking. What is included in this information also depends on what you have configured.
To configure the option to send an email to a configured email address, you work with the Acceptable use policy element, which is one of the elements of a template for an End User Notification Page.
The element is available after navigating to Policy > Web Policy > End User Notification Pages on the user interface. On the End User Notification Pages page, you can select Create Template from the Actions menu and proceed to the page with the template elements.
This is the beginning of the procedure for creating a new template. You can also clone (copy) a default template and work with the Acceptable use policy element to modify the cloned template and configure an email option.

After selecting the Acceptable use policy element, the options for configuring the sending of an email are provided under Mail to.
They are provided together with other options that allow you to configure the section for your acceptable use policy on an End User Notification Page.

You can configure the recipient and subject of the email that the end user can send and write a text that will be sent with the email.
After clicking +Variables, a list with variables is inserted where you can select variables, for example, a variable for a URL or a username. The values that these variables had at the time when an end user's request for web access was blocked are included in the email.
The recipient of the email, for example, support, will then know from this email about the URL of the blocked website or the name of the end user who tried to access this website.
To send the email, the end user clicks an option that appears on the End User Notification Page if you have configured it for this page.

For more information, see Create a Template for an End User Notification Page.
Location Added as Criteria for Web Policy Configuration
There is a new item available in the list of criteria for configuring rules and rule sets. It is named Location and its value is a string that specifies the name of a location that is configured for an endpoint within your network. The endpoint then runs as a client of Secure Web Gateway.
Web traffic is routed from this location to an instance of Secure Web Gateway on a Point of Presence, which is a node in the worldwide network that serves as a cloud platform for this product.
To go to the list of criteria, you navigate to Policy > Web Policy > Policy on the user interface. On the Web Policy page, you select, for example, the Global Block Lists rule set from the policy tree on the left. Then you click the value under Criteria in the line with the rule set name.
The list of criteria opens, which includes Location as an item now. The list is also provided when you create a rule or rule set of your own with the Rule Builder.

For more information, see List of Criteria.
New Templates for Configuring Progress Pages
Three new templates are now available for configuring progress pages. These pages are used to show the progress that is made when a user of your organization downloads a file or another object from the web.
Use of these pages is by default configured as part of the settings in the Feature Configurations for the Progress Page rule set of your web policy. It is also configured for the Advanced Threat Defense library rule set.
Different progress pages are shown depending on the progress made with a download.
-
Progress — Shown while a download is still in progress
-
Progress Done — Shown when a download is completed
-
Progress Canceled — Shown when a download is terminated due to an incident before it was completed
You can work with the new templates to configure these pages according to your requirements. To access the templates, you navigate to Policy > Web Policy > End User Notification Pages on the user interface.
On the End User Notification Pages page, the new templates are included in the list of default templates.

To work with a template, you clone (copy) it and configure settings for the cloned template.
Clicking the first of the three icons under Actions, which is known as the Clone and Edit icon, allows you to begin with the procedure for cloning and configuring a template.
For more information, see Using a Progress Page to Show Download Progress and Create Your Own Progress Pages and Settings.
Skyhigh Private Access
Troubleshooting Connectivity Issues with Digital Experience Capabilities
When working with Skyhigh Private Access , you can now analyze Time-Stamp information to identify network or application-related issues. Skyhigh Private Access now provides Transaction Time, Processing Time, Time to First Byte From Server, and Time to Last Byte From Server in the reporting which may track the duration of a task and identify any potential errors. For details, see Troubleshooting Connectivity Issues with Digital Experience Capabilities.
To access the time stamp information, go to Analytics > Web > Web Traffic and click on the request count.
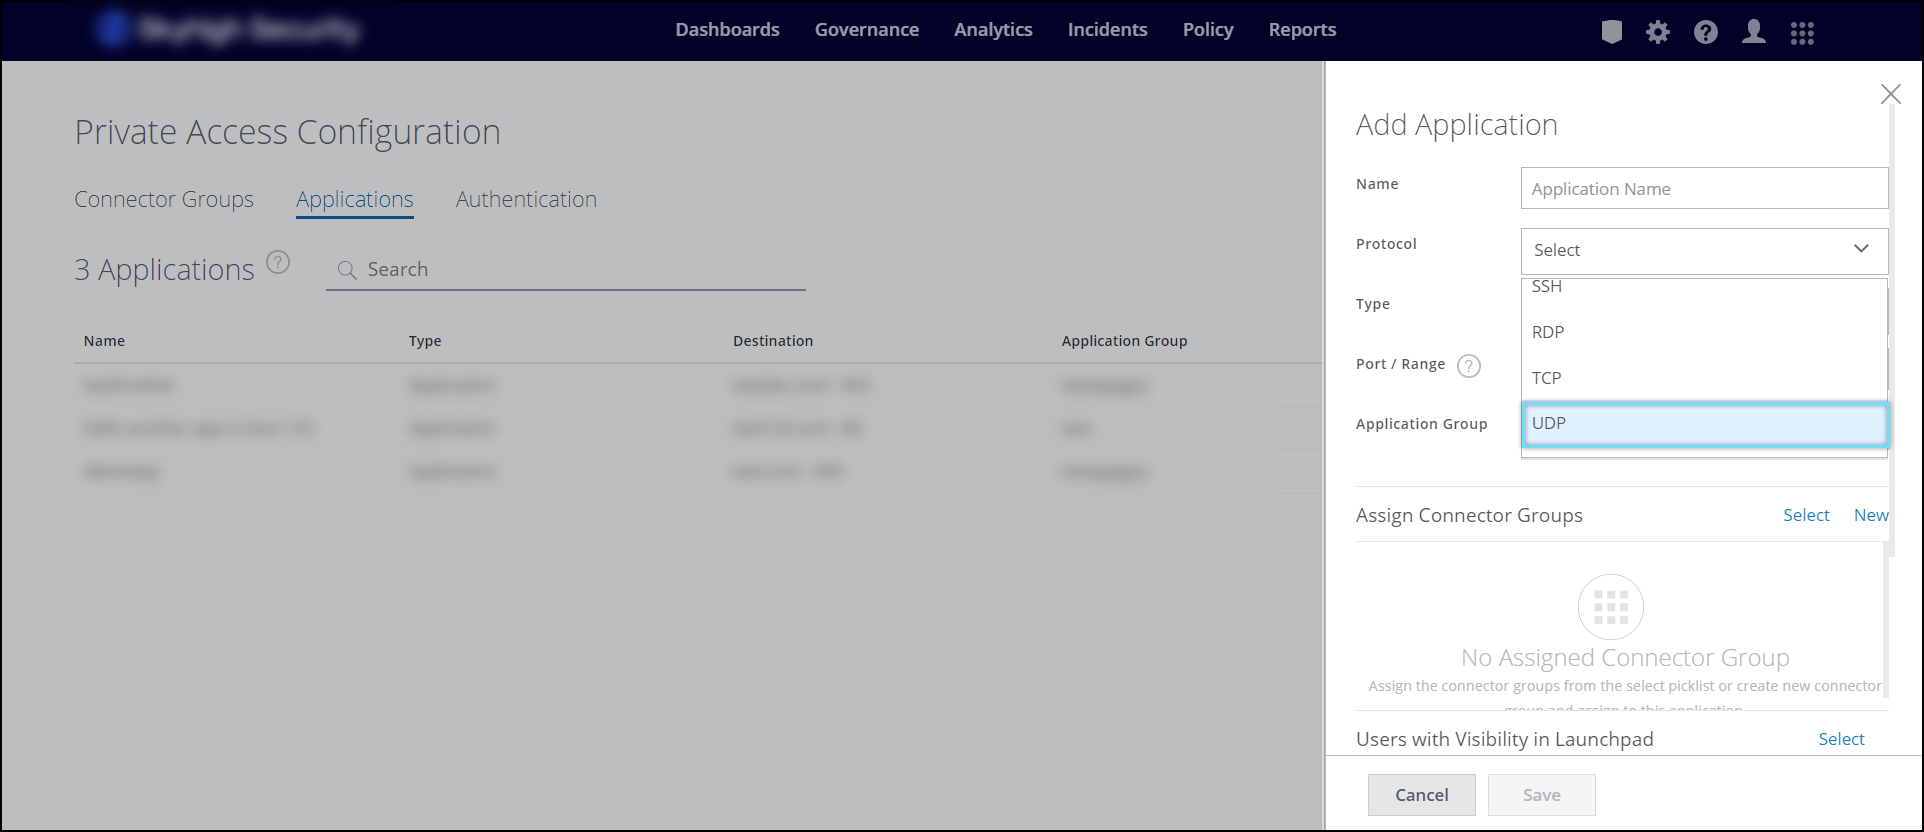
Support for UDP Protocol-based Private Applications
Private Access supports protocols such as HTTP, HTTPS, SSH, RDP, and Others (TCP) which is now extended to comprehensively support UDP traffic. For more details, see Add Applications.
Refer here for the client proxy version to be used.
_1.png?revision=1)
Skyhigh CASB
Scheduled Report Enhancements
On the Report Manager, the Scheduled Reports table is enhanced with additional fields to get deeper insights about a report. The Edit Report page is upgraded with a new Saved View menu to enrich the capability to edit the scheduled reports.
Availability of Additional Fields on the Scheduled Reports
- On the Scheduled Reports table (found under Reports > Report Manager > Scheduled Reports tab), the following fields are added to view the selected search filters and the status of the corresponding report:
- Active Filters. Displays the filters associated with the corresponding report.
- Status. Indicates the current status of a report generation process; whether the report is generated (Active) or stopped (Inactive).
- On the Actions, you can start and stop the report generation process:
- Activate. Generates the report.
- Deactivate. Stops generating the report.
For details, see Scheduled Reports.

Saved View on the Edit Report
The scheduled reports are now linked with the saved views to enhance the report editing efficiency. A new Saved View menu has been added to the Edit Report page (found under Reports > Report Manager > Scheduled Reports >Actions > Edit). Use the Saved View menu to select a desired saved view from the list and generate the scheduled report with the newly selected saved view. For details, see Edit a Report.
For example, if you have scheduled a report with the AI Service Usage saved view and edit the report by selecting the Allowed Cloud Storage CSPs saved view from the menu, the report will be generated with the Allowed Cloud Storage CSPs saved view.
NOTES:
- If you modify the filters or a saved view associated with the scheduled report and save it, the report will be generated with the updated changes.
- The Saved View menu lists the saved views corresponding to the type of the report. For example, If the report type is Services, the saved views related only to Services are listed.
- If you modify the information related to Saved Views or Recipients, the events will be recorded within the audit log (found under Settings > Audit Log).

Sanctioned SaaS Adoption Using Shadow IT Splash Banner
On the Services and Cloud Registry pages, the splash banner notifies security admins about the option to enable CASB Sanctioned SaaS API integration. By enabling the API integration, you can secure the usage of various cloud services within your organization. For details about the CASB Sanctioned SaaS API integration, see Manage Sanctioned Services via Skyhigh CASB.

Skyhigh CASB for Miro
Skyhigh CASB for Miro allows Security Operations Center (SOC) admins to monitor user activities across various resources such as boards, projects, organizations, sessions, and more in Miro. User activity monitoring facilitates debugging important events like editing the global security settings, inviting new users, editing/creating/deleting the boards, etc., and taking remediation action to mitigate the risk. For details, see About CASB Connect for Miro.

Skyhigh CNAPP
Deprecated Policy Templates for Google Kubernetes Engine (GKE)
The following GKE policy templates are deprecated in Skyhigh Security:
- GKE: Do not admit containers with allowPrivilegeEscalation in Pod Security Policies
- GKE: Do not generally permit containers with capabilities assigned beyond the default set in Pod Security Policies
- GKE: Do not admit containers with NET_RAW capabilities in Pod Security Policies
- GKE: Do not admit containers wishing to share the host IPC namespace in Pod Security Policies
- GKE: Do not admit containers wishing to share the host network namespace in Pod Security Policies
- GKE: Do not admit containers wishing to share the host process ID namespace in Pod Security Policies
- GKE: Do not generally permit containers to be run as the root user in Pod Security Policies
- GKE: Do not admit privileged containers in Pod Security Policies
For details, see Policy Templates for GKE.
Resolved and Known Issues
Click here to view Resolved and Known Issues
- For details, see Skyhigh Security Cloud Bug Fixes and Known Issues.