Deploy Skyhigh Client Using Trellix ePO
To deploy and manage the policies, you must configure Trellix ePO. We have both On-prem and Cloud ePO within ePO.
It is necessary to push Trellix Agent from ePO to the device while deploying Skyhigh Client (SC) using Trellix ePO. You need to install the Skyhigh Client software on the endpoint after pushing the Trellix Agent. Once the Skyhigh Client policy is configured, deploy the policy.
- ▼ Skyhigh Client Deployment using ePO Cloud
-
Deploy Trellix Agent
- In ePO, click on System Tree at the top of the page, and then click the New Systems button at the top of the System Tree.
- In the How to add systems section at the top, select the radio button labeled Create and download agent installation package.
- In the Agent version, for Windows, select the Windows radio button, and for Mac, select the Non-Windows radio button, and select the required Trellix Agent versions. Then, click OK in the bottom-right corner of the page.
- When ePO is done generating the package, click the Agent Package link to download the installation package, and then click Close.
- Copy the FramePkg.exe (for Windows) and agentPackages.zip (for macOS, it will have install.sh within the package) file to the endpoint you intend to manage, and then execute it.
- Go back to the ePO system tree, select the root of the tree (My Organization), and then select This Group and All Subgroups in the Preset drop-down. This will let you see all managed endpoints in the entire system tree. You should see the hostname of your endpoint in the list. If it does not appear, then wait for the agent to check in and refresh the page.
Deploy RTW Build to ePO Cloud
The current RTW build will be pushed from the Trellix to the ePO cloud.
- In ePO Cloud, go to the Menu > Software > Advanced Deployment.
- Click New Deployment at the top of the page.
- Name the deployment Deploy Skyhigh Client, and select the latest Skyhigh Client Version in the Package drop-down.
- Set the Action to Install.
- Select the systems for which the Skyhigh Client has to be deployed.
- Set the Start Time drop-down to Run Immediately.
- Click Save.
- To enforce the deployment, click System Tree at the top of the ePO interface, select your endpoint, and then click Wake Up Agents. This will cause ePO to attempt to connect to the Client. To follow the status of the wake-up call, go to Menu > Automation > Server Task Log.
If the task fails to complete successfully, then you can manually update with the following steps:- Open a command prompt on the Client machine.
- Change directory to C:\Program Files\SCP\Agent.
- Run the command cmdagent -s (for Windows) and /Library/McAfee/agent/bin/cmdagent -s (for MacOS). This should open the Skyhigh Agent Status Monitor window.
- Click the top four buttons to kick off an agent synchronization. (Collect and Send Props, Send Events, Check New Policies, and Enforce Policies)
- Once the task is completed, confirm on the endpoint by navigating to the Start menu and looking for a Skyhigh Client folder.
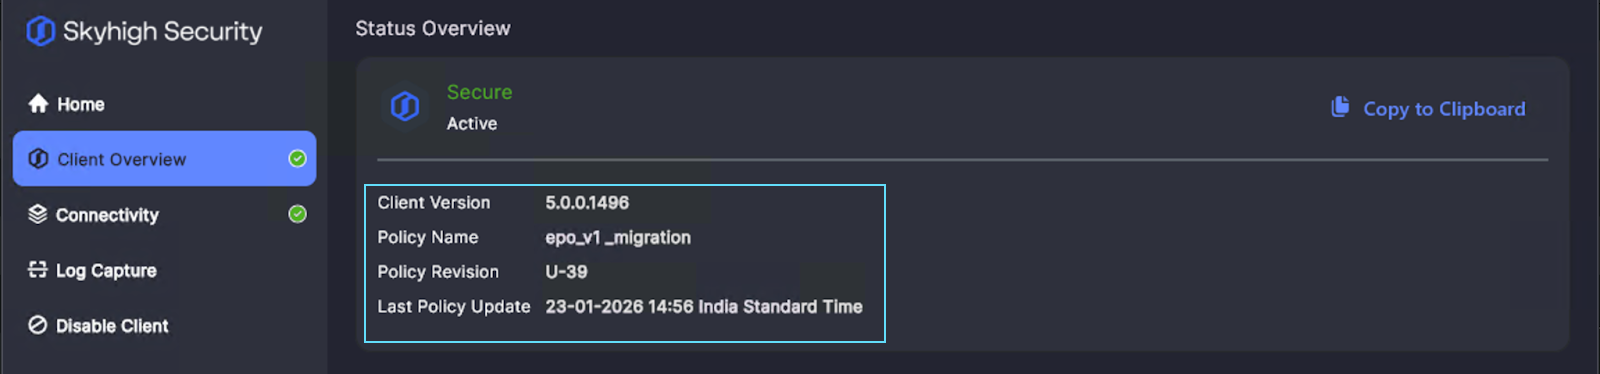
- In Windows, you will find Skyhigh Client. Open Skyhigh Client and check if you have a Policy Name and Policy Revision value. If these are blank, then repeat step 8(d) to do another agent communication to pull the policy.
- In macOS, click Skyhigh Client icon at the top right corner to find the details.
- Review Skyhigh Client to confirm that the policy has been updated. You should see the policy along with the Always Redirecting status, and you can see the Active Proxy field, which will show where proxy requests are being sent.
Configure Skyhigh Client Policy
- Log in to ePO Cloud. Click the menu on the top-left and go to Policy Catalog.
- In the Product drop-down, select Skyhigh Client Proxy.
- A default policy called Skyhigh Default is created by default. This is a read-only policy. Click New Policy to create a new Skyhigh Client policy.
- In the Policy Catalog, go to the respective policy, under Actions, click Edit.
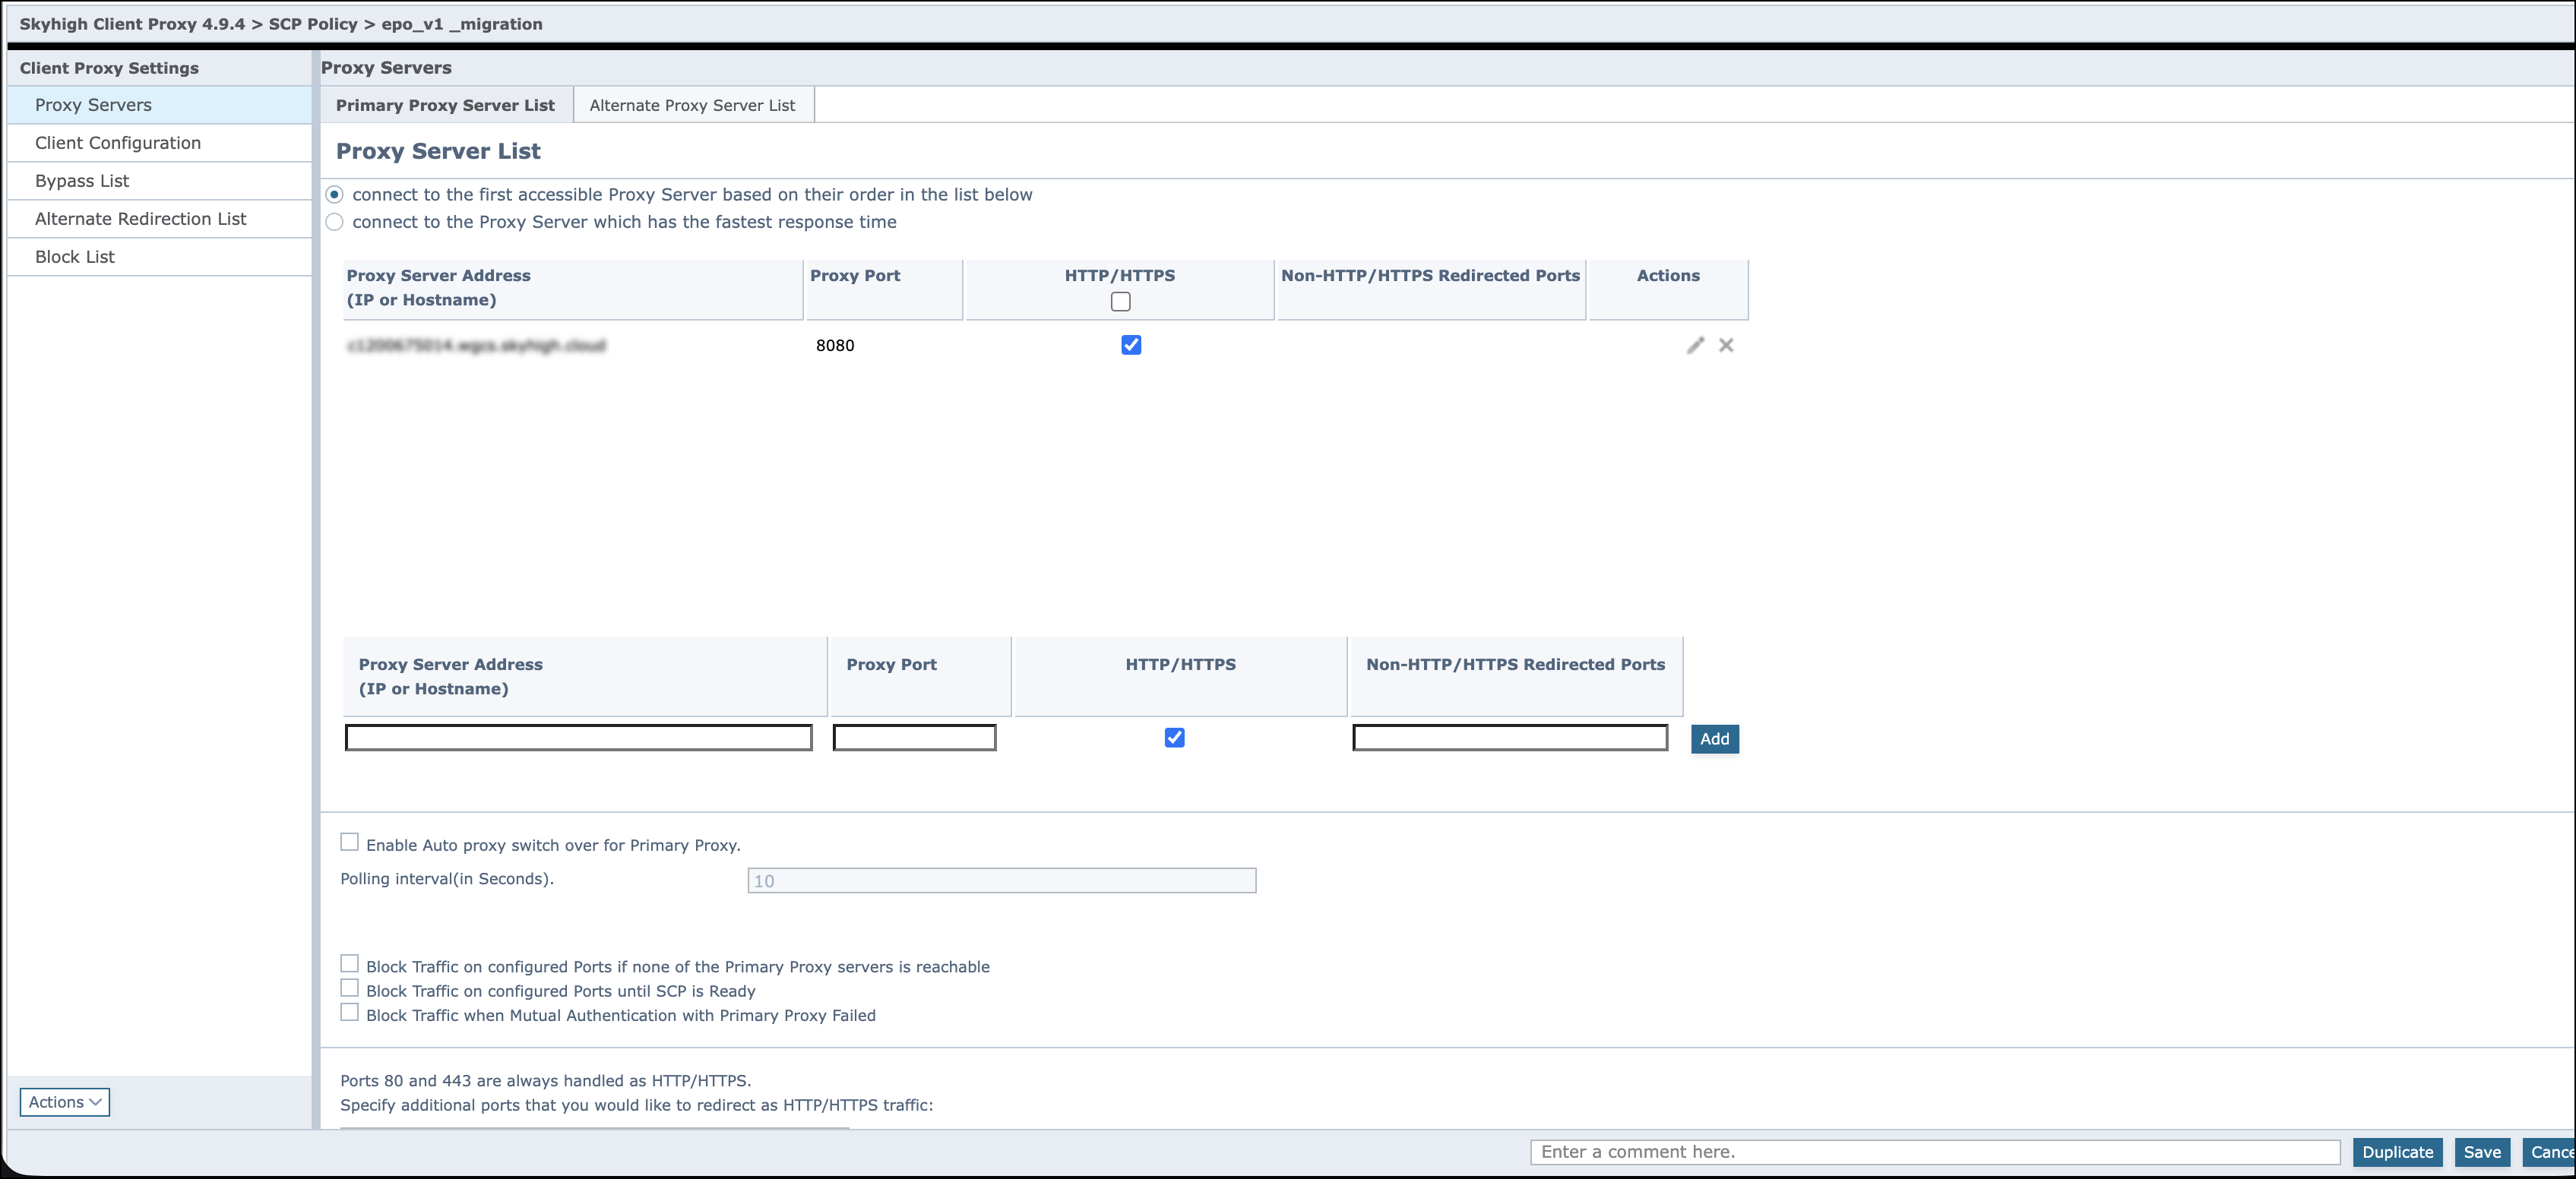
- Under Skyhigh Client Settings, in the Proxy Servers page, you can assign the Proxy Server by entering the IP or Hostname of the proxy and the Proxy Port. Click Add.
- Under Client Configuration, in Traffic Redirection Settings, enable the required options using the radio button.
- Go to System Tree, under System Name, select your system.
- Click the Policies tab. In Product, select Skyhigh Client.
- In Actions, select Edit the Assignment.
- In Inherit from, select Break inheritance and assign the policy and settings below.
- Select the created policy in Assigned Policy.
- Click Save.
Migrate Existing Policy From ePO to SSE
NOTE: V2 policy format can only be created in SSE UI. ePO can only be used to deploy the policy to the endpoint using the below steps.
To access SSE V1 and V2 Policy from the endpoints managed by ePO, the Client Proxy extension (4.9.x) must be installed on ePO and the Client Proxy package should be deployed to the endpoints.
Prerequisite
IMPORTANT: Skyhigh recommends using the same shared secret for SaaS ePO, SCP v1, and SCP v2.
Export the tenant credentials
Follow the below steps to export the tenant credentials from SSE to an .xml file:
- Go to Policy Catalog > Skyhigh Client Proxy > Configuration > Tenant Settings > Tenant Authentication
- From the Actions drop-down list, select Export Credentials. Download the tenant credentials to a .xml file.

Steps to Migrate Policy V1 from ePO to Skyhigh Client
NOTE: Skyhigh recommends using Skyhigh Default as the base policy when creating a new policy.
- Go to the Policy Catalog > Skyhigh Client proxy > New Policy
- Enter the policy name in the Create a new policy dialog box.
- Go to Client Configuration tab:
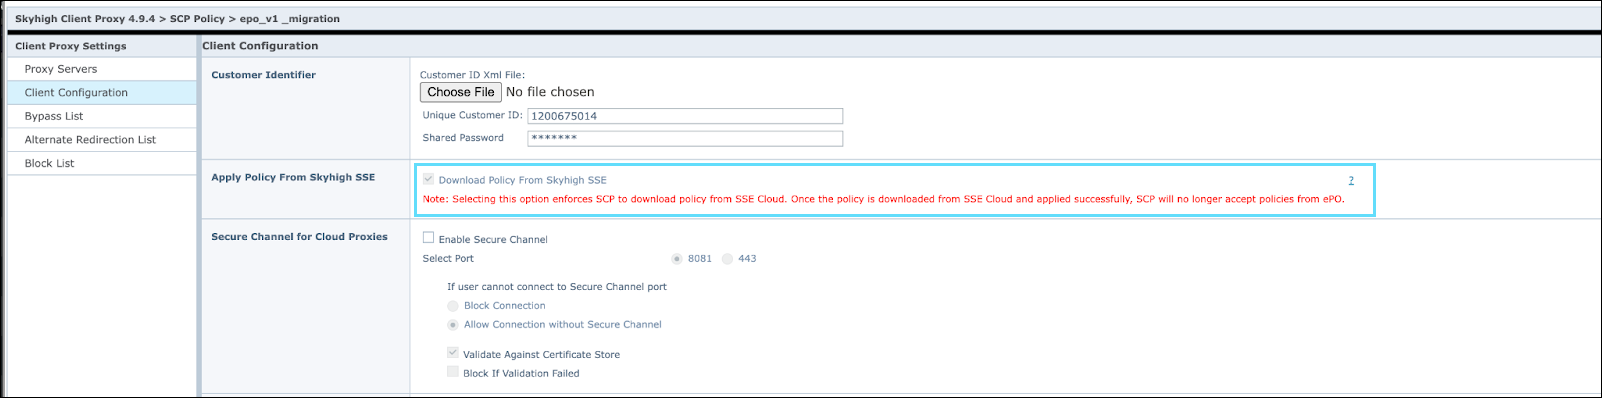
- Import the Customer ID XML File into customer Identifier.
- Select the Download Policy From Skyhigh SSE checkbox to migrate the ePO policy to SSE.
- Go to Systems > System Tree > My Organization
- Select the organizational level where you want to assign Client Proxy policy to all endpoints.
- Go to the Assigned Policies tab.
- Select Edit Assignment.

- From the Assigned policy drop-down, select the policy.
- The selected ePO policy appears on the Skyhigh Client.

- Create a policy on SSE with policy name similar to the existing ePO policy.

- After the sync between ePO and SSE, the SSE policy replaces the ePO policy on the Skyhigh Client. The endpoints then synchronize with the Skyhigh SSE SCP and ePO policies.
Steps to Migrate Policy V2 from ePO to Skyhigh Client
NOTE: Skyhigh recommends using Skyhigh Default as the base policy when creating a new policy.
- Go to the Policy Catalog > Skyhigh Client Proxy > New Policy.
- Enter the policy name in the Create a new policy dialog box.

- Go to Client Configuration tab:
- Import the Customer ID XML File into customer Identifier.
- Select the Download Policy From Skyhigh SSE checkbox to push the policy to all endpoints.

- Select Systems > System Tree > My Organization.
- Select the organizational level where you want to assign Client Proxy policy to all endpoints.
- Go to the Assigned Policies tab.
- Select Edit Assignment.

- From the Assigned policy drop-down, select the policy.
- The selected ePO policy appears on the Skyhigh Client.

- Create a policy on SSE with policy name similar to the existing ePO policy.

- After the sync between ePO and SSE, the SSE policy replaces the ePO policy on the Skyhigh Client. The endpoints then synchronize with the Skyhigh SSE SCP and ePO policies.

-
-
- ▼ Skyhigh Client Deployment using ePO On-Prem
-
Authenticate the Secure Web Gateway (On-Prem)
It is recommended to enable authentication for SCP in SWG (on-prem).
- Log in to SWG and click Policy at the top of the interface.
- In the policy pane on the left, click Add > Rule Set from Library.
- Go to Authentication > Authentication With Skyhigh Client Proxy.
- Click Auto-Solve Conflict. Click Solve by referring to existing objects. Click OK.
- Click on Show details and then click the Authenticate: Skyhigh Client link on that rule.
- Enter your customer ID number in the Customer ID field, and then click the Change... button to enter the shared passphrase.
- Click OK to save the settings object, and then Save Changes on the top-right.
Deploy Trellix Agent
- In ePO, click on System Tree at the top of the page, and then click the New Systems button at the top of the System Tree.
- In the How to add systems section at the top, select the radio button labeled Create and download agent installation package. Then, click OK in the bottom-right corner of the page.
- When ePO is done generating the package, click the Agent Package link to download the installation package, and then click Close.
- Copy the FramePkg.exe (for Windows) and agentPackages.zip (for MacOS, it will have install.sh within the package) file to the endpoint you intend to manage, and then execute it.
- Go back to the ePO system tree, select the root of the tree ("My Organization"), and then select This Group and All Subgroups in the Preset drop-down. This will let you see all managed endpoints in the entire system tree. You should see the hostname of your endpoint in the list. If it does not appear, then wait for the agent to check in and refresh the page.
Check In the SC Package into the ePO main repo
- You can install Skyhigh Client using the cloud security portal or through downloads or policy downloads.
- You can check the SC package into the ePO main repository in two ways:
1. Go to Main Menu (three lines) > Main Repository > Check In Package. In Check In Package, choose the required build in the File path. Click Ok, and then Next.
- Package Info: contains build details such as Name, Version, Minor Version, Type, and Language of the build you're checkin
- Choose the branch however you want to post it as Current, Previous, or an Evaluation branch
- Current: Current build is what we want to post to all the clients
- Previous: Earlier version of current build
- Evaluation: Any build that needed to be tested or the older version of build
- Options: Enable the Options to move the existing package to the Previous branch using
- You can follow these steps to check in the SC package:
- Navigate to Software > Catalog Utilities & Connectors > Packages.
- Select the required package in Actions > Check in at another branch to check in.
- Select the required client package branch.
- Click Check In.
Deploy Skyhigh Client
- In ePO on Prem, go to the Menu > Software > Product Deployment.
- Click New Deployment at the top of the page.
- Name the deployment Deploy SC, and select the latest SC Version (Skyhigh Client 5.0.0.x) in the Package drop-down.
- Set the Action to Install.
- Set the Start Time drop-down to Run Immediately.
- Click Save.
- Click System Tree at the top of the ePO interface, select your endpoint, and then click Wake Up Agents. This will cause ePO to attempt to connect to the client. To follow the status of the wake-up call, go to Menu > Automation > Server Task Log.
If the task fails to complete successfully, then you can manually update it with the following steps:- Open a command prompt on the client machine.
- Change directory to C:\Program Files\SCP\Agent.
- Run the command cmdagent /s. This should open the Skyhigh Agent Status Monitor window.
- Click the top four buttons to kick off an agent synchronization. (Collect and Send Props, Send Events, Check New Policies, and Enforce Policies).
- Once the task is completed, confirm on the endpoint by navigating to the Start menu and looking for a Skyhigh Client folder.
- In Windows, you will find Skyhigh Client. Open Skyhigh Client and check if you have a Policy Name and Policy Revision value. If these are blank, then repeat step 7(d) to do another agent communication to pull the policy.
- In macOS, click Skyhigh Client icon at the top right corner to find the details.
- Review Skyhigh Client to confirm that the policy has been updated. You should see the policy along with the Always Redirecting status, and you can see the Active Proxy field, which will show where proxy requests are being sent.
Configure Skyhigh Client Policy
- Log in to ePO Cloud. Click the menu on the top-left and go to Policy Catalog.
- In the Product drop-down, select Skyhigh Client Proxy.
- A default policy called Skyhigh Default is created by default. This is a read-only policy. Click New Policy to create a new Skyhigh Client policy.
- In the Policy Catalog, go to the respective policy, under Actions, click Edit.
- Under Skyhigh Client Settings, in the Proxy Servers page, you can assign the Proxy Server by entering the IP or Hostname of the proxy and the Proxy Port. Click Add.
- Under Client Configuration, Import Customer ID Xml under Customer Identifer section and in Traffic Redirection Settings, enable the required options using the radio button.
- Go to System Tree, under System Name, select your system.
- Click the Policies tab. In Product, select Skyhigh Client.
- In Actions, select Edit the Assignment.
- In Inherit from, select Break inheritance and assign the policy and settings below.
- Select the created policy in Assigned Policy.
- Click Save.
NOTE: To migrate policy V1 and V2 from ePO on-prem to Skyhigh Client, see Migrate Existing Policy From ePO to SSE, under Skyhigh Client Deployment using ePO Cloud section.