Enable Clientless Access for Private Applications
Enable the Clientless Access option to allow end users to access private web applications without installing the Client Proxy software on their devices. The end user device uses a web browser to authenticate and establish a secure connection. Make sure to enable SAML authentication before configuring the Clientless Access option. You cannot enable Clientless Access without enabling SAML authentication. Furthermore, once Clientless Access is enabled, you cannot disable the SAML authentication at a later time.
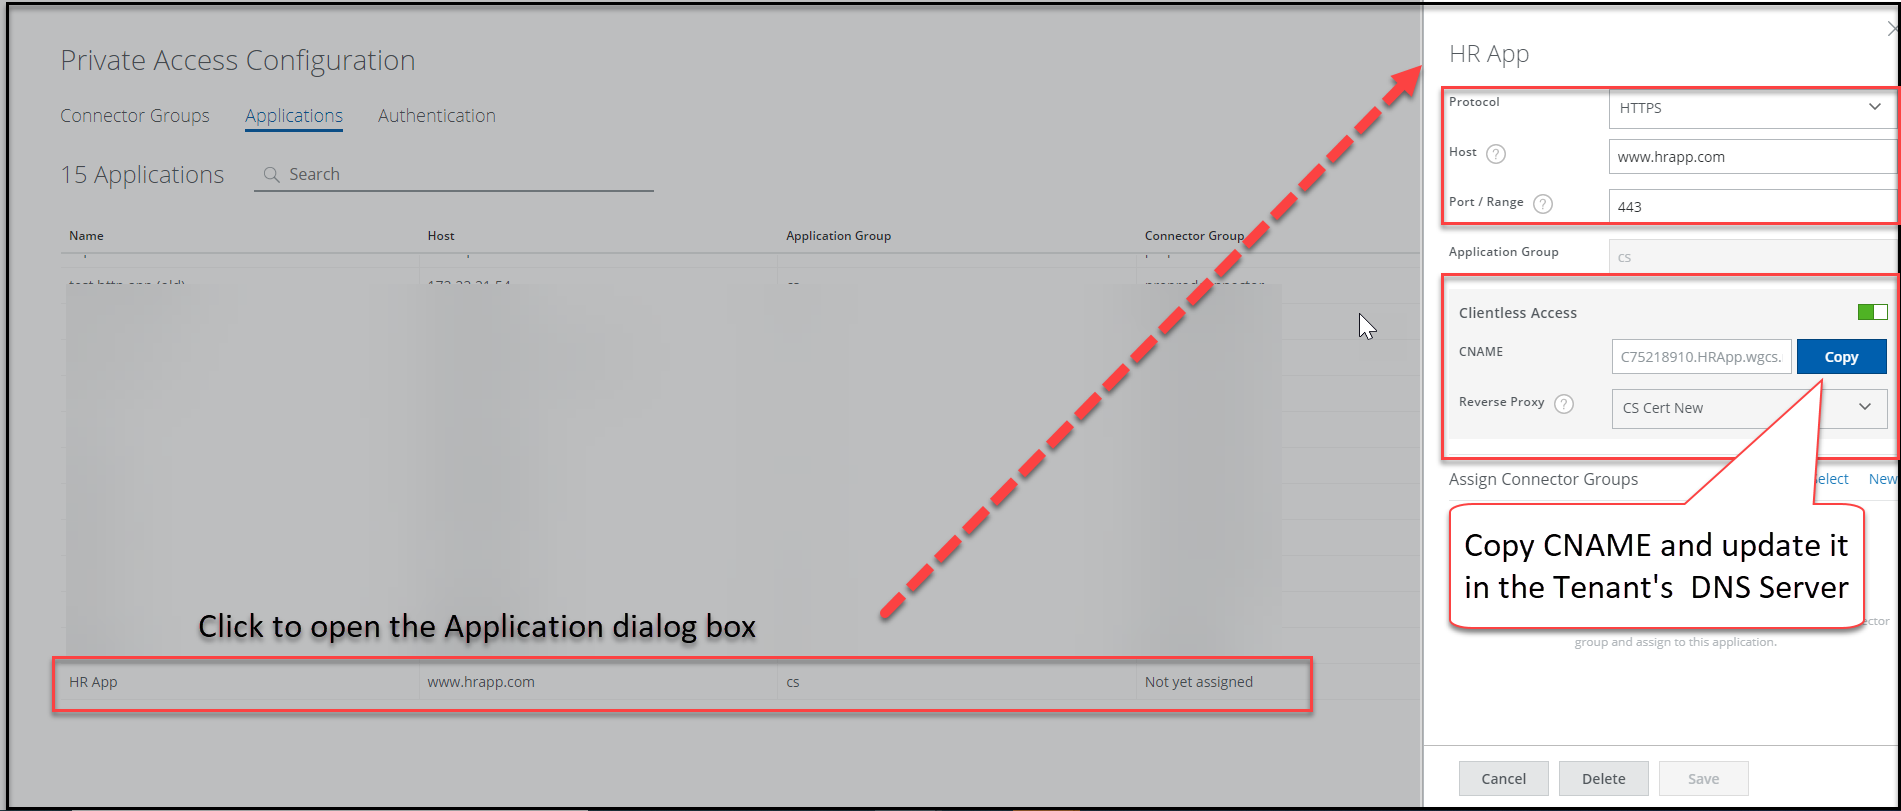
Generates the canonical name (CNAME) for the applications that were specifically configured for Clientless Access. Copy this CNAME record information and update it on the Tenant's public DNS server. When the user tries to access this application in a web browser, Skyhigh Private Access resolves the URL of the private application through this CNAME information. Upon successful authentication, the end users can access the Clientless Access enabled application.
Note: Supports Clientless Access only for the HTTPS protocol on port 443.
You can enforce RBI policy on the applications configured for clientless access. This allows users to securely navigate to potential high risk or sensitive websites in a remote browser. For information about configuring private access rules, see Configure Private Access Policy Rules.
Complete the following to enable clientless access:
- Go to Settings > Infrastructure > Private Access Configuration.
- Click the Applications.
- Click Add Application and complete the following fields:
- Name — Enter the name of the application. The application name should be unique across all tenants when you enable the Clientless Access option.
- Protocol — Select HTTPS from the drop-down list box. Supports only HTTPS protocol.
Note: The Port field automatically populates 443, the default port used by the HTTPS protocol. Only port 443 is supported.
- Host — Enter the FQDN of the application. Do not use smart match or IP address for the hostname.
- Port — Displays the port 443 port used for the HTTPS protocol. Other ports are not supported.
- Application Group — Select an application group from the drop-down list or enter an application group name to create a new application group.
- Clientless Access — Click to enable Clientless Access for the configured web application.
- HTTPS Connection - Reverse Proxy — Select the reverse proxy from the drop-down list. The list is available only if you have configured it in the Feature Configuration tab. For information, see HTTPS Connection - Reverse Proxy.
The reverse proxy inspects the encrypted traffic and ensures authorized access based on the defined policies. The default Skyhigh certificate encrypts the inspected https traffic when you have deployed only Skyhigh Private Access. - Assign Connector Groups — Assign an existing connector group or create a connector group and assign it to an application. Click Select to assign an existing application or select New to add a connector group.
- Click Save.
Generates CNAME for the added application. - Click the recently added application to open the <Application Name> dialog box.
- Click Copy to copy the canonical name (CNAME).
Make sure to update the copied CNAME information in the Tenant's public DNS server. The CNAME record configured in the bind DNS server zone file would look likeC75218910.hrapp.wgcs.skyhigh.cloud CNAME www.hrapp.com.

