Device Posture Configuration
Overview
The security posture of all connected devices is evaluated continuously, including enterprise-owned, personal, mobile, and BYOD devices. You can specify the device's attributes such as operating system, operating system version, firewall policy, antivirus software status, file path, and registry information (Windows devices). The device must meet the specified criteria to consider it to be compliant in order to establish trust and gain access to the requested private application.
Configure Device Posture Natively
Before you begin
Install Client Proxy for macOS and Windows systems and Skyhigh Client app for Andriod and iOS. For information, see Install Skyhigh Client Proxy
NOTES:
- Configuration of Device Posture Natively is same for both Private Access and Cloud Firewall.
- Antivirus and firewall checks are currently not supported on Windows Server due to limitations in the Windows Security API.
- Go to Settings > Infrastructure > Web Gateway Setup.
- In the Configure Device Profile section, click New Device Profile.
- In the Name box, enter the name of the device profile.
- Complete the following fields:
- OS name — Select the operating system (Windows or macOS) of the device. Make sure to specify registry information when you select Windows OS.
- OS version — Select an operator and specify the operating system version. The possible operators are == (equals), >= (greater than or equal to), > (greater than), <= (less than or equal to), < (less than), and Range. In the Value field, specify the OS version number.
For example, if you set the operator to ==, the devices with operating system version matching the specified version succeeds the posture check. If you set the operator to >=, then the devices with versions equal to or higher than the specified version succeed the posture check. If you set the operator to Range, then specify the OS version 7.0.1 - 7.1.0 range. All devices with versions from 7.0.1 to 7.1.0 succeeds the posture check.
Note: For macOS, you can specify only major and minor version numbers. For example 10.14 - Antivirus — Specify whether the antivirus software is enabled or disabled on the device. Will not check for the status of the antivirus software when you select Ignore.
- Firewall — Specify whether the firewall is enabled or disabled on the device. Will not check for the firewall status when you select Ignore.

- Encrypted Fixed Disk — Specify if there is any encrypted fixed disk on the device. Will not check for encryption status of the fixed disk when you select Ignore.
- File Path — Specify the file path found on the users' device. This field is applicable for both Windows and macOS. Checks for the presence of a specific file in the specified path. The device must have this file in the specified path to pass the validation.
For example, you can specifyC:\Program Files\Windows Defender Advanced Threat Protection\MsSense.exe - Active Directory domain name — Specify the Active Directory (AD) domain associated with the device. This field is applicable for both Windows and macOS. The device must be part of the matching AD domain to pass the validation.
- Process Validation
- Application Path — Specify the process that runs on the device. You can enter the process name and absolute path of the process.
For example,C:\Program Files (x86)\Microsoft\Edge\Application\msedge.exeor entermsedge.exe - Additional checks — You can provide additional information such as certificate Distinguished name (DN) or signer Thumbprint, or SHA256 checksum values.
- Application Path — Specify the process that runs on the device. You can enter the process name and absolute path of the process.
NOTE: Process Validation checks are not supported and cannot be applied to system processes running with elevated permissions.
- Presence of Registry Key — Applies only to Windows devices. You can specify the presence of the registry key, registry value name, and registry value data.
For example, you can specifyComputer\HKEY_LOCAL_MACHINE\SOFTWARE\Microsoft\Windows Defender
NOTE: The HKEY_CURRENT_USER registry hive is currently not supported.

- Registry Value Name — Specify the registry key value. Valid values include positive integers representing Windows Registry keys.
For example,RemediationExe - Registry Value Data — Specify the registry data. This field supports data types like REZ_SZ (ASCII characters), REG_DWORD, REG_QWORD.
For REG_DWORD type, enter the value that is displayed within the brackets and not the entire hexadecimal value. Example, cFormatTags is 2

- Enable Company CA certificate present in the Trust Store section to add the company CA certificate information.
- Certificate Location — Enter the location (path) of the company CA certificate stored in the Trust store. For example, the certificate can be under the
\LocalMachine\<Path of the certificate>or\CurrentUser\<Path of the certificate>folder for Windows devices. You can run this command in PowerShell "Get-ChildItem -Path Cert:\LocalMachine\Root\" to verify if the certificate is available. For macOS devices the location is/Library/Keychains/System.keychainfolder. - Certificate Thumbprint — Enter the thumbprint of the CA certificate. The thumbprint of a certificate is not case sensitive, and you can enter without separators. For example, you can enter 261022C297D4BDAD02E6261E2A85480BF0449582.
- Certificate — Select Valid if the device has a valid certificate, select Invalid if the device has an invalid or expired certificate, and select Ignore to ignore the validation of the device certificate. When you select Valid, the Skyhigh Client Proxy software checks if the CA certificate is available in the specified location, certificate thumbprint, valid signature, its expiration date and status. When you select Invalid, the device posture validation passes for the invalid inputs.
- Certificate Location — Enter the location (path) of the company CA certificate stored in the Trust store. For example, the certificate can be under the
- Click to enable Client certificate signed by company's CA section to add the client certificate information.
- Certificate Location — Enter the location (path) of the client certificate signed by a Certificate Authority. For example, the certificate can be under the
\LocalMachine\<Path of the certificate>or\CurrentUser\<Path of the certificate>folder for Windows devices and the/Library/ Keychains/System.keychainfolder for macOS devices. - Certificate Thumbprint — Enter the thumbprint of the CA certificate used to sign the client certificate. The thumbprint of a certificate is not case sensitive, and you can enter without separators. For example, 261022C297D4BDAD02E6261E2A85480BF0449582.
- Certificate — Select Valid if the device has a valid certificate, select Invalid if the device has an invalid or expired certificate, and select Ignore to ignore the validation of the device certificate.
- Certificate Location — Enter the location (path) of the client certificate signed by a Certificate Authority. For example, the certificate can be under the
- Click Save.

Device Posture via Crowdstrike Integration
For Private Access
Skyhigh SSE platform enables customers to create Zero trust device policies using a combination of native Zero Trust Assessments capabilities such as OS version, presence of registry key, Antivirus(On/Off) and more to assess device posture. CrowdStrike performs zero trust assessment and provides various scores like OS score, sensor score, and overall score of the client. By using a combination of these scores, we can enforce powerful Zero Trust Assessment of devices before allowing access to private applications via Skyhigh Private Access.
Before you Begin
- Download the latest SCP build.
Note: The CrowdStrike Integration reads Zero Trust Assessment scores pushed locally to each endpoint by CrowdStrike.CrowdStrike Falcon requires a Feature Flag to be enabled for a Customer ID (CID) to allow ZTA data files to be pushed to endpoints. The Feature Flag to distribute ZTA files to endpoints – zta_distribute_payload – can only be enabled by opening a case with CrowdStrike Support with the request for the Feature Flag zta_distribute_payload be enabled.
-
Ensure that you have installed CrowdStrike on your system before using it as integration option.
-
Go to Setting > Infrastructure > Web Gateway Setup > Configure SCP > Manage SCP > Global Configuration to enable CrowdStrike in Device Risk Assessment settings to use the CrowdStrike integration option.

Configure CrowdStrike Integration
- Go to Settings > Infrastructure > Web Gateway Setup.
- In the Configure Device Profile section, click New Device Profile.
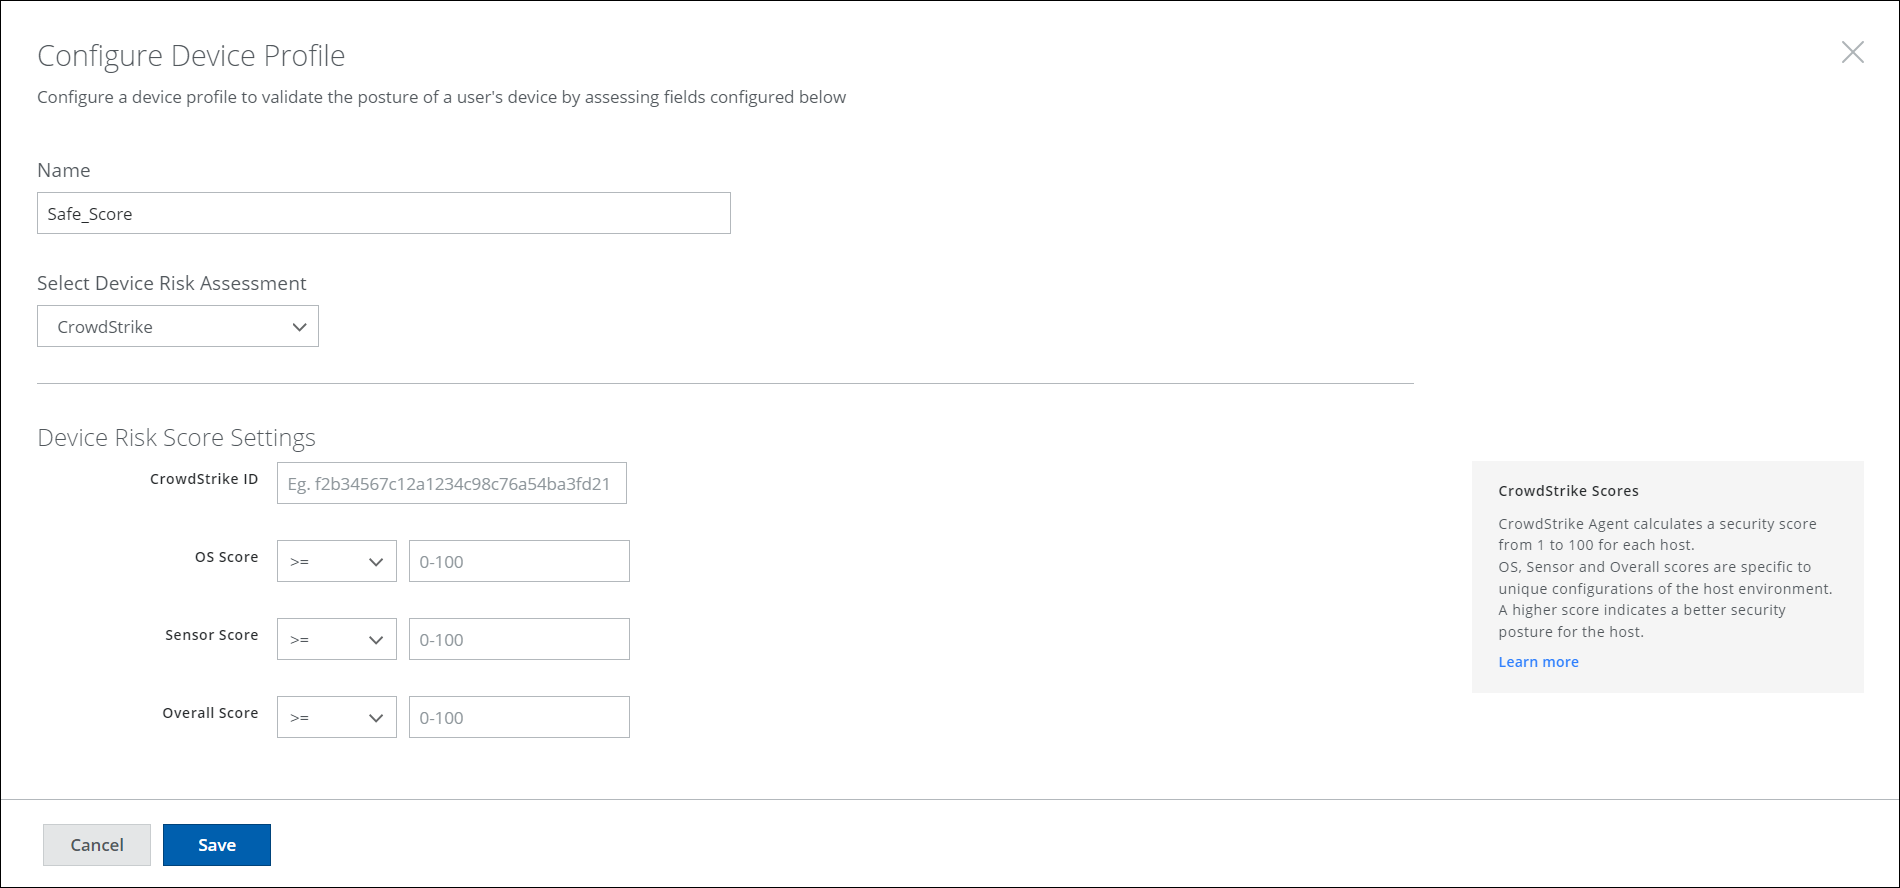
- In the Name box, enter the name of the device profile.
- In the Select Device Risk Assessment section, select CrowdStrike from the dropdown option.
- Complete the following fields:
- CrowdStrike ID — Enter the valid CrowdStrike customer ID.
- OS Score — The possible operators are == (equals), >= (greater than or equal to), > (greater than), <= (less than or equal to), < (less than). In the Value field, specify the OS score between 0 to 100.
- Sensor Score — The possible operators are == (equals), >= (greater than or equal to), > (greater than), <= (less than or equal to), < (less than). In the Value field, specify the Sensor score between 0 to 100.
- Overall Score — The possible operators are == (equals), >= (greater than or equal to), > (greater than), <= (less than or equal to), < (less than). In the Value field, specify the Overall score between 0 to 100.

- Click Save and Publish the changes.
CrowdStrike ZTA score is not stored in a JWT on the local machine by default. Contact Crowdstrike support to enable the zta_distribute_payload setting.
Match CrowdStrike Profile with PA Policy
- Go to Settings > Access Control > Private Access Policy.
- In the Private Access Policy page, select the Device Profile as the Criteria.
- In the Value option, select CrowdStrike to view all the configured CrowdStrike profiles.
- Click Done.

- Choose the required Action from Select Action and enable the rule.
- Publish the changes.

For Cloud Firewall
Skyhigh SSE platform enables customers to create Zero trust device policies using a combination of native Zero Trust Assessments capabilities such as OS version, presence of registry key, Antivirus(On/Off) and more to assess device posture. CrowdStrike performs a zero trust assessment and provides various scores, like OS score, sensor score, and overall score of the client. By using a combination of these scores, we can enforce a powerful Zero Trust Assessment of devices before allowing/dropping traffic from compliant/non-compliant devices via Skyhigh Cloud Firewall.
Before you Begin
- Download the latest SCP build.
Note: Skyhigh Client Proxy 4.7.0 is the minimum supported version required to integrate the CrowdStrike feature.
-
Ensure that you have installed CrowdStrike on your system before using it as integration option.
-
Go to Setting > Infrastructure > Web Gateway Setup > Configure SCP > Manage SCP > Global Configuration > Device Risk Assessment settings to enable CrowdStrike.

Configure CrowdStrike Integration
- Go to Settings > Infrastructure > Web Gateway Setup.
- In the Configure Device Profile section, click New Device Profile.
- In the Name box, enter the name of the device profile.
- In the Select Device Risk Assessment section, select CrowdStrike from the dropdown option.
- Complete the following fields:
- CrowdStrike ID — Enter the valid CrowdStrike customer ID.
- OS Score — The possible operators are == (equals), >= (greater than or equal to), > (greater than), <= (less than or equal to), < (less than). In the Value field, specify the OS score between 0 to 100.
- Sensor Score — The possible operators are == (equals), >= (greater than or equal to), > (greater than), <= (less than or equal to), < (less than). In the Value field, specify the Sensor score between 0 to 100.
- Overall Score — The possible operators are == (equals), >= (greater than or equal to), > (greater than), <= (less than or equal to), < (less than). In the Value field, specify the Overall score between 0 to 100.
- Click Save and Publish the changes.
CrowdStrike ZTA score is not stored in a JWT on the local machine by default. Contact Crowdstrike support to enable the zta_distribute_payloadsetting.
Match CrowdStrike Profile with Cloud Firewall Policy
- Go to Settings > Policy > Cloud Firewall Policy.
- In the Cloud Firewall Policy page, select the Device Profile as the Criteria.
- In the Value option, select CrowdStrike to view all the configured CrowdStrike profiles.
- Click Done.

- Choose the required Action from Select Action and enable the rule.
- Publish the changes.
